The Gilded Forest Placemats: A Free Crochet Pattern for Textured, Leaf-Stitch Christmas Table Decor
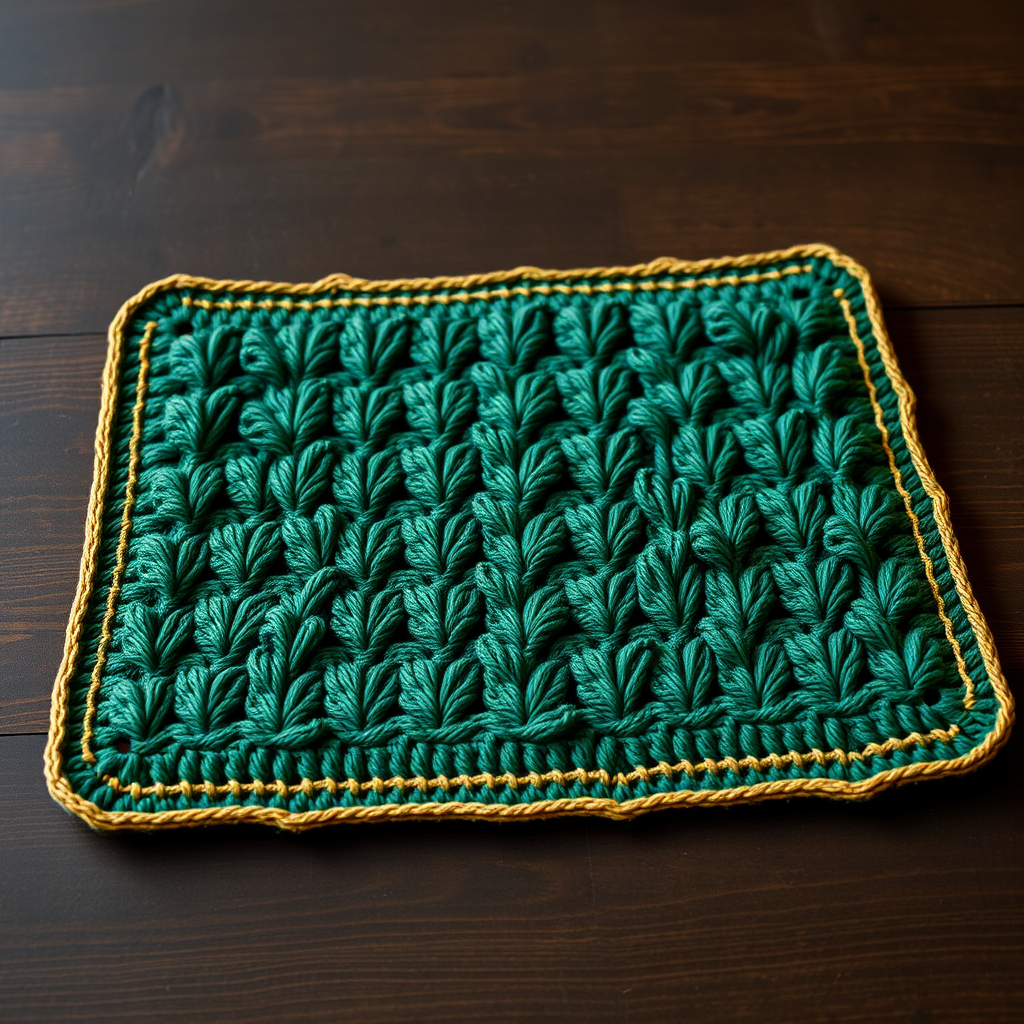
Bring the Enchanted Forest to Your Holiday Table
This holiday season, elevate your dining experience with a touch of handmade luxury. The Gilded Forest Placemat is more than just a table accessory; it's a cozy, textured statement piece that brings the warmth and beauty of a winter forest to your home. Featuring a cascading leaf stitch and a subtle, gilded edge, this free crochet pattern is designed to be both stunning and achievable for confident beginners. Each placemat is a rich, forest green canvas adorned with raised leaf clusters, finished with a delicate gold border that catches the candlelight. Let's get started on creating your own set of these enchanting placemats.
Materials Needed
Before you begin, gather the following supplies. Using the exact materials will ensure your placemat matches the intended gauge and look.
- Yarn: Worsted weight (Category 4) cotton or cotton-blend yarn in two colors:
- Main Color (MC): Forest Green (approx. 200 yds per mat)
- Contrast Color (CC): Gold or Champagne (approx. 50 yds per mat)
- Hook: Size H/8 (5.0 mm) crochet hook
- Other: Yarn needle for weaving in ends, scissors, blocking pins (optional, for finishing)
Gauge & Finished Size
- Gauge: 14 sc x 16 rows = 4 inches (10 cm) in single crochet. Always check your gauge to ensure the correct size.
- Finished Size: Approximately 12 inches wide x 18 inches long. This is easily adjustable by adding or removing foundation chains in multiples of 6+2.
Abbreviations (US Terms)
- ch: chain
- sc: single crochet
- dc: double crochet
- tr: treble crochet
- sk: skip
- st(s): stitch(es)
- sl st: slip stitch
- MC: Main Color (Forest Green)
- CC: Contrast Color (Gold)
Special Stitch: Leaf Cluster (worked over 3 stitches)
This stitch creates the beautiful, raised leaf texture. Practice it a few times on a swatch before starting your placemat.
- Yarn over, insert hook into next st, yarn over, pull up a loop (3 loops on hook).
- Yarn over, pull through 2 loops (2 loops on hook).
- Yarn over, insert hook into same st, yarn over, pull up a loop (4 loops on hook).
- Yarn over, pull through 2 loops (3 loops on hook).
- Yarn over, insert hook into same st, yarn over, pull up a loop (5 loops on hook).
- Yarn over, pull through 2 loops (4 loops on hook).
- Yarn over, pull through all 4 loops on hook. (One Leaf Cluster made)
Step-by-Step Instructions
Foundation & First Rows (with MC)
Foundation Row: With MC, ch 44 (or any multiple of 6 + 2 for desired width).
Row 1: Sc in 2nd ch from hook and in each ch across. Turn. (43 sc)
Row 2 (Right Side): Ch 1, sc in first st, *ch 3, sk next 2 sts, Leaf Cluster in next st, ch 3, sk next 2 sts, sc in next st; repeat from * across. Turn. (7 Leaf Clusters, 8 sc)
Building the Leaf Pattern (Rows 3-6)
These four rows form the repeating pattern that creates the cascading leaf effect.
Row 3: Ch 1, sc in first st, *ch 2, sk next ch-3 space, dc in top of next Leaf Cluster, ch 2, sk next ch-3 space, sc in next sc; repeat from * across. Turn.
Row 4: Ch 1, sc in first st, *ch 3, sk next ch-2 space, tr in next dc, ch 3, sk next ch-2 space, sc in next sc; repeat from * across. Turn.
Row 5: Ch 1, sc in first st, *ch 2, sk next ch-3 space, dc in next tr, ch 2, sk next ch-3 space, sc in next sc; repeat from * across. Turn.
Row 6: Ch 1, sc in first st, *ch 3, sk next ch-2 space, Leaf Cluster in next dc, ch 3, sk next ch-2 space, sc in next sc; repeat from * across. Turn.
Repeating the Pattern
Rows 7-36: Repeat Rows 3-6 seven more times (or until desired length, ending with a Row 6 repeat). This will give you a total of 8 full pattern repeats.
Final Row & Edging
Final Row (with MC): Ch 1, sc in first st, *sc in next ch-3 space, sc in top of next Leaf Cluster, sc in next ch-3 space, sc in next sc; repeat from * across. Fasten off MC. (43 sc)
Edging (with CC): Join CC with a sl st in any corner. Ch 1, sc evenly around the entire placemat, working 3 sc in each corner. Join with sl st to first sc. Fasten off. Weave in all ends.
Finishing Touches
Blocking: Lightly steam block or wet block to open up the leaf stitches and even out the edges. Lay flat to dry. This step is crucial for achieving the professional, polished look of the gilded edge and the defined leaf texture.
Your Gilded Forest Placemat is now complete! Repeat the pattern to create a full set for your holiday table. The rich texture and subtle gold trim will make every meal feel like a special occasion.


