Free Pattern: Paprika Pillow Ring Wreath – Beginner Waffle Stitch Crochet
Introduction
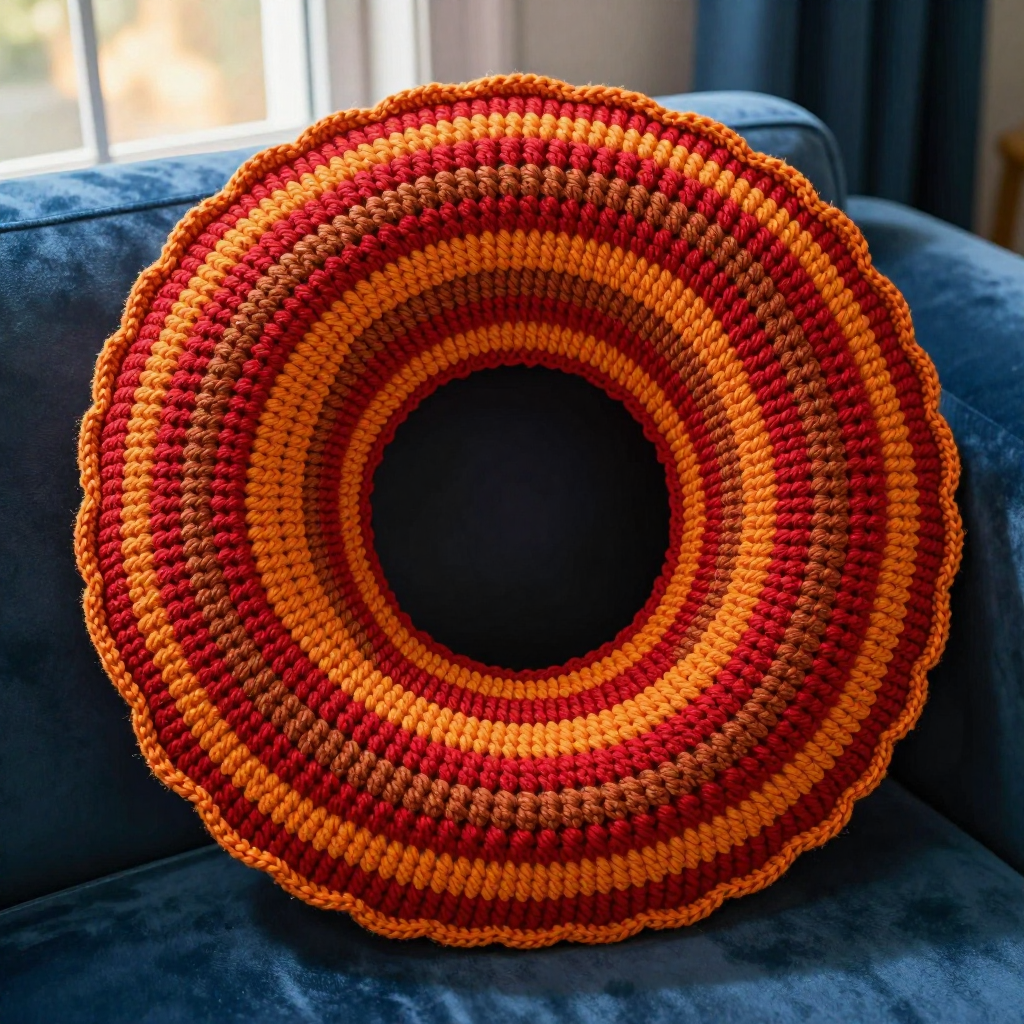
Welcome to the Paprika Pillow Ring Wreath — a bold, vintage-inspired crochet wreath that looks like it wandered straight out of a 1970s spice market. If you have never picked up a crochet hook before, this is the perfect first "big" project: it is worked in super bulky yarn, so it grows fast, the stitches are easy to see, and you only need to learn four simple stitches. The finished piece is a plump 14-inch padded ring with a raised waffle-stitch grid on the front, warm paprika-red and burnt-orange stripes, and a neat single-crochet border around the edge. It feels thick, squishy, and handmade in the best way, and it looks gorgeous hanging on a door, propped on a shelf, or sitting on a table as a centerpiece.
Materials Needed
- Yarn: Super bulky / jumbo weight yarn (approx. 6–7 wraps per inch), about 220 yards total: 130 yards paprika red and 90 yards burnt orange.
- Hook: 10 mm (US size N/P) crochet hook.
- Stitch markers: at least 4 (or use scrap yarn loops).
- Tapestry needle: a large-eye blunt needle that fits super bulky yarn, for weaving in ends.
- Scissors.
- Stuffing: polyester fiberfill (a small handful — about a fist-sized amount, lightly packed).
- Finished size: 14 in / 35.5 cm diameter ring, approximately 3 in / 7.5 cm thick.
Abbreviations and Beginner Glossary
Every pattern is written in shorthand. Here is every abbreviation used in this pattern, explained as if you have never crocheted before. All terms are US crochet terms.
- ch – chain: yarn over the hook, pull the loop through the loop on your hook. This makes a small link in a chain.
- sl st – slip stitch: insert hook into the stitch, yarn over, and pull the loop straight through both the stitch and the loop on your hook. It joins without adding height.
- sc – single crochet: insert hook into stitch, yarn over, pull up a loop (2 loops on hook), yarn over, pull through both loops. One short, firm stitch.
- dc – double crochet: yarn over, insert hook into stitch, yarn over, pull up a loop (3 loops on hook), yarn over, pull through 2 loops, yarn over, pull through remaining 2 loops. A taller stitch.
- fpdc – front post double crochet: work a double crochet, but instead of going into the top of the stitch below, insert your hook around the vertical post of the stitch below, from front to back and out the front again. This pushes that post forward and creates the raised "waffle" ridge.
- st / sts – stitch / stitches.
- rnd – round: one complete circle of stitches worked in the round.
- magic ring – an adjustable loop of yarn you crochet into, then pull tight to close the center hole. (If you prefer, chain 4 and join with a sl st to make a ring instead.)
- join – work a slip stitch into the first stitch of the round to close the circle.
- fasten off – cut the yarn leaving a tail, then pull the tail through the last loop to lock it.
- weave in ends – thread a yarn tail onto a tapestry needle and sew it back and forth through the fabric so it disappears.
Gauge
Gauge: 6 stitches x 5 rounds = 4 inches / 10 cm in waffle stitch (dc/fpdc pattern), measured flat before joining.
Why gauge matters: gauge is how big your stitches turn out. If your stitches are bigger than the pattern's, your wreath will be too large and you may run out of yarn; if smaller, it will be too small. Because this pattern is worked in the round, matching the round count is what keeps the circle flat.
How to make a gauge swatch: With your 10 mm hook and paprika red, make a magic ring and work Rnds 1–3 of the Front Circle (36 sts). Lay it flat and measure across the middle. Your circle should measure about 6 inches across at that point. If it is much bigger, try a smaller hook; if much smaller, try a larger hook. It is fine to simply begin the real project and check after Rnd 3 — if the circle is cupping upward, your stitches are too tight; if it is ruffling, they are too loose.
Beginner Tips Before You Start
- Count every round. Super bulky yarn hides mistakes, so count your stitches at the end of each round before joining. Each round's count is written in parentheses.
- Use stitch markers. Place a marker in the first stitch of each round so you always know where to join. This is the number-one beginner lifesaver.
- Do not pull the yarn too tight. Keep your loops relaxed and even. Tight tension makes the circle cup into a bowl and makes fpdc stitches hard to insert.
- Work the fpdc loosely. When you go around the post of the stitch below, keep the hook relaxed so the raised ridge sits on top of the fabric, not squashed into it.
- Keep the front and back circles the same size. Lay them on top of each other before joining — they should match edge to edge.
- Stuff lightly. Overstuffing stretches the border and flattens the waffle texture. A light, even fill is all you need.
Step-by-Step Instructions
Front Circle (make 1)
With paprika red, make a magic ring.
Rnd 1: Ch 2 (this does not count as a stitch), work 12 dc into the ring, join with sl st to the first dc. (12 dc)
Rnd 2: Ch 2, work 2 dc in each stitch around, join. (24 dc)
Rnd 3: Ch 2, [1 dc in next st, 2 dc in next st] around, join. (36 dc)
Rnd 4: Ch 2, [1 dc in each of next 2 sts, 2 dc in next st] around, join. (48 dc)
Rnd 5: Ch 2, [1 dc in each of next 3 sts, 2 dc in next st] around, join. (60 dc)
Rnd 6: Ch 2, [1 dc in each of next 4 sts, 2 dc in next st] around, join. (72 dc)
Change to burnt orange.
Rnd 7 (waffle set-up): Ch 2, [1 dc in next st, 1 fpdc around next st] around, join. (36 dc, 36 fpdc = 72 sts)
Rnds 8–9: Ch 2, [1 dc in next st, 1 fpdc around next fpdc] around, join. (72 sts)
Change to paprika red.
Rnds 10–12: Ch 2, [1 dc in next st, 1 fpdc around next fpdc] around, join. (72 sts) Fasten off and weave in ends.
Back Circle (make 1)
With paprika red, work Rnds 1–6 exactly as for the Front Circle (72 dc).
Change to burnt orange.
Rnds 7–8: Ch 2, 1 dc in each st around, join. (72 dc)
Change to paprika red.
Rnds 9–10: Ch 2, 1 dc in each st around, join. (72 dc) Fasten off and weave in ends.
Joining and Stuffing
Place the Front and Back Circles together with right sides facing out (the waffle side and the flat side both facing you) and the stitch patterns aligned. Join burnt orange yarn at any point between the two layers.
Rnd 1 (joining rnd): Ch 1, sc through both layers around, working 1 sc in each stitch pair, join with sl st to first sc. (72 sc)
Rnd 2: Ch 1, sc in each sc around, join. (72 sc)
Stuff lightly and evenly with polyester fiberfill through the small gap left before closing.
Rnd 3: Ch 1, sc in each sc around, join. Fasten off, leaving a 10 in / 25 cm tail. Use the tail to close any remaining gap with a few whip stitches (small stitches over the edge, catching both layers). Weave in ends.
Assembly and Finishing
Seaming: The joining rounds do the seaming for you. When you work the sc through both layers, make sure your hook goes through a stitch on the front circle and the matching stitch on the back circle every time, so the two circles stay perfectly aligned all the way around.
Weaving in ends: Thread each tail onto the tapestry needle and sew it back and forth through the inside of the fabric for about 2 inches, changing direction once, then trim close to the fabric. Never knot your ends — weaving hides them.
Blocking: Gently pat the ring into a smooth circle with your hands. If it looks slightly wavy, mist it lightly with water, shape it flat on a towel, and let it dry completely. Do not overstuff; the waffle texture should remain clearly visible.
Pro Tips and Variations
- Change the color story: Swap paprika and burnt orange for mustard and cream, or deep teal and sage, to make a completely different vintage palette. Keep the same stripe rhythm (Rnds 7–9 one color, Rnds 10–12 the other).
- Make it bigger or smaller: To enlarge, add one more increase round (Rnd 7 of the increase sequence: [1 dc in each of next 5 sts, 2 dc in next st] around = 84 dc) and add one extra waffle round to each stripe. To shrink, stop after Rnd 5 (60 dc) and work two waffle rounds per stripe.
- Substitute yarn: Any super bulky yarn that meets the gauge works. If you use a thinner yarn held double, check your gauge carefully after Rnd 3 before continuing.
- Add a hanging loop: Before fastening off the final joining round, ch 12, sl st back into the same stitch to form a loop, then continue. Hang your wreath on a door or wall hook.


