Paprika Bordered Solid Square Free Crochet Pattern: A Folk Art Placemat Motif
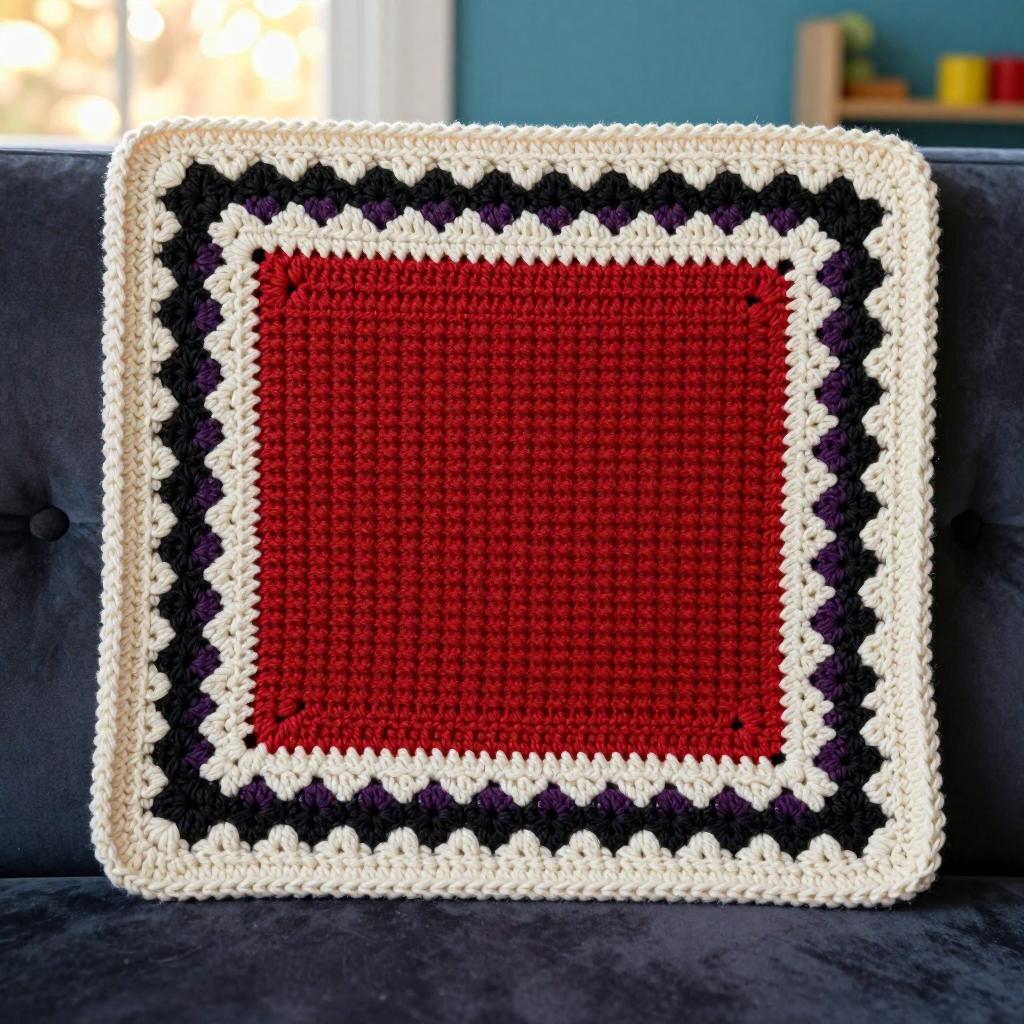
Paprika Bordered Solid Square: A Folk Art Placemat for Absolute Beginners
Introduction
If you have never held a crochet hook before, this is the perfect first project for you. The Paprika Bordered Solid Square is a warm, folk-art placemat built from one simple stitch repeated over and over, then framed with a bold cream and blackberry border that makes it look far more complicated than it actually is. It is special because it teaches you the three stitches every crocheter needs (single crochet, half double crochet, and double crochet) in one small, satisfying square that finishes in an evening or two. The finished piece is a tidy 9½ inches square, with a smooth, slightly ridged paprika-red center and a raised, textured shell border that feels wonderful under your fingertips. Picture it under a bowl of soup or a mug of tea, and you will see exactly why this little square is worth your very first chain.
Materials Needed
- Yarn: DK weight yarn (Category 3), approximately 90–100 yards total: 55 yards paprika red, 20 yards cream, 20 yards blackberry (deep plum-purple).
- Crochet hook: G/6 (4.0 mm), or the size you need to match gauge.
- Stitch markers: At least 4, to mark corners and the first stitch of each round.
- Tapestry needle: A blunt-tipped needle with a large eye, for weaving in ends.
- Scissors: Any small sharp pair.
- Blocking supplies: Pins and a spray bottle of water, or a steam iron used gently.
- Finished size: 9½ x 9½ inches (24 x 24 cm) after blocking.
Abbreviations and Beginner Glossary
Every abbreviation used in this pattern is listed below. Read this section once before you begin — you will not need to memorize it.
- ch – chain. Make a loop with the yarn on your hook, wrap the yarn over the hook, and pull it through the loop. That is one chain.
- sl st – slip stitch. Insert your hook into the stitch, wrap the yarn over, and pull it through both the stitch and the loop on your hook at the same time. It makes a nearly invisible join.
- sc – single crochet. Insert hook into the stitch, wrap yarn over and pull up a loop (2 loops on hook), wrap yarn over again and pull through both loops. One loop remains.
- hdc – half double crochet. Wrap yarn over the hook first, insert hook into the stitch, wrap yarn over and pull up a loop (3 loops on hook), wrap yarn over and pull through all 3 loops at once.
- dc – double crochet. Wrap yarn over, insert hook into the stitch, wrap yarn over and pull up a loop (3 loops on hook), wrap yarn over and pull through 2 loops, wrap yarn over and pull through the last 2 loops.
- sp – space. The gap created by a chain (for example, a ch-2 space is the little hole made by two chains).
- st(s) – stitch(es). One completed stitch, or several of them.
- turn – flip your work over so you can work back along the row you just finished.
- fasten off – cut the yarn a few inches from your work, pull the tail all the way through the last loop, and tug gently to lock it.
- join – connect the end of a round to its beginning with a slip stitch.
- shell – a group of 5 double crochet stitches worked into the same stitch, which fans out into a little scallop.
- right side – the front face of the fabric, the side you want showing on the finished placemat.
Gauge
Gauge: 16 hdc x 12 rows = 4 inches (10 cm) in half double crochet after blocking.
Gauge simply means how big your stitches come out. If your stitches are bigger than the pattern expects, your placemat will be too large; if they are smaller, it will be too small. To check, chain 22, work 14 rows of hdc, and measure the middle 4 inches of the swatch with a ruler. If you have more than 16 stitches in 4 inches, your stitches are too tight — try a larger hook. If you have fewer, your stitches are too loose — try a smaller hook. Do not skip this step; it takes ten minutes and saves you from a lopsided placemat.
Beginner Tips Before You Start
- Count your chains carefully. The foundation chain of 39 is the whole width of the square. If you lose count, count again from the hook end before you start Row 1.
- Do not pull the yarn too tight. Keep your loops relaxed and even. Tight tension makes the border rounds difficult to work into later.
- Use a stitch marker in the first stitch of every border round. When you come back around, you will know exactly where to join.
- Mark all four corners. The corners are where mistakes hide. A marker in each ch-2 corner space keeps your square square.
- Remember the ch 2 at the start of a row is not a stitch. Your first hdc goes into the very first stitch, not into the chain.
- Keep the right side facing you during the border. Never turn once you begin the border rounds — you work around the edge in one continuous direction.
Step-by-Step Instructions
Center Square (paprika red)
With paprika red, ch 39.
Row 1: Hdc in the 2nd ch from hook and in each ch across. (38 hdc)
Row 2: Ch 2, turn. Hdc in each st across. (38 hdc)
Rows 3–24: Repeat Row 2. (38 hdc per row)
Do not fasten off yet. Do not turn after the last row. Your piece now measures about 9½ inches wide and 9½ inches tall, and you will work the border around the outer edge with the right side facing you.
Border Round 1 (cream)
Change to cream by pulling a loop of cream through the working loop, then fastening off paprika red. Ch 1. Work sc evenly around the entire square: 1 sc in each row-end along the first side (24 sc), 1 sc in each st along the top edge (38 sc), 1 sc in each row-end along the second side (24 sc), and 1 sc in each foundation ch along the bottom edge (38 sc). At each corner, work (sc, ch 2, sc) in the corner stitch. Join with sl st to the first sc. (128 sc plus 4 ch-2 corner spaces)
Border Round 2 (cream)
Ch 1. Sc in each sc around, working (sc, ch 2, sc) in each ch-2 corner space. Join with sl st to the first sc. (136 sc plus 4 ch-2 corner spaces) Fasten off cream.
Border Round 3 (blackberry)
Join blackberry with a sl st in any sc. Ch 1. Sc in each sc around, working (sc, ch 2, sc) in each ch-2 corner space. Join with sl st to the first sc. (144 sc plus 4 ch-2 corner spaces) Do not fasten off.
Border Round 4 (blackberry shell round)
Ch 1. Sc in the same st as the join. *Skip 2 sc, work 5 dc in the next sc (shell made), skip 2 sc, sc in the next sc; repeat from * around, working (sc, ch 2, sc) in each corner ch-2 space to keep the corners sharp. Join with sl st to the first sc. (24 shells, 24 sc between shells, plus 4 corner ch-2 spaces) Fasten off blackberry.
Border Round 5 (cream)
Join cream with a sl st in any sc between shells. Ch 1. Sc in each st around — work 1 sc in each dc of every shell and 1 sc in each sc between shells — working (sc, ch 2, sc) in each corner ch-2 space. Join with sl st to the first sc. (168 sc plus 4 ch-2 corner spaces) Fasten off cream.
Assembly and Finishing
There is no seaming in this project — the whole placemat is one piece. Finishing is all about hiding your tails and shaping the square.
- Weave in the ends: Thread each yarn tail onto the tapestry needle. Turn the placemat to the wrong side and run the needle through the backs of 6–8 stitches, changing direction once so the tail cannot work loose. Trim close to the fabric.
- Block the square: Mist the placemat lightly with water (or hold a steam iron an inch above the surface — never press it down). Pin it to a towel or blocking mat, stretching the corners gently until it measures exactly 9½ x 9½ inches. Use a ruler on both diagonals to check it is square.
- Let it dry completely — usually a few hours or overnight — before removing the pins. The shell border will relax and lie flat, and the corners will hold their crisp shape.
Pro Tips and Variations
- Change the palette: Swap paprika for mustard, cream for oatmeal, and blackberry for sage green for a completely different folk-art mood. Keep one light and one dark color so the border still pops.
- Make a set of four: The pattern uses under 100 yards, so one skein of each color makes several placemats. Work them assembly-line style, finishing all the centers first, then all the borders.
- Adjust the size: For a larger mat, add rows to the center in pairs (each pair adds about ⅔ inch of height) and add the same number of stitches to the foundation chain. The border rounds will simply have more stitches to work around.
- Substitute yarn: Worsted weight yarn with an H/8 (5.0 mm) hook makes a thicker, faster mat — just check your gauge first, since the finished size will grow.