Lavender Hexagon Motif Bag Free Pattern: A Pastel Dreamy Crochet Crossbody
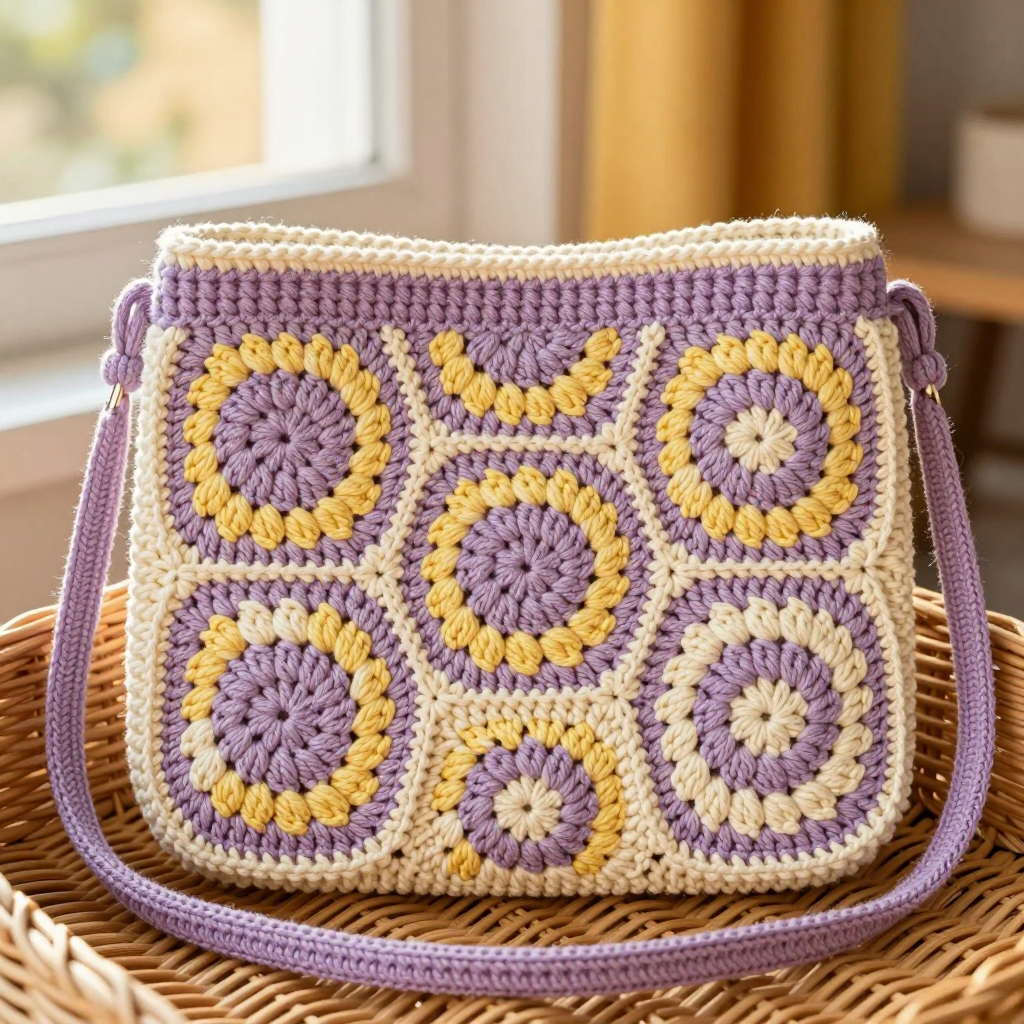
Lavender Hexagon Motif Bag: A Pastel Dreamy Crochet Crossbody
Introduction
If you have never held a crochet hook before, this Lavender Hexagon Motif Bag is the perfect first "real" project to fall in love with. It is made from just seven small, friendly hexagon shapes that you crochet one at a time, then join together like puzzle pieces into a sweet little flat-front crossbody bag. The finished bag is about 7.5 inches wide and 6 inches tall, with a soft matte texture and a dreamy pastel color story of dusty lilac, pale yellow, and cream. Because each motif is small and quick, you get a satisfying finish every few minutes, and any tiny wobbles in your first stitches simply disappear into the honeycomb pattern. By the end you will have a handmade accessory that looks boutique-bought and feels like a warm hug on your shoulder.
Materials Needed
- Yarn: Medium weight (worsted/aran, CYC 4) acrylic or cotton blend. You need 1 skein each in dusty lilac (A), pale yellow (B), and cream (C) — approximately 120 yd (110 m) per 2 oz (57 g) skein. The sample uses about 1.5 skeins lilac, 0.5 skein pale yellow, and 0.5 skein cream.
- Crochet hook: H/8 (5.0 mm), or whatever size you need to match the gauge below.
- Stitch marker: At least one, to mark the first stitch of each round.
- Tapestry needle: A blunt-tipped yarn needle for seaming and weaving in ends.
- Scissors: Sharp small scissors for cutting yarn.
- Optional: One small button or sew-on snap for a closure.
- Finished size: Bag approximately 7.5 in (19 cm) wide x 6 in (15 cm) tall x 3 in (7.6 cm) deep. Strap 41 in (104 cm) long.
Abbreviations and Beginner Glossary
Every pattern is written in shorthand. Here is every abbreviation used in this pattern, explained as if you have never crocheted before. All terms are US crochet terms.
- ch – chain: wrap the yarn over your hook and pull it through the loop on your hook. This makes a small linked loop. Chains are the foundation of most crochet.
- sl st – slip stitch: insert your hook into the stitch, yarn over, and pull the loop straight through both the stitch and the loop on your hook. It makes an almost invisible joining stitch.
- sc – single crochet: insert hook into stitch, yarn over, pull up a loop (2 loops on hook), yarn over again, pull through both loops. One short, firm stitch.
- dc – double crochet: yarn over, insert hook into stitch, yarn over, pull up a loop (3 loops on hook), yarn over, pull through 2 loops, yarn over, pull through remaining 2 loops. A taller stitch.
- tr – treble crochet: yarn over twice, insert hook, pull up a loop, then yarn over and pull through 2 loops three times. Even taller. (Listed for reference; not used in this pattern.)
- sp – space: the gap between stitches, usually under a chain. You work into the space rather than into a stitch.
- st / sts – stitch / stitches.
- beg – beginning.
- rep – repeat: do the same instruction again.
- * ... * – the asterisks mark a group of stitches you repeat around the round.
- Magic ring – an adjustable loop: wrap the yarn around your fingers to form a loop, work your stitches into the loop, then pull the short tail to close the hole tight.
- Join-as-you-go (JAYG) – when working the last round of a motif, you replace a corner chain with a slip stitch into the matching corner of a finished motif, so the pieces join as you crochet.
- Whipstitch – a simple seaming stitch: pass the needle over the edge of both pieces and back through, making small diagonal stitches.
- Back loop – each stitch has two top loops; the back loop is the one farther from you. Working only into it leaves a neat ridge.
Gauge
Gauge: One hexagon motif = 3 in (7.6 cm) across flat-to-flat after blocking. 6 sc = 2 in (5 cm).
Gauge simply means how big your stitches come out. If your stitches are bigger than the pattern's, your bag will be too big and floppy; if smaller, it will be stiff and tiny. To check, crochet one complete motif exactly as written, block it lightly, and measure it flat-to-flat (from the middle of one flat side to the middle of the opposite flat side). If it is larger than 3 in, try a smaller hook; if smaller, try a larger hook. Always trust your own swatch over the hook size printed on the label.
Beginner Tips Before You Start
- Use a stitch marker. Place it in the first stitch of each round so you always know where the round began and where to join.
- Do not pull your yarn too tight. Keep an even, relaxed tension. Tight stitches make the motif curl and shrink below gauge.
- Count after every round. The stitch counts in parentheses tell you exactly how many stitches you should have. Counting now saves unpicking later.
- Make all seven motifs before joining. Lay them out in the honeycomb grid first so you can see the finished shape before any seaming.
- Block each motif before joining. Lightly steam or damp-block to 3 in flat-to-flat. Blocked motifs line up beautifully and make seaming easy.
- Keep your tails long. Leave a 6-in (15-cm) tail on each motif; you will use them for seaming and weaving in.
Step-by-Step Instructions
Part 1: The Hexagon Motif (make 7)
Use A (dusty lilac) for Rounds 1–2, B (pale yellow) for Round 3, and C (cream) for Round 4. Each round begins with a chain and ends with a slip stitch into the first stitch of that round.
Round 1 (A): Make a magic ring. Ch 3 (this counts as your first dc), then work 11 dc into the ring. Join with a sl st to the top of the beginning ch-3. Pull the tail to close the ring. (12 dc)
Round 2 (A): Ch 3 (counts as first dc), dc in the same stitch. *Ch 2, then 2 dc in the next stitch; repeat from * around, ending with ch 2. Join with a sl st to the top of the beginning ch-3. (6 ch-2 spaces, 12 dc)
Round 3 (B): Ch 1, sc in the same stitch. *Sc in the next stitch, then (sc, ch 2, sc) in the next ch-2 space, then sc in the next stitch; repeat from * around, ending with ch 2. Join with a sl st to the first sc. (30 sc, 6 ch-2 spaces)
Round 4 (C): Ch 1, sc in the same stitch. *Sc in each of the next 3 stitches, then (sc, ch 2, sc) in the next ch-2 space, then sc in each of the next 3 stitches; repeat from * around, ending with ch 2. Join with a sl st to the first sc. Fasten off, leaving a 6-in (15-cm) tail for seaming. (42 sc, 6 ch-2 spaces)
Block each motif lightly to 3 in (7.6 cm) flat-to-flat. Do not over-stretch.
Part 2: Layout and Joining
Arrange your 7 motifs in a honeycomb grid: 2 motifs in the top row, 3 in the middle row, and 2 in the bottom row. The middle row becomes the front panel; the top and bottom rows fold back to create the top edge and the base.
Join the motifs with C (cream) using join-as-you-go or whipstitch through the back loops of the edge stitches.
- Join the 3 middle-row motifs side by side along their vertical edges.
- Join the 2 top-row motifs to the top edges of the middle row.
- Join the 2 bottom-row motifs to the bottom edges of the middle row.
Fold the top and bottom rows back and seam their outer edges to the middle row to form a flat-front bag with a 3-in (7.6-cm) deep base and a 6-in (15-cm) tall front.
Part 3: Side Seams
With C, whipstitch the side edges of the folded bag closed, leaving the top opening free. Weave in ends.
Part 4: Top Edging
With C, join yarn at one side of the top opening. Ch 1, then work sc evenly around the entire top opening, working 1 sc in each stitch and 1 sc in each corner space. Join with a sl st to the first sc. Fasten off and weave in ends.
Part 5: The Strap
With A (dusty lilac), leave a 6-in (15-cm) tail. Ch 3.
Row 1: Sc in the 2nd ch from hook and in the next ch. (2 sc)
Row 2: Ch 1, turn, sc in each st across. (2 sc)
Rows 3–onward: Repeat Row 2 until the strap measures 41 in (104 cm) or your desired length. Fasten off, leaving a 6-in (15-cm) tail.
Assembly and Finishing
Attach the strap: Pin the strap ends to the inside of the bag at the top side edges, about 1 in (2.5 cm) from each side seam. Try the bag on first to check the length. Sew securely with matching lilac yarn, going back and forth through the strap and bag edge several times so it holds strong.
Weave in ends: Thread each tail onto your tapestry needle and run it through the back of several stitches, then change direction and run it back the other way to lock it. Trim close to the work.
Block: Lightly steam the bag and strap, or spritz with water and pin into shape on a towel. Let dry completely. This relaxes the stitches and gives crisp, even hexagons.
Optional closure: Add a small button or snap at the top center if you would like the bag to close.
Pro Tips and Variations
- Change the colors: Swap the pastel palette for any three colors you love. Keep one color for the center rounds, one for the middle round, and one for the outer round and seams for a cohesive look.
- Adjust the size: Add a fourth motif to the middle row for a wider bag, or use a larger hook and thicker yarn to scale the whole bag up. Just remember to re-check your gauge.
- Try a different yarn: Cotton gives a sturdy, washable bag; acrylic is softer and lighter. Any worsted/aran (CYC 4) yarn works — just match the gauge.
- Make the strap yours: Work the strap in cream to match the seams, or crochet a longer strap for a crossbody fit. You can also add a fabric lining for extra structure.