Bleached Denim Ombré Circle Bag Free Crochet Pattern
Introduction
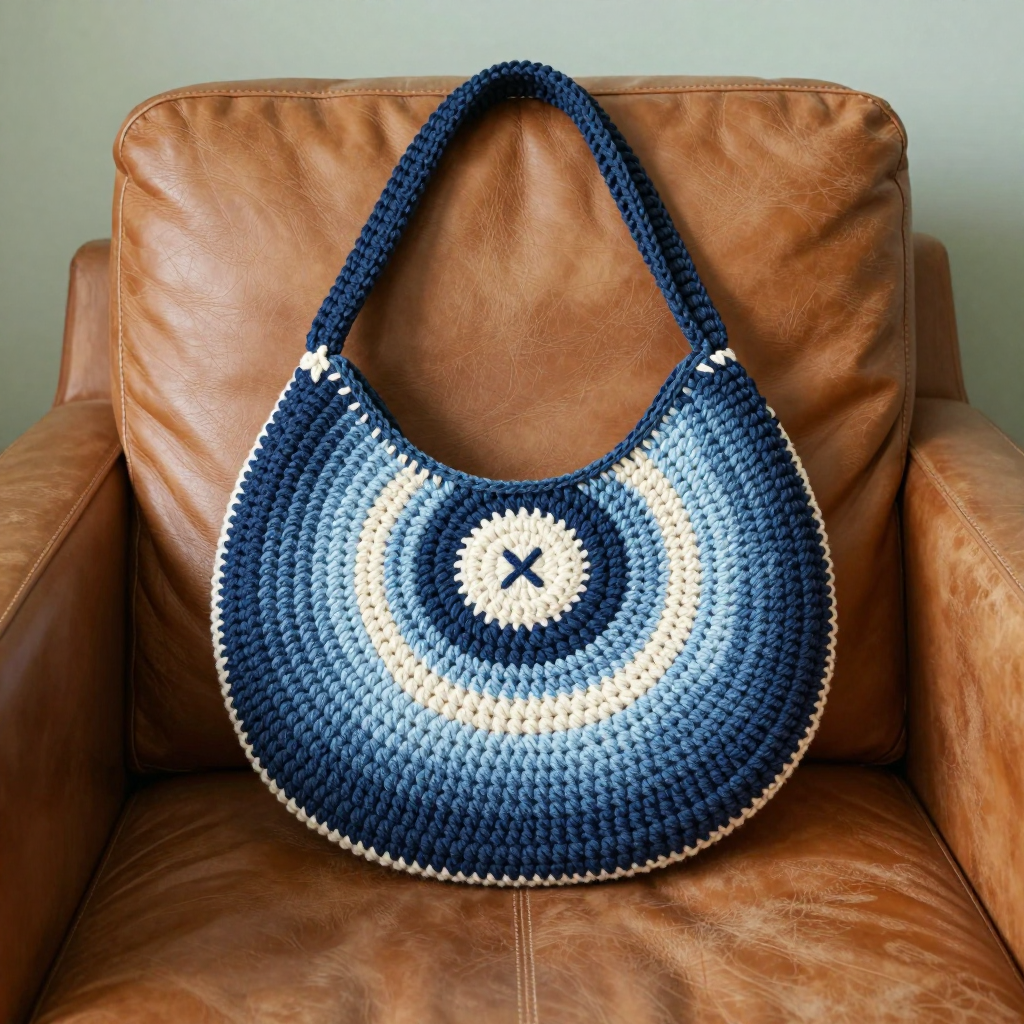
If you have ever looked at a crocheted bag and thought, "I could never make that," this is the project that will prove you wrong. The Bleached Denim Ombré Circle Bag is made from just two flat circles, a simple strap, and a tiny patch — every single stitch is a basic single crochet, the very first stitch most people learn. It is perfect for the absolute beginner who wants a finished item that looks like it came from a boutique, not a classroom. The finished bag is soft and slightly fuzzy, about 8.5 inches (21.5 cm) across, with faded indigo, washed denim, and pale bleached-sky stripes that spiral gently out from the center like a pair of jeans worn in all the right places. It is light, floppy in the best way, and hangs from a long dark strap that sits comfortably across your body or over one shoulder.
Materials Needed
- Yarn: Worsted weight (category 4) acrylic/cotton blend, approximately 220 yards total, divided as follows:
- Color A — faded dark indigo: approx. 70 yds (plus a few extra yards for the strap and embroidery)
- Color B — medium washed denim blue: approx. 60 yds
- Color C — pale bleached sky blue: approx. 60 yds
- Color D — off-white/ecru: approx. 10 yds (for the patch)
- Crochet hook: Size G/6 (4.0 mm)
- Stitch markers: at least 4 (or use scraps of contrasting yarn)
- Tapestry needle (also called a yarn needle — a big blunt needle with an eye large enough for yarn)
- Scissors
- Finished size: Each disc approx. 8.5" (21.5 cm) across; finished bag approx. 8.5" x 8.5" (21.5 x 21.5 cm); strap approx. 22" (56 cm) long and about 1" (2.5 cm) wide; patch approx. 2" (5 cm) across.
Abbreviations and Beginner Glossary
- ch — chain: yarn over the hook, pull the loop through the loop already on your hook. This makes a small "V" and is how you start a row.
- sc — single crochet: insert your hook into the stitch, yarn over, pull up a loop (2 loops on hook), yarn over again, pull through both loops. One loop remains. That is one sc.
- slip st — slip stitch: insert hook into the stitch, yarn over, pull the loop straight through both the stitch and the loop on your hook. It makes an almost invisible join.
- st / sts — stitch / stitches.
- 2 sc in next st — work two single crochets into the same stitch. This is an increase and is what makes the circle grow.
- magic ring — an adjustable loop of yarn you crochet into, then pull closed so there is no hole in the center. (If you prefer, chain 4 and join with a slip st to form a ring, then work Round 1 into that ring.)
- [ ] — brackets mean "repeat everything inside the brackets the number of times stated after them."
- ( ) — parentheses at the end of a round show the total stitch count you should have when the round is finished.
- turn — flip your work over so you work back the other way (used only for the strap).
- fasten off — cut the yarn a few inches from your work and pull the tail all the way through the last loop to lock it.
- weave in ends — thread a yarn tail onto the tapestry needle and run it back and forth through the back of the fabric so it disappears.
- wrong side — the back/inside face of the fabric (the side you do not want showing).
Gauge
16 sc x 18 rounds = 4" (10 cm) in single crochet worked in the round. Also: the first 2 rounds of the disc should measure about 2.5" (6 cm) across.
Gauge matters because it is how we make sure your bag comes out the same size as the pattern. If your stitches are bigger than the pattern's, your bag will be too big and you may run out of yarn; if they are smaller, the bag will be too small. To check, crochet the first 6 rounds of a disc, then lay a ruler across the circle: it should measure about 4" (10 cm) across. If it is much bigger, try a smaller hook (size F/5, 3.75 mm); if much smaller, try a larger hook (size H/8, 5.0 mm).
Beginner Tips Before You Start
- Use a stitch marker in the first stitch of every round. Because you work in a continuous spiral (no joining, no turning), it is very easy to lose track of where a round began. Move the marker up each round.
- Do not pull your yarn tight. Keep your tension relaxed and even — tight stitches make a stiff, cupped disc that will not lie flat.
- Change colors on the last yarn-over of the last stitch of the round. Finish that stitch with the new color so the color change is clean. Carry the unused colors loosely up the back — do not cut them every time.
- Count every round. The stitch counts in parentheses are your safety net; if a round does not match, fix it before moving on.
- Make both discs before joining. Lay them side by side and check they are the same size.
Step-by-Step Instructions
Stripe Sequence (used for both discs)
Rounds 1–2: Color A. Rounds 3–4: Color B. Rounds 5–6: Color C. Rounds 7–8: Color B. Rounds 9–10: Color A. Rounds 11–12: Color C. Rounds 13–14: Color B. Rounds 15–16: Color A. Rounds 17–18: Color C. Rounds 19–20: Color B.
Disc (make 2)
With Color A, make a magic ring.
Round 1: 6 sc into the ring. Pull the ring closed. (6 sc)
Round 2: 2 sc in each st around. (12 sc)
Round 3 (Color B): [2 sc in next st, 1 sc in next st] 6 times. (18 sc)
Round 4: [2 sc in next st, 1 sc in each of next 2 sts] 6 times. (24 sc)
Round 5 (Color C): [2 sc in next st, 1 sc in each of next 3 sts] 6 times. (30 sc)
Round 6: [2 sc in next st, 1 sc in each of next 4 sts] 6 times. (36 sc)
Round 7 (Color B): [2 sc in next st, 1 sc in each of next 5 sts] 6 times. (42 sc)
Round 8: [2 sc in next st, 1 sc in each of next 6 sts] 6 times. (48 sc)
Round 9 (Color A): [2 sc in next st, 1 sc in each of next 7 sts] 6 times. (54 sc)
Round 10: [2 sc in next st, 1 sc in each of next 8 sts] 6 times. (60 sc)
Round 11 (Color C): [2 sc in next st, 1 sc in each of next 9 sts] 6 times. (66 sc)
Round 12: [2 sc in next st, 1 sc in each of next 10 sts] 6 times. (72 sc)
Round 13 (Color B): [2 sc in next st, 1 sc in each of next 11 sts] 6 times. (78 sc)
Round 14: [2 sc in next st, 1 sc in each of next 12 sts] 6 times. (84 sc)
Round 15 (Color A): [2 sc in next st, 1 sc in each of next 13 sts] 6 times. (90 sc)
Round 16: [2 sc in next st, 1 sc in each of next 14 sts] 6 times. (96 sc)
Round 17 (Color C): [2 sc in next st, 1 sc in each of next 15 sts] 6 times. (102 sc)
Round 18: [2 sc in next st, 1 sc in each of next 16 sts] 6 times. (108 sc)
Round 19 (Color B): [2 sc in next st, 1 sc in each of next 17 sts] 6 times. (114 sc)
Round 20: [2 sc in next st, 1 sc in each of next 18 sts] 6 times. (120 sc)
Fasten off Color B. Each disc measures approx. 8.5" (21.5 cm) across. Weave in ends.
Joining the Discs
Hold the two discs with wrong sides together (the sides you want hidden facing each other), matching stitch counts (120 sts each).
Joining Round: With Color A, join yarn with a slip st at any point on the outer edge. Work 1 round of sc through both layers all the way around, working 1 sc in each pair of matching stitches. Join with a slip st to the first sc. (120 sc) Do not fasten off yet.
Strap
Row 1: Ch 1, sc in each of the next 4 sc along the top edge. Turn. (4 sc)
Row 2: Ch 1, sc in each sc across. Turn. (4 sc)
Repeat Row 2 until the strap measures approx. 22" (56 cm), or your desired length. Fasten off, leaving a long tail.
Attach the strap end to the opposite side of the top edge with a slip-stitch seam or by sewing securely with the tail. Weave in ends.
Patch Motif (make 1)
With Color D, make a magic ring.
Round 1: 8 sc into the ring. Join with a slip st to the first sc. (8 sc)
Round 2: Ch 1, 2 sc in each st around. Join with a slip st. (16 sc)
Round 3: Ch 1, [2 sc in next st, 1 sc in next st] 8 times. Join with a slip st. (24 sc)
Fasten off, leaving a long tail. Using Color A, embroider a small 3-stitch cross or star in the center of the patch with your yarn needle. Sew the patch to the front disc, centered about 1.5" (4 cm) below the top edge, using the tail and a yarn needle.
Assembly and Finishing
Seaming: Your bag is already joined around the outer edge by the Joining Round. To make that seam neat, run your tapestry needle under each single crochet of the joining round and give a gentle tug so the edge sits flat and even. Sew the strap ends down firmly with the long tails, going back and forth through the strap and the top edge three or four times so it will never pull loose.
Weaving in ends: Thread each tail onto the tapestry needle and run it back and forth through the back of the fabric for about 2 inches (5 cm), changing direction once. Trim close to the fabric.
Blocking: Lightly steam-block the bag to flatten the discs and even out the stripes. Pin each disc flat on a towel or blocking mat, hold a steam iron about 1 inch (2.5 cm) above the surface (do not press the iron onto the stitches), let the steam settle in, then leave it to dry completely before removing the pins. If you prefer not to steam, spritz with water and let it air-dry flat.
Optional: Add a small fabric lining if you like — cut two circles slightly smaller than the bag, sew them together, and stitch inside the top edge.
Pro Tips and Variations
- Change the palette: Swap the three blues for any three shades of one color — sage green to mint, rust to peach, or charcoal to silver — and keep the same stripe order for a smooth ombré.
- Make it bigger or smaller: To enlarge the bag, keep increasing 6 stitches per round (each round adds one more plain sc between increases) until the disc is your desired size, then join as written. To shrink it, stop at Round 16 (96 sts).
- Substitute yarn: Any worsted weight (category 4) yarn works — cotton gives a crisper, sturdier bag; acrylic gives a softer, fuzzier, more worn-in look. Always check your gauge first.
- Customize the strap: Make the strap wider by starting with 6 or 8 sc instead of 4, or make it longer for a cross-body fit — just keep repeating Row 2 until it is the length you want.