Lebes Coin Motif Crochet Backpack Free Pattern: Olive & Ochre Spike Stitch
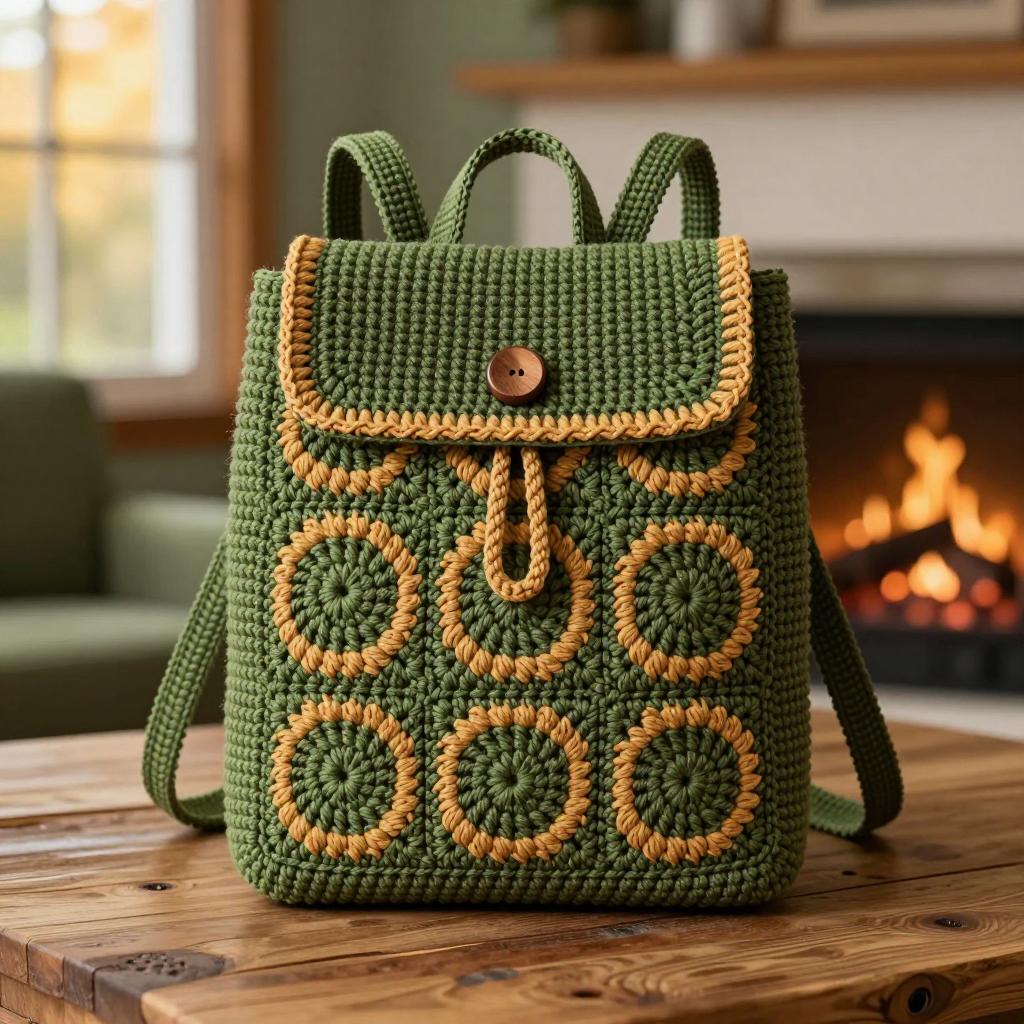
Lebes Coin Motif Crochet Backpack: Olive & Ochre Spike Stitch
Introduction
Welcome to your very first crochet backpack! This project is perfect for complete beginners who have just learned a few basic stitches and want to make something they will actually carry and show off. The Lebes Coin Backpack is built from nine hexagon "coin" motifs, each one ringed with ochre spike stitches that echo the look of stacked Mediterranean ceramic bowls. Worked in smooth olive macrame cord, the finished bag is firm, matte, and rope-like, with a structured boxy shape that stands up on its own. It measures 12 inches wide by 13 inches tall, with a rectangular flap and two narrow straps, and it feels sturdy and satisfying in your hands — like a little piece of a Greek island summer you made yourself.
Materials Needed
- Yarn: Macrame cord, 3 mm (approx. 4 mm cotton cord equivalent), smooth single-strand cotton. 2 skeins Olive (approx. 220 yd each) and 1 skein Ochre (approx. 220 yd).
- Crochet hook: 5.0 mm (US H-8) for the motifs, body, base band, and top edge.
- Crochet hook: 4.5 mm (US G-7) for the flap and straps.
- Stitch markers (at least 10) to mark corners and seam junctions.
- Tapestry needle (also called a yarn needle — a large blunt needle with an eye big enough for cord) for seaming and weaving in ends.
- Scissors for cutting cord.
- One 1-inch olive-toned wooden toggle button for the closure.
- Optional: cotton canvas fabric for lining.
- Finished size: Body 12 in / 30.5 cm wide x 13 in / 33 cm tall. Flap 12 in wide x 5 in / 12.5 cm deep. Straps 1.5 in / 4 cm wide x 26 in / 66 cm long (adjustable).
Abbreviations and Beginner Glossary
- ch — chain. Wrap yarn over hook, pull it through the loop on your hook. Makes one chain.
- sl st — slip stitch. Insert hook into stitch, yarn over, pull through both the stitch and the loop on your hook at once. Makes a tiny, flat join.
- sc — single crochet. Insert hook into stitch, yarn over, pull up a loop (2 loops on hook), yarn over, pull through both loops. One loop remains.
- hdc — half double crochet. Yarn over, insert hook, pull up a loop (3 loops on hook), yarn over, pull through all 3 loops.
- dc — double crochet. Yarn over, insert hook, pull up a loop (3 loops on hook), yarn over, pull through 2 loops, yarn over, pull through last 2 loops.
- sp-st — spike stitch. Work 1 sc into the stitch 2 rows/rounds below, pulling the loop up to the current height before completing the sc.
- st(s) — stitch(es).
- beg — beginning.
- rnd — round. One complete circle of stitches worked around a center point.
- magic ring — an adjustable loop of yarn you crochet into, then pull tight to close the center hole.
- join — connect the last stitch of a round to the first with a sl st.
- fasten off — cut yarn, pull the tail through the last loop, and tighten.
- turn — flip your work over so you can work back the other way.
- flat-to-flat — the distance across a hexagon from one flat side to the opposite flat side.
Gauge
Gauge: One hexagon motif (Rnds 1–5) = 4 in / 10 cm across flat-to-flat. Also: 4 sc = 1 in / 2.5 cm, and 4 sc rows = 1 in / 2.5 cm.
Why gauge matters: Gauge is how big your stitches come out. If your stitches are bigger than the pattern expects, your bag will be too large and the motifs won't line up; if smaller, the bag will be too small. How to check: Work one complete hexagon motif (Rnds 1–5) and lay it flat. Measure across from flat side to flat side. If it is larger than 4 in, switch to a 4.5 mm hook for the motifs only. If smaller, try a 5.5 mm hook. Always make a swatch before starting the full bag.
Beginner Tips Before You Start
- Use stitch markers to track rounds. Place one in the first stitch of each round so you never lose your place, and one at each of the six hexagon corners.
- Do not pull the cord too tight. Macrame cord is stiff; keep your loops relaxed and even so the spike stitches lie flat.
- Count every round. The stitch counts in parentheses tell you exactly how many stitches you should have. If you are off, fix it before moving on.
- Keep the spike loops loose. When you pull up a spike stitch, draw the loop up gently to the current round's height — don't yank it.
- Work seams on the wrong side. This keeps the right side showing clean hexagon outlines.
- Block your motifs before joining. Lightly dampen and pin each hexagon to 4 in flat-to-flat so they match perfectly.
Step-by-Step Instructions
Hexagon Motif (make 9)
With Olive and the 5.0 mm hook, make a magic ring.
Rnd 1: Ch 3 (counts as first dc), 11 dc into ring, join with sl st to top of beg ch-3. (12 dc)
Rnd 2: Ch 3, dc in same st, 2 dc in each st around, join. (24 dc)
Rnd 3: Ch 3, dc in same st, dc in next st, *2 dc in next st, dc in next st; rep from * around, join. (36 dc)
Rnd 4 (shaping to hexagon): Ch 1, sc in same st, sc in next 4 sts, [2 sc in next st, sc in next 4 sts] 6 times, join. (42 sc) This creates six soft corners; block lightly to a hexagon.
Rnd 5 (Ochre spike ring): Join Ochre with sl st in any st. Ch 1, sc in same st. *Spike: sc into the dc of Rnd 3 directly below the next st (pull loop up to Rnd 5 height). Sc in next st. Rep from * around, alternating spike and sc, join with sl st to first sc. Fasten off Ochre. (21 sc + 21 spikes)
Rnd 6 (Olive border): Join Olive. Ch 1, sc in each st and each spike-top around, working 3 sc in each of the six corner sts to keep hexagon points sharp, join. Fasten off, leaving a 10 in tail for joining. (approx. 54 sc)
Block all 9 motifs to 4 in flat-to-flat and press flat under a damp cloth.
Joining the Body
Arrange motifs in a 3 x 3 grid, all hexagons oriented point-up. Using Olive and the 5.0 mm hook, join with slip stitch through both loops, working flat seams along shared edges: join Row 1 (3 motifs side by side), Row 2, Row 3, then join the three rows together. Work all seams on the wrong side so the right side shows clean hexagon outlines. Weave in ends.
Base Band
With Olive and the 5.0 mm hook, join yarn at bottom-right corner of joined body.
Row 1: Ch 1, sc evenly across bottom edge, working 1 sc per st and 2 sc at each seam junction. (approx. 60 sc)
Rows 2–4: Ch 1, turn, sc in each st across. (60 sc)
Fasten off. This 1 in band gives the bag a flat, structured base.
Sides and Top Edge
Join Olive at one side seam at the base band. Work sc evenly up the side edge, across the top edge (1 sc per st, 2 sc at seam junctions), and down the other side. Work 2 more rounds of sc around the entire opening. Fasten off. (approx. 150 sc per round)
Flap
With the 4.5 mm hook and Olive, join yarn at top-right corner of the front panel.
Row 1: Ch 1, sc in each of the next 48 sts across the front top edge. (48 sc)
Rows 2–14: Ch 1, turn, sc in each st across. (48 sc) Flap measures approx. 5 in deep.
Row 15 (Ochre spike border): Join Ochre, ch 1, sc in each st across, working 1 spike (into Row 13) every 4th st. Fasten off.
Row 16 (Olive edge): Join Olive, ch 1, sc in each st across, 3 sc in each corner. Fasten off.
Straps (make 2)
With the 4.5 mm hook and Olive, ch 7.
Row 1: Sc in 2nd ch from hook and each ch across. (6 sc)
Rows 2–104: Ch 1, turn, sc in each st across. (6 sc) Strap measures approx. 26 in.
Do not fasten off; work 1 round of sc evenly around the entire strap edge to neaten, then fasten off. Make second strap identically.
Assembly and Finishing
Attach the straps: Pin the top of each strap 2.5 in in from each side edge on the back panel, with strap ends overlapping the top edge by 1 in. Using Olive and a tapestry needle, sew each strap end securely with a box-X stitch (a square with an X through it) through all layers. Sew a 1 in square of Olive cord over each attachment point for reinforcement.
Add the closure: Sew one 1 in olive-toned wooden toggle button centered on the flap, 1 in up from the flap point. Crochet a 1 in chain loop from Ochre at the corresponding center-front position and sew in place to fit the toggle.
Weave in ends: Thread each tail onto the tapestry needle and weave it back and forth through the wrong side of the fabric for about 1 in, then trim close to the work.
Block: Lightly steam-block the finished bag, shaping the hexagons and flattening the spike rings. Hold a steam iron just above the surface (do not press down hard) and let the bag dry completely in shape.
Optional lining: Cut cotton canvas to fit the inside of the bag, sew it in by hand along the top edge, and turn the bag right side out.
Pro Tips and Variations
- Change the colors: Swap Olive for terracotta and Ochre for cream for a warm desert palette, or use navy with mustard spikes for a bolder look.
- Adjust the size: Add a fourth row or column of motifs for a larger tote — each extra motif adds 4 in. Keep the 3 x 3 grid for the stated 12 x 13 in size.
- Substitute yarn: Any smooth worsted-weight (category 4) cotton works; just check your gauge swatch and adjust hook size to hit 4 in per motif.
- Make the straps adjustable: Add a small metal slider or crochet a longer strap and knot it through the attachment square for a custom fit.