Sunset Dune Market Tote Free Pattern
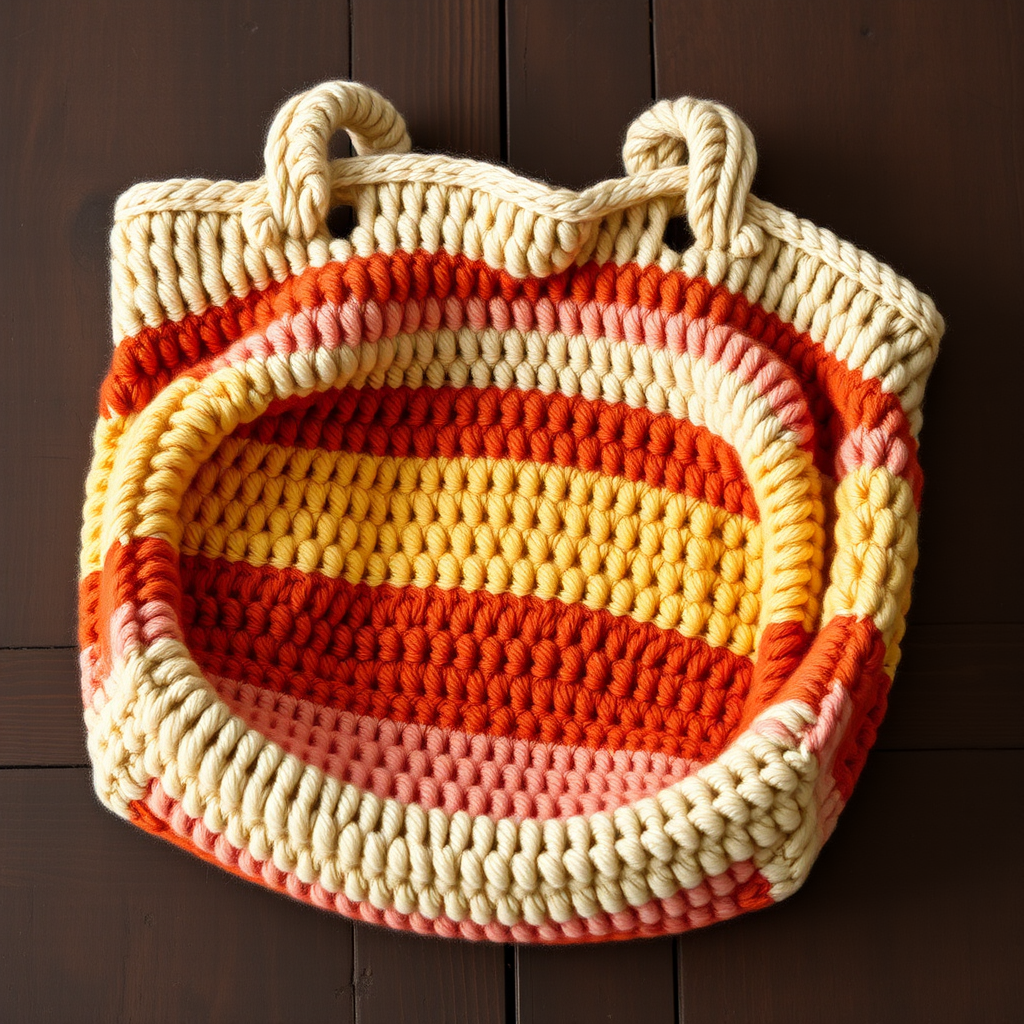
Sunset Dune Market Tote: A Free Crochet Pattern for Boho Summer Style
Imagine carrying a piece of golden-hour serenity with you wherever you go. The Sunset Dune Market Tote captures the warm, earthy glow of desert dunes at dusk, transforming it into a stylish, textured accessory that's as practical as it is beautiful. This free crochet pattern uses a sturdy single-crochet construction and a stunning color-blocked palette of sand, terracotta, amber, and dusty rose to create a roomy, durable bag perfect for farmers' market hauls, beach days, or everyday errands.
Whether you're a seasoned crocheter or a confident beginner looking for your next project, this market tote is a rewarding make. The pattern is worked in simple continuous rounds with basic increases, making it meditative and easy to follow. The result is a dense, structured bag that holds its shape beautifully and features integrated handles for effortless carrying. Let's dive into this boho-inspired project and create a handmade treasure you'll reach for all summer long.
Materials Needed
Before you begin, gather the following supplies. This project calls for worsted-weight cotton yarn, which provides the perfect combination of durability, stitch definition, and that slightly rustic, textured look we're aiming for.
- Yarn: Worsted weight cotton yarn in 4 colors:
- Color A (Sand) – approximately 250 yards
- Color B (Terracotta) – approximately 80 yards
- Color C (Amber) – approximately 80 yards
- Color D (Dusty Rose) – approximately 80 yards
- Crochet Hook: I/9 (5.5 mm) crochet hook
- Other Tools: Yarn needle for weaving in ends, stitch marker (optional but helpful), scissors
Gauge: 13 sc x 15 rows = 4 inches. Note: Exact gauge is not critical for this project, but maintaining consistent tension throughout will ensure your bag is even and well-proportioned.
Step-by-Step Instructions
This pattern is worked in continuous rounds (spiral) without joining, which creates a seamless, smooth fabric. Use a stitch marker to keep track of the beginning of each round. Let's get started!
Bag Base (Increasing Rounds)
Foundation: With Color A (Sand), make a slip knot and ch 2.
- Round 1: Work 6 sc in the 2nd ch from the hook. Place a stitch marker to mark the beginning of the round. (6 sts)
- Round 2: 2 sc in each st around. (12 sts)
- Round 3: *Sc in next st, 2 sc in next st* repeat around. (18 sts)
- Round 4: *Sc in next 2 sts, 2 sc in next st* repeat around. (24 sts)
- Round 5: *Sc in next 3 sts, 2 sc in next st* repeat around. (30 sts)
- Round 6: *Sc in next 4 sts, 2 sc in next st* repeat around. (36 sts)
- Round 7: *Sc in next 5 sts, 2 sc in next st* repeat around. (42 sts)
- Round 8: *Sc in next 6 sts, 2 sc in next st* repeat around. (48 sts)
- Round 9: *Sc in next 7 sts, 2 sc in next st* repeat around. (54 sts)
- Round 10: *Sc in next 8 sts, 2 sc in next st* repeat around. (60 sts)
- Round 11: *Sc in next 9 sts, 2 sc in next st* repeat around. (66 sts)
- Round 12: *Sc in next 10 sts, 2 sc in next st* repeat around. (72 sts)
- Round 13: *Sc in next 11 sts, 2 sc in next st* repeat around. (78 sts)
- Round 14: *Sc in next 12 sts, 2 sc in next st* repeat around. (84 sts)
- Round 15: *Sc in next 13 sts, 2 sc in next st* repeat around. (90 sts)
- Round 16: *Sc in next 14 sts, 2 sc in next st* repeat around. (96 sts)
- Round 17: *Sc in next 15 sts, 2 sc in next st* repeat around. (102 sts)
- Round 18: *Sc in next 16 sts, 2 sc in next st* repeat around. (108 sts)
- Round 19: *Sc in next 17 sts, 2 sc in next st* repeat around. (114 sts)
- Round 20: *Sc in next 18 sts, 2 sc in next st* repeat around. (120 sts)
Your base should now be a flat, circular disc. If it's cupping, your tension may be too tight; if it's ruffling, it may be too loose. Don't worry—once we start working even, it will settle.
Bag Body (Color Blocking)
Now we'll work even (no increases) to build the height of the bag, introducing our sunset color palette in horizontal stripes.
- Rounds 21-25: Sc in each st around with Color A (Sand). (120 sts)
- Round 26: Switch to Color B (Terracotta). Sc in each st around. (120 sts)
- Rounds 27-28: Continue with Color B. Sc in each st around. (120 sts)
- Round 29: Switch to Color C (Amber). Sc in each st around. (120 sts)
- Rounds 30-31: Continue with Color C. Sc in each st around. (120 sts)
- Round 32: Switch to Color D (Dusty Rose). Sc in each st around. (120 sts)
- Rounds 33-34: Continue with Color D. Sc in each st around. (120 sts)
- Round 35: Switch back to Color A (Sand). Sc in each st around. (120 sts)
- Rounds 36-40: Continue with Color A. Sc in each st around. (120 sts)
Pro Tip: When changing colors, work the last yarn-over of the final stitch of the old color with the new color to create a clean, seamless transition. Carry the unused yarn up the inside of the bag or cut and weave in ends at each color change.
Creating the Handles
This is where we shape the integrated handles by creating chained gaps. This technique forms sturdy, wide loops that serve as your bag's handles.
- Round 41: Sc in next 30 sts, ch 30, skip 30 sts, sc in next 60 sts, ch 30, skip 30 sts, sc in last 30 sts. (120 sts + 60 ch)
- Round 42: Sc in each st and each ch around. (180 sts) Work one sc into each of the 120 existing stitches and one sc into each of the 60 chain stitches.
- Rounds 43-45: Sc in each st around. (180 sts)
Finish: Fasten off, leaving a long tail for weaving. Weave in all ends securely using your yarn needle.
Finishing Touches & Handle Reinforcement
To give your bag a professional finish and ensure the handles are extra durable, we'll reinforce the handle openings.
- Fold the bag flat so the two handle openings align on top of each other. You'll see the chained spaces forming the handle loops.
- Using Color A (or a matching color), attach your yarn to the edge of one handle opening.
- Work a round of slip stitches evenly around the entire perimeter of the handle opening. This creates a clean, reinforced edge that prevents stretching. Repeat for the second handle opening.
- Weave in all remaining ends.
Optional: Adding a Longer Strap
If you prefer a crossbody or shoulder-length strap instead of (or in addition to) the integrated handles, here's a simple method:
- Strap: With Color A, ch 100. Row 1: Sc in the 2nd ch from the hook and in each ch across. (99 sts) Fasten off.
- Attachment: Using a yarn needle and whip stitch, securely attach each end of the strap to the inside of the bag at the top edge, positioning them on opposite sides of the bag. Ensure they are sewn firmly to support the weight of your belongings.
Your Sunset Dune Market Tote is now complete! The dense single-crochet fabric is sturdy enough for heavy groceries yet stylish enough for a beach day. The earthy, sun-washed color palette evokes desert dunes at dusk, making this bag a true statement piece. Enjoy your new handmade companion, and don't forget to share your creation with fellow crafters. Happy crocheting!


