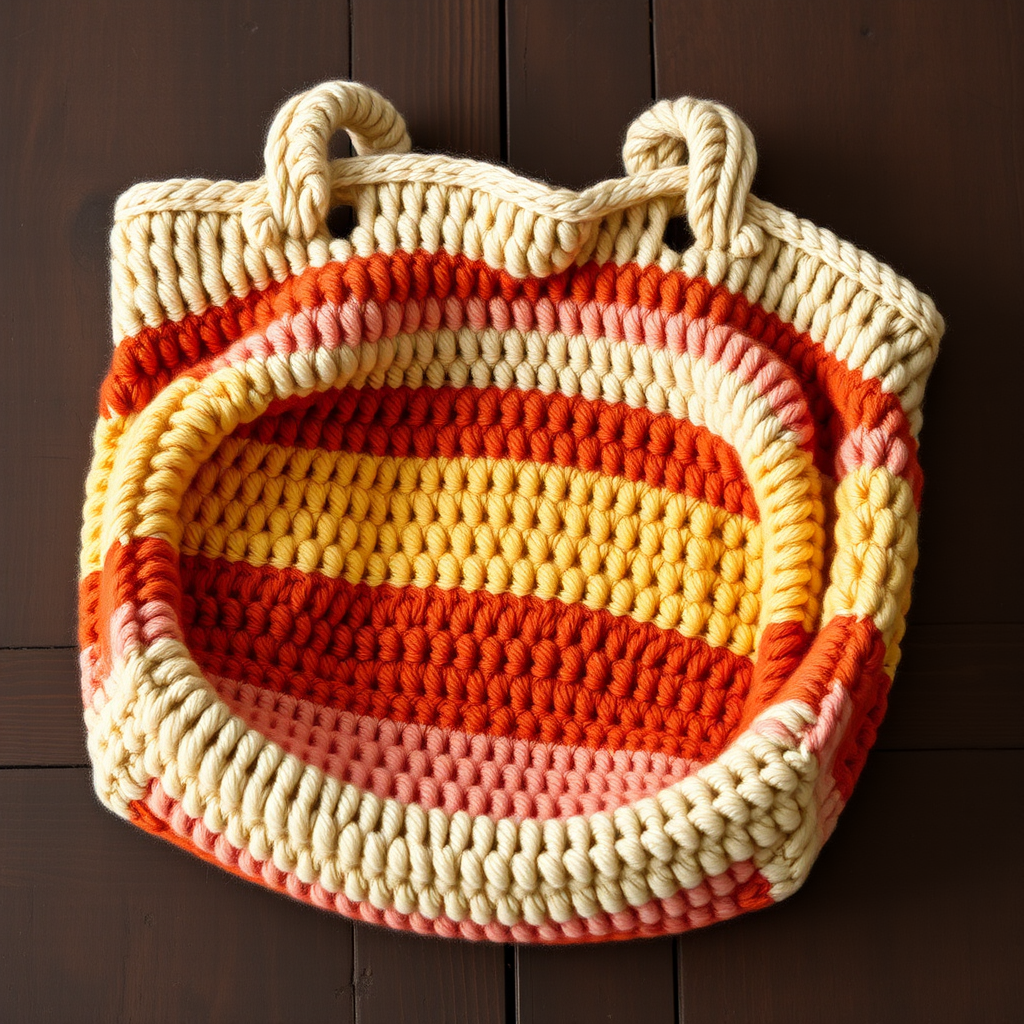
Lagoon Treasure Tote Free Pattern

Dive Into Summer: The Lagoon Treasure Tote Free Crochet Pattern
Are you ready to hook up the ultimate accessory for your next beach day or farmers market run? The Lagoon Treasure Tote is a stunning, sea-inspired crochet project that mimics the look of a woven treasure basket. With its dense, textured single crochet stitch and vibrant coastal color palette, this bag is as sturdy as it is beautiful.
This free pattern is perfect for intermediate beginners looking to move beyond flat squares. You will practice working in continuous rounds, changing colors, and creating a professional-looking strap. The repetitive nature of the body makes it a wonderfully meditative project, while the striped color changes keep things visually exciting. Let’s grab our hooks and dive into this treasure!
Materials Needed
Before we set sail, let's gather our supplies. Because this bag is designed to hold treasures, we want a sturdy, durable fiber.
- Yarn: Worsted weight cotton yarn in three colors. Cotton is essential here as it holds its shape well and gets stronger when wet.
- Main Color (MC): Ocean Teal (approx. 300 yards)
- Contrast A: Sandy Beige (approx. 150 yards)
- Contrast B: Coral Pink (approx. 150 yards)
- Hook: 5.0 mm crochet hook (US H-8)
- Notions: Yarn needle for weaving in ends, stitch marker, and scissors.
Gauge & Size
To ensure your tote turns out the perfect size, it is crucial to check your gauge.
- Gauge: 14 sc x 16 rows = 4 inches in single crochet.
- Finished Size: Approximately 12 inches wide and 12 inches tall (excluding handles).
Step-by-Step Instructions
Note: This bag is worked in continuous rounds from the bottom up. Do not join at the end of rounds unless specified. Use a stitch marker to keep track of the beginning of each round.
Part 1: The Base (Worked in MC)
We start by creating a flat, oval base. This gives the bag a roomy bottom.
- Foundation: With MC, ch 2.
- Round 1: Work 6 sc in the second ch from the hook. (6 sts)
- Round 2: 2 sc in each st around. (12 sts)
- Round 3: (Sc in next st, 2 sc in next st) around. (18 sts)
- Round 4: (Sc in next 2 sts, 2 sc in next st) around. (24 sts)
- Round 5: (Sc in next 3 sts, 2 sc in next st) around. (30 sts)
- Round 6: (Sc in next 4 sts, 2 sc in next st) around. (36 sts)
- Round 7: (Sc in next 5 sts, 2 sc in next st) around. (42 sts)
- Round 8: (Sc in next 6 sts, 2 sc in next st) around. (48 sts)
- Round 9: (Sc in next 7 sts, 2 sc in next st) around. (54 sts)
- Round 10: (Sc in next 8 sts, 2 sc in next st) around. (60 sts)
- Round 11: (Sc in next 9 sts, 2 sc in next st) around. (66 sts)
- Round 12: (Sc in next 10 sts, 2 sc in next st) around. (72 sts)
Fasten off MC and weave in the end securely. Your base should now be a flat circle/oval with 72 stitches around the edge.
Part 2: The Body (Striped Rounds)
Now we build the walls of the tote. We will work 1 sc in each stitch around for every round. The magic happens with the color changes. Follow this sequence strictly to achieve the Lagoon look.
Color Sequence Key: A = Contrast A (Beige), MC = Ocean Teal, B = Contrast B (Coral).
- Round 13: With Contrast A, sc in each st around. (72)
- Round 14: With MC, sc in each st around. (72)
- Round 15: With Contrast B, sc in each st around. (72)
- Round 16: With MC, sc in each st around. (72)
- Round 17: With Contrast A, sc in each st around. (72)
- Round 18: With MC, sc in each st around. (72)
- Round 19: With Contrast B, sc in each st around. (72)
- Round 20: With MC, sc in each st around. (72)
- Round 21: With Contrast A, sc in each st around. (72)
- Round 22: With MC, sc in each st around. (72)
- Round 23: With Contrast B, sc in each st around. (72)
- Round 24: With MC, sc in each st around. (72)
- Round 25: With Contrast A, sc in each st around. (72)
- Round 26: With MC, sc in each st around. (72)
- Round 27: With Contrast B, sc in each st around. (72)
- Round 28: With MC, sc in each st around. (72)
- Round 29: With Contrast A, sc in each st around. (72)
- Round 30: With MC, sc in each st around. (72)
- Round 31: With Contrast B, sc in each st around. (72)
- Round 32: With MC, sc in each st around. (72)
- Round 33: With Contrast A, sc in each st around. (72)
- Round 34: With MC, sc in each st around. (72)
- Round 35: With Contrast B, sc in each st around. (72)
- Round 36: With MC, sc in each st around. (72)
- Round 37: With Contrast A, sc in each st around. (72)
- Round 38: With MC, sc in each st around. (72)
- Round 39: With Contrast B, sc in each st around. (72)
- Round 40: With MC, sc in each st around. (72)
- Round 41: With Contrast A, sc in each st around. (72)
- Round 42: With MC, sc in each st around. (72)
- Round 43: With Contrast B, sc in each st around. (72)
- Round 44: With MC, sc in each st around. (72)
- Round 45: With Contrast A, sc in each st around. (72)
- Round 46: With MC, sc in each st around. (72)
- Round 47: With Contrast B, sc in each st around. (72)
- Round 48: With MC, sc in each st around. (72)
- Round 49: With Contrast A, sc in each st around. (72)
- Round 50: With MC, sc in each st around. (72)
- Round 51: With Contrast B, sc in each st around. (72)
- Round 52: With MC, sc in each st around. (72)
- Round 53: With Contrast A, sc in each st around. (72)
- Round 54: With MC, sc in each st around. (72)
- Round 55: With Contrast B, sc in each st around. (72)
- Round 56: With MC, sc in each st around. (72)
- Round 57: With Contrast A, sc in each st around. (72)
- Round 58: With MC, sc in each st around. (72)
- Round 59: With Contrast B, sc in each st around. (72)
- Round 60: With MC, sc in each st around. (72)
Fasten off MC. Tip: When changing colors, do not cut the yarn if you will use it again soon. Carry it up the inside of the bag to reduce ends to weave in.
Part 3: Top Edging
This creates a neat, finished border at the top of the bag.
- Round 61: With Contrast A, sc in each st around. (72)
- Round 62: With MC, sc in each st around. (72)
- Round 63: With Contrast B, sc in each st around. (72)
Fasten off and weave in the end.
Part 4: Handles (Make 2)
These straps are crocheted flat and then folded to create a thick, sturdy handle.
- With MC, ch 80.
- Row 1: Sc in the second ch from the hook and in each ch across. (79 sts)
- Row 2: Ch 1, turn, sc in each st across. (79 sts)
- Fasten off, leaving a long tail (approx. 12 inches) for sewing.
Part 5: Assembly
This is where the bag comes together!
- Create the Strap: Fold each handle piece in half lengthwise (bringing the long edges together). Sew the long edges together using the yarn needle and the long tail to create a sturdy, double-thick strap.
- Position the Handles: Place the bag flat. Attach one handle to the inside of the bag at one side, and the other handle to the inside of the opposite side. Ensure the handles are centered and about 2 inches down from the top edge.
- Sew Securely: Using the yarn needle and the long tails, sew the handles firmly to the inside of the bag. Use a whip stitch or backstitch, going through the handle and the bag body several times to ensure it can hold heavy treasures.
Finishing Touches
Weave in all remaining ends with your yarn needle. Give your bag a gentle steam block or a light spray with water and shape it if necessary.
Your Lagoon Treasure Tote is now complete! This sturdy, stylish bag is ready for sunshine, sandy toes, and all your market finds. The dense cotton stitch ensures it will hold its shape for years to come. Happy crocheting!