Lichen & Loam Textured Basket Free Pattern – Crochet a Forest Floor Storage Haven
Lichen & Loam Textured Basket Free Pattern – Crochet a Forest Floor Storage Haven
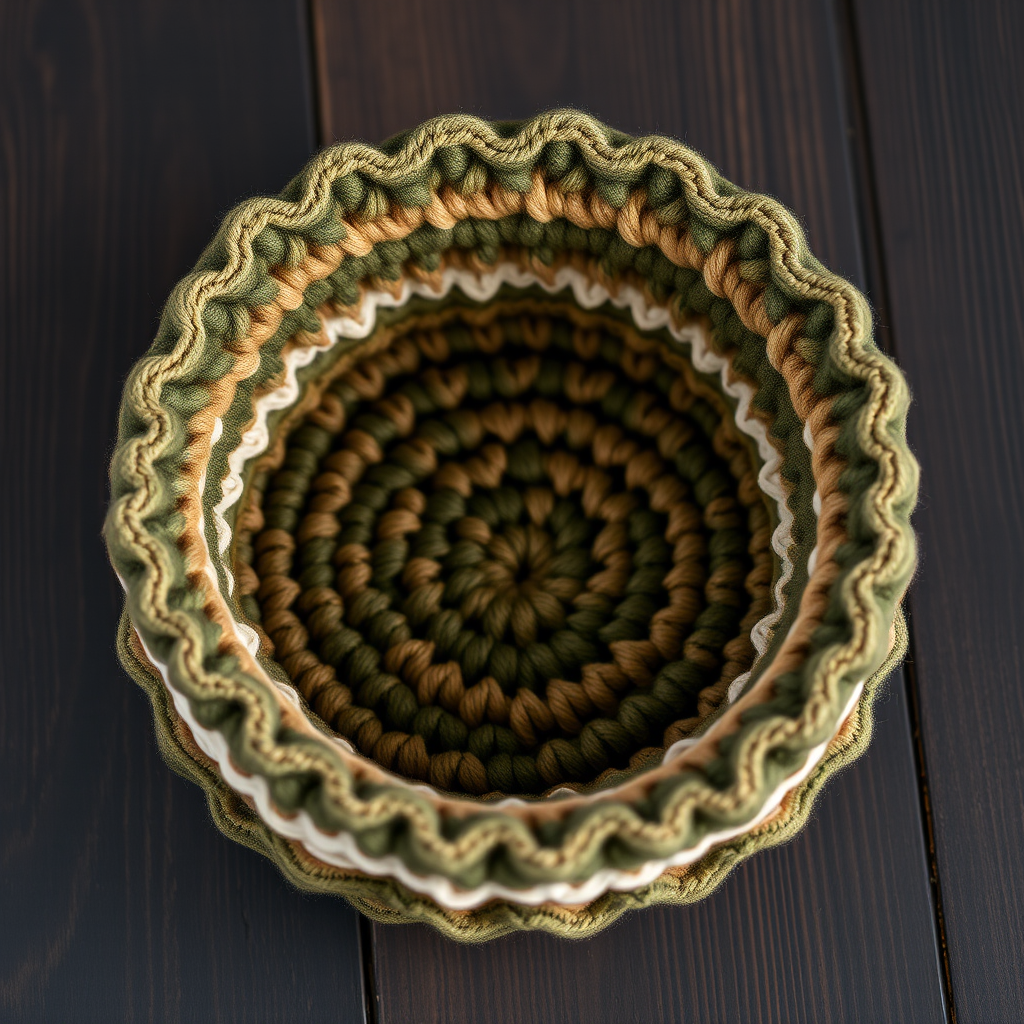
Bring the quiet beauty of a mossy forest floor into your home with this richly textured crochet basket. Worked in earthy, heathered tones of deep moss green, warm taupe, and soft cream, this sculptural basket is as functional as it is beautiful. The dense, textured stitch pattern creates a sturdy construction that's perfect for stashing yarn, toys, or cozy blankets. Whether you're an experienced crocheter looking for a satisfying project or a beginner ready to tackle your first home decor piece, this pattern is designed to guide you through every step with clarity and ease.
The Lichen & Loam Basket features a flat, circular base that flares gently outward as it rises, creating a generous storage space. The color-block stripes transition organically, mimicking the layered strata of a forest floor. The top edge is finished with a delicate scalloped shell border, adding a touch of elegance to the earthy aesthetic. With approximately 250g of worsted-weight cotton yarn, this project is both economical and rewarding.
Materials Needed
Before you begin, gather the following materials to ensure a smooth and enjoyable crocheting experience:
- Yarn: Worsted weight cotton or cotton-blend yarn in three colors:
- Color A: Deep moss green (approximately 100g)
- Color B: Warm taupe (approximately 80g)
- Color C: Soft cream (approximately 70g)
- Crochet Hook: 5.0 mm (H-8) crochet hook
- Stitch Markers: To track rounds (essential for spiral work)
- Yarn Needle: For weaving in ends and finishing
- Scissors: For cutting yarn
Gauge: 14 single crochet (sc) x 16 rows = 4 x 4 inches (10 x 10 cm) in single crochet. Be sure to check your gauge to ensure your basket turns out the correct size.
Step-by-Step Instructions
This basket is worked in continuous spirals from the base up, which means you will not join rounds unless specified. Use a stitch marker to track the beginning of each round. The continuous spiral technique creates a seamless, polished look.
Base
Round 1: With Color A, make a magic ring. Work 8 single crochet (sc) into the ring. Pull the tail to close the ring tightly. Place a stitch marker to mark the beginning of the round. (8 stitches)
Round 2: Work 2 sc in each stitch around. (16 stitches)
Round 3: (Sc in next stitch, 2 sc in next stitch) repeat around. (24 stitches)
Round 4: (Sc in next 2 stitches, 2 sc in next stitch) repeat around. (32 stitches)
Round 5: (Sc in next 3 stitches, 2 sc in next stitch) repeat around. (40 stitches)
Round 6: (Sc in next 4 stitches, 2 sc in next stitch) repeat around. (48 stitches)
Round 7: (Sc in next 5 stitches, 2 sc in next stitch) repeat around. (56 stitches)
Round 8: (Sc in next 6 stitches, 2 sc in next stitch) repeat around. (64 stitches)
Round 9: (Sc in next 7 stitches, 2 sc in next stitch) repeat around. (72 stitches)
Round 10: (Sc in next 8 stitches, 2 sc in next stitch) repeat around. (80 stitches)
Round 11: (Sc in next 9 stitches, 2 sc in next stitch) repeat around. (88 stitches)
Round 12: (Sc in next 10 stitches, 2 sc in next stitch) repeat around. (96 stitches)
Fasten off Color A and weave in the end securely. Your base should now be a flat, circular disc approximately 8-9 inches in diameter.
Sides
Round 13: With Color B, join with a slip stitch in any stitch. Chain 1. Working in the back loop only (this creates a crisp, defined edge where the base meets the sides), single crochet in each stitch around. (96 stitches)
Round 14-15: Single crochet in each stitch around (working through both loops now). (96 stitches)
Round 16: Switch to Color C. Single crochet in each stitch around. (96 stitches)
Round 17: (Sc in next 3 stitches, 2 sc in next stitch) repeat around. This increase will begin to flare the sides of the basket outward. (120 stitches)
Round 18: Single crochet in each stitch around. (120 stitches)
Round 19: Switch to Color A. Single crochet in each stitch around. (120 stitches)
Round 20: (Sc in next 4 stitches, 2 sc in next stitch) repeat around. (144 stitches)
Round 21: Single crochet in each stitch around. (144 stitches)
Round 22: Switch to Color B. Single crochet in each stitch around. (144 stitches)
Round 23: (Sc in next 5 stitches, 2 sc in next stitch) repeat around. (168 stitches)
Round 24: Single crochet in each stitch around. (168 stitches)
Round 25: Switch to Color C. Single crochet in each stitch around. (168 stitches)
Round 26: (Sc in next 6 stitches, 2 sc in next stitch) repeat around. (192 stitches)
Round 27: Single crochet in each stitch around. (192 stitches)
Round 28: Switch to Color A. Single crochet in each stitch around. (192 stitches)
Round 29: (Sc in next 7 stitches, 2 sc in next stitch) repeat around. (216 stitches)
Round 30: Single crochet in each stitch around. (216 stitches)
Round 31: Switch to Color B. Single crochet in each stitch around. (216 stitches)
Round 32: (Sc in next 8 stitches, 2 sc in next stitch) repeat around. (240 stitches)
Round 33: Single crochet in each stitch around. (240 stitches)
Round 34: Switch to Color C. Single crochet in each stitch around. (240 stitches)
Round 35: Single crochet in each stitch around. (240 stitches)
Round 36: Switch to Color A. Single crochet in each stitch around. (240 stitches)
Round 37: Single crochet in each stitch around. (240 stitches)
At this point, your basket should be approximately 6-7 inches tall with a gently flaring shape. The dense single crochet fabric should feel sturdy and substantial.
Edge – Scalloped Shell Border
Round 38: With Color A, chain 1. (Sc in next stitch, skip 1 stitch, 5 double crochet (dc) in next stitch, skip 1 stitch) repeat around. Join with a slip stitch to the first single crochet. Fasten off and weave in all ends.
This creates a beautiful scalloped shell border that adds a delicate, organic finish to the top edge of your basket. The shells echo the texture of lichen clusters found on forest floors.
Handles (Optional)
If you'd like to add handles to your basket for easy carrying, follow these instructions:
Step 1: Create 2 separate chains of 40 stitches each using Color A (or your preferred color).
Step 2: Attach each chain to opposite sides of the basket by slip stitching them onto the edge. Space them evenly so the basket hangs balanced.
Step 3: Work a row of single crochet over each chain to reinforce and add thickness. This will make the handles more comfortable to grip and more durable for carrying heavier items.
Step 4: Weave in all ends securely.
Finishing Touches
Once you've completed all rounds and woven in your ends, give your basket a gentle blocking to even out the stitches and help it hold its shape. Simply mist it lightly with water and shape it with your hands, then allow it to dry completely. The cotton yarn will hold its shape beautifully.
Your Lichen & Loam Textured Basket is now ready to use! Fill it with yarn for your next project, store toys in the nursery, or use it to corral cozy blankets in the living room. The earthy, organic aesthetic will bring a touch of the forest floor into any space.
This pattern is perfect for beginners and experienced crocheters alike. The continuous spiral technique is simple to master, and the repetitive increases make it easy to track your progress. The color changes add visual interest without complicating the pattern. Enjoy the meditative rhythm of the stitches as you create this beautiful, functional piece for your home.
Happy crocheting, and may your home be filled with the quiet beauty of the forest!


