Emerald Isle Blessing Wreath Free Pattern
How to Crochet the Emerald Isle Blessing Wreath: A Free St. Patrick's Day Pattern
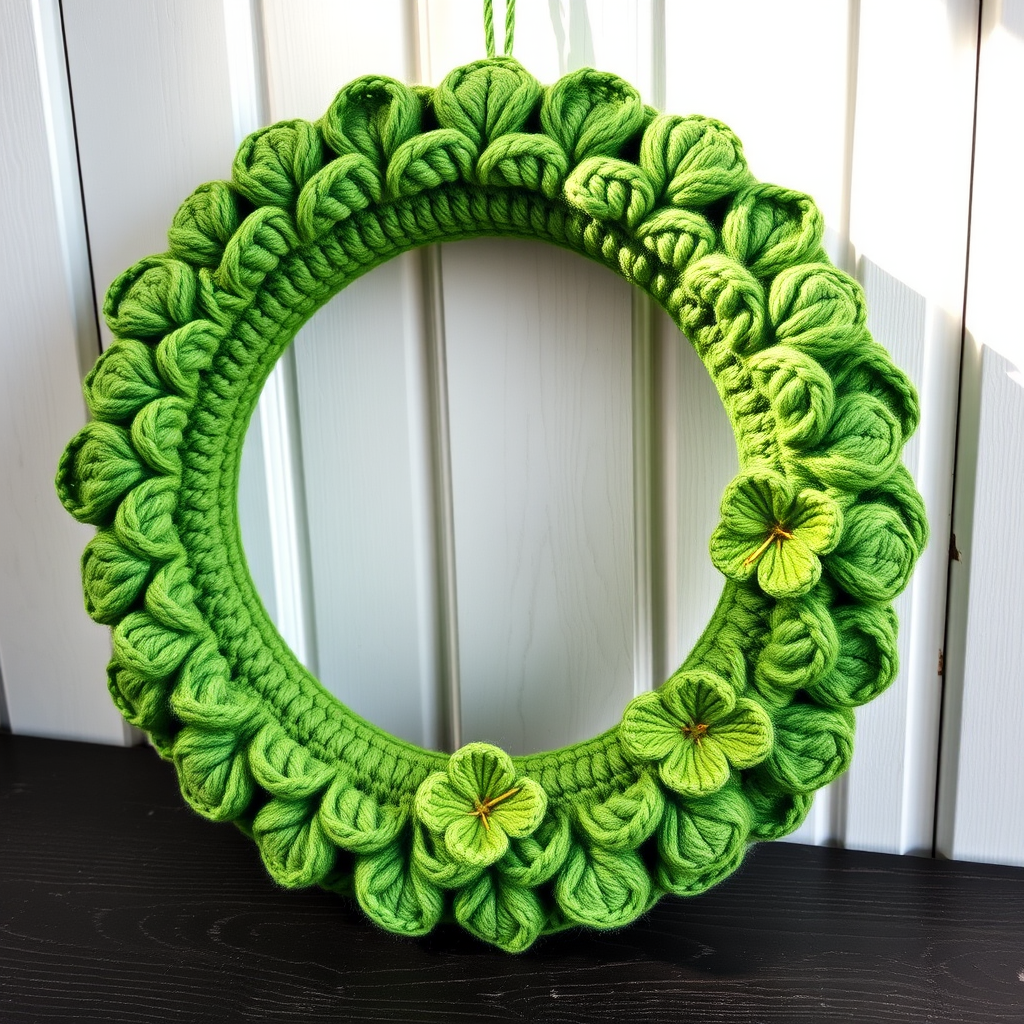
Celebrate the luck of the Irish this season by crafting a lush, textured wreath that brings a cozy, handcrafted touch to your front door. Made with soft worsted-weight yarn in rich greens and warm golds, this Emerald Isle Blessing Wreath is a charming project designed for both beginners and seasoned crocheters. The plump, round ring is covered in dimensional leaves and adorable shamrock motifs, creating a stunning piece of handmade home decor that will welcome guests with warmth and Irish charm.
This free crochet pattern is perfect for adding a festive touch to your St. Patrick's Day celebrations. The continuous spiral construction creates a thick, sturdy ring that holds its shape beautifully, while the textured leaves and shamrocks add visual interest and depth. Whether you're an experienced maker looking for a quick weekend project or a beginner ready to expand your skills, this wreath pattern offers a satisfying and rewarding crafting experience.
Materials Needed for Your Crochet Wreath
Before you begin, gather the following supplies to ensure a smooth and enjoyable crochet session:
Yarn Requirements
- Worsted weight yarn in shades of green: Approximately 200 yards of Kelly Green, 100 yards of Forest Green, and 50 yards of Mint
- Accent yarn: Approximately 20 yards of Gold or Yellow for the shamrock stems and hanging loop
Tools and Notions
- Crochet hook: H/8 (5.0 mm) crochet hook
- Stitch marker (to track your rounds)
- Yarn needle for weaving in ends and assembly
- Scissors
- Fiberfill stuffing (optional, for a plumper ring)
- 12-inch foam wreath form (alternative method, optional)
Note on gauge: Gauge is not critical for this project. Simply aim for a firm, consistent stitch tension to help the wreath hold its shape. If your stitches are too loose, the ring may become floppy.
Crochet Abbreviations Used in This Pattern
- ch = chain
- sc = single crochet
- hdc = half double crochet
- dc = double crochet
- sl st = slip stitch
- st(s) = stitch(es)
- rnd = round
- sc2tog = single crochet 2 together (decrease)
Step-by-Step Instructions for the Emerald Isle Blessing Wreath
This wreath is crocheted in a continuous spiral, creating a thick, sturdy ring. You will work in rounds without joining, using a stitch marker to keep track of your place. Follow these detailed instructions carefully for best results.
Part 1: Crocheting the Base Ring
Step 1: Begin the Foundation
With Kelly Green yarn, chain 6 stitches. Join with a slip stitch to the first chain to form a ring. This will be the center of your wreath's core.
Step 2: Round 1 - Initial Increases
Chain 1 (this does not count as a stitch). Work 12 single crochet stitches into the center ring. Do not join with a slip stitch. Place your stitch marker in the first stitch to mark the beginning of the round. You should now have 12 stitches.
Step 3: Round 2 - Doubling Up
Work 2 single crochet stitches in each stitch around the entire round. This will double your stitch count. You should now have 24 stitches. Move your stitch marker to the first stitch of this round.
Step 4: Round 3 - Even Increases
*Single crochet in the next stitch, then work 2 single crochet in the following stitch.* Repeat from * to * around the entire round. You should now have 36 stitches. Move your marker up.
Step 5: Round 4 - More Increases
*Single crochet in the next 2 stitches, then work 2 single crochet in the following stitch.* Repeat from * to * around. You should now have 48 stitches. Move your marker.
Step 6: Rounds 5-10 - Straight Crochet
For the next 6 rounds (Rounds 5 through 10), simply single crochet in each stitch around without any increases. You will maintain 48 stitches in each round. This creates the tall, tube-like body of your wreath ring. Remember to move your stitch marker at the start of each new round.
Step 7: Round 11 - Beginning Decreases
*Single crochet in the next 2 stitches, then single crochet 2 together (sc2tog) to decrease.* Repeat from * to * around the round. You should now have 36 stitches. Move your marker.
Step 8: Round 12 - Continuing Decreases
*Single crochet in the next stitch, then single crochet 2 together (sc2tog).* Repeat from * to * around. You should now have 24 stitches. Move your marker.
Step 9: Round 13 - Final Decreases
Single crochet 2 together (sc2tog) around the entire round. You should now have 12 stitches remaining.
Step 10: Closing the Tube
Fasten off your yarn, leaving a long tail of approximately 18-20 inches for sewing. Stuff the tube lightly with fiberfill to make it plump and round. Using your yarn needle, weave the tail through the remaining 12 stitches and pull tight to close the opening. Sew the opening closed securely.
Step 11: Forming the Ring Shape
To create the wreath ring shape, bring the two ends of your tube together. Using the yarn tail, sew the ends together securely to form a complete circle. Weave in the end. Alternative method: If you prefer, you can crochet around a foam wreath form by working single crochet stitches over the form, but the stuffed tube method described here gives a softer, plumper look.
Part 2: Creating the Textured Leaves
You will need to make 8-10 leaves to cover your wreath beautifully. Each leaf is worked in rows, not rounds.
Step 1: Foundation Chain
With Forest Green yarn, chain 10 stitches.
Step 2: First Side of the Leaf
Row 1: Single crochet in the 2nd chain from your hook. Work a half double crochet in the next chain. Then work a double crochet in each of the next 3 chains. Work a half double crochet in the next chain, followed by a single crochet in the next chain.
Step 3: Creating the Leaf Point
Now you will create the pointed tip of the leaf. Chain 3 stitches, then work a slip stitch into the last chain you just worked in (the final chain of your foundation). This forms a small point at the tip of the leaf.
Step 4: Second Side of the Leaf
Now you will work back down the other side of the foundation chain. Single crochet in the next chain, work a half double crochet in the next chain, then work a double crochet in each of the next 3 chains. Work a half double crochet in the next chain, and finish with a single crochet in the last chain.
Step 5: Finishing the Leaf
Slip stitch to the first single crochet of the round to close the leaf shape. Fasten off, leaving a long tail (about 8-10 inches) for sewing onto the wreath.
Step 6: Repeat
Repeat these steps to create 8-10 leaves total. For visual variety, you can make some leaves in Forest Green and some in Mint, or alternate between the two colors.
Part 3: Making the Shamrock Motifs
You will need to make 3 shamrock motifs for this wreath.
Step 1: Foundation Ring
With Kelly Green yarn, chain 4 stitches. Join with a slip stitch to the first chain to form a ring.
Step 2: First Leaf of the Shamrock
Round 1: Chain 3 (this counts as your first double crochet). Work 2 double crochet stitches into the ring. Chain 3, then slip stitch into the ring. This completes your first leaf.
Step 3: Second and Third Leaves
Repeat the leaf pattern two more times: Chain 3, work 2 double crochet into the ring, chain 3, slip stitch into the ring. After completing the third leaf, chain 3 and slip stitch into the ring one final time to finish.
Step 4: Finishing the Motif
Fasten off and weave in the end. Your shamrock should now have three distinct leaves.
Step 5: Adding the Stem
Using the Gold yarn and a yarn needle, embroider a small stem on each shamrock using a backstitch. Start at the base of the leaves and stitch downward about 1/4 inch to create a delicate stem.
Part 4: Assembling Your Wreath
Step 1: Arranging the Leaves and Shamrocks
Lay your wreath ring flat on a table. Arrange the leaves and shamrock motifs evenly around the front surface of the wreath. Play with the placement until you achieve a balanced, pleasing composition. The leaves should overlap slightly to create a lush, full appearance.
Step 2: Sewing the Decorations
Using the yarn tails left on each leaf and shamrock, sew them securely onto the wreath ring with your yarn needle. Make sure to weave the needle through the wreath body, not just the surface stitches, to ensure they stay firmly attached. Weave in all ends as you go.
Step 3: Creating the Hanging Loop
Cut a 10-inch piece of Gold yarn. Fold it in half to create a loop. Tie the two loose ends together in a secure knot. Using your yarn needle, sew the knotted end of the loop to the top back of the wreath. Make sure the loop is centered and secure.
Step 4: Final Weaving
Weave in all remaining yarn ends securely using your yarn needle. Trim any excess yarn with scissors.
Finishing Touches and Display Tips
Gently shape your wreath, fluffing the leaves and adjusting the shamrocks so they sit nicely against the ring. Your Emerald Isle Blessing Wreath is now ready to hang! The rich greens and gold accents will look stunning against a white wooden door, and the textured crochet work will catch the light beautifully.
This wreath makes a wonderful handmade gift for friends and family, or a lovely addition to your own seasonal decor. The soft, cozy appearance and visible stitch texture add depth and charm that store-bought decorations simply can't replicate. Enjoy your beautiful creation and the luck of the Irish it brings to your home!