Kiva Step Asymmetric Waffle Collar Free Crochet Pattern for Cats
Introduction
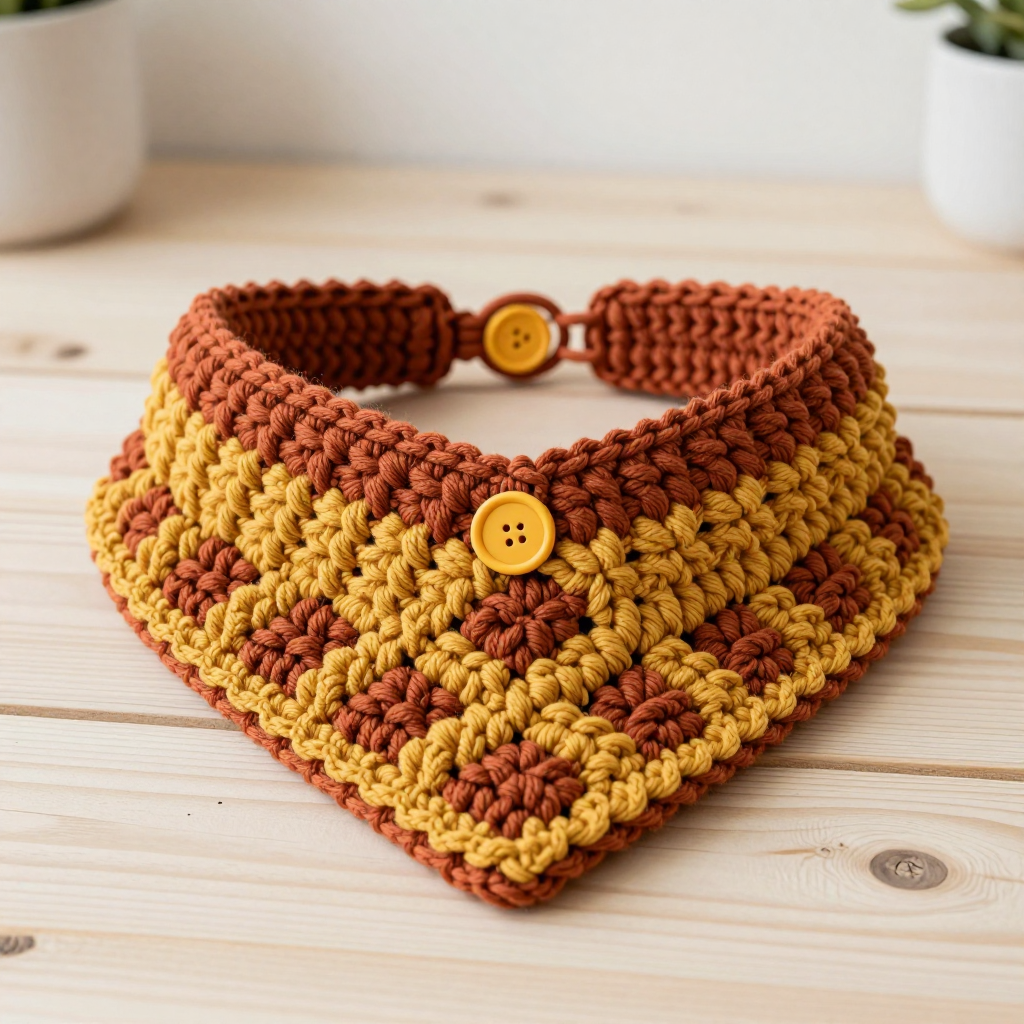
Welcome! If you have never held a crochet hook before, you are in exactly the right place. This Kiva Step Asymmetric Waffle Collar is a small, forgiving project that lets you practice the most important beginner stitches while making something genuinely beautiful. It is perfect for total beginners because it is flat, quick, and only uses a handful of stitches you will learn in minutes. The finished piece is a soft, plush cat collar with a narrow terracotta band and a bold stepped panel of raised waffle squares that march diagonally from one shoulder to the other in warm terracotta and golden mustard chenille. It feels velvety and squishy in your hands, looks sculptural and desert-boho, and closes with a simple button loop. Let's make one together, one stitch at a time.
Materials Needed
- Yarn: Chenille plush yarn, super bulky (weight 6), approx. 55 yds total — 30 yds terracotta (Color A) and 25 yds mustard (Color B).
- Scrap yarn: A small amount of any leftover yarn to stuff the button.
- Main hook: 6.5 mm (US K-10.5) crochet hook.
- Spare hook: 5.5 mm (US I-9) crochet hook for the button loop and button.
- Stitch markers: At least 4, to mark squares and corners.
- Tapestry needle: A large-eye blunt needle for weaving in ends and sewing on the loop and button.
- Scissors: Sharp craft scissors for cutting yarn.
- Finished size: Fits a neck circumference of 8–10 in / 20–25 cm (adjustable via button placement). The collar band is approx. 1.75 in / 4.5 cm wide and the stepped panel is approx. 3.5 in / 9 cm deep at its widest point.
Abbreviations and Beginner Glossary
- ch — chain: yarn over the hook, pull the loop through the loop on your hook. This makes a small link.
- st / sts — stitch / stitches: one completed loop of yarn in your work.
- sl st — slip stitch: insert hook into the stitch, yarn over, pull through both the stitch and the loop on your hook at once. Makes a tiny, flat join.
- sc — single crochet: insert hook into stitch, yarn over, pull up a loop (2 loops on hook), yarn over, pull through both loops (1 loop left).
- dc — double crochet: yarn over, insert hook into stitch, yarn over, pull up a loop (3 loops on hook), yarn over, pull through 2 loops, yarn over, pull through last 2 loops.
- FPdc — front-post double crochet: work a dc, but instead of going into the top of the stitch, wrap your hook around the front of the post (the vertical body) of the stitch below. This pushes the stitch forward and creates a raised ridge.
- BPdc — back-post double crochet: same as FPdc, but wrap your hook around the back of the post of the stitch below. This pushes the stitch backward.
- sc2tog — single crochet two together (a decrease): insert hook into first stitch, pull up a loop, insert hook into next stitch, pull up a loop (3 loops on hook), yarn over, pull through all 3 loops. Turns 2 stitches into 1.
- magic ring — an adjustable loop of yarn you crochet into, then pull tight to close the center hole.
- turn — flip your work over so you can work back across the row you just made.
- fasten off — cut the yarn leaving a tail, then pull the tail all the way through the last loop to lock it.
- weave in ends — thread a yarn tail onto a tapestry needle and sew it back and forth through the fabric to hide it.
Gauge
Gauge: 8 dc x 4 rows = 4 in / 10 cm in waffle stitch (front-post dc pattern) with the 6.5 mm hook.
Gauge means how many stitches and rows fit into a set measurement. It matters because if your stitches are bigger or smaller than mine, your collar will come out the wrong size and the button may not fit. To check, make a swatch: with Color A and the 6.5 mm hook, ch 16. Row 1: dc in the 4th ch from hook and each ch across (13 dc). Row 2: ch 3, turn, dc in next 2 dc, *FPdc around next dc, dc in next 3 dc; repeat from * to end, FPdc around last dc. Row 3: ch 3, turn, dc in next 2 dc, *BPdc around next st, dc in next 3 sts; repeat from * to end, BPdc around last st. Repeat Rows 2–3 until the swatch is 4 in / 10 cm tall. Block it lightly, measure, and if you have more stitches than 8 per 4 in, go down a hook size; if fewer, go up a hook size.
Beginner Tips Before You Start
- Count every row. Place a stitch marker in the first stitch of each row so you never lose your place.
- Do not pull the yarn too tight. Chenille is fluffy and shows tension mistakes; keep your loops relaxed and even.
- Remember the ch 3 rule. The ch 3 at the start of a row counts as your first dc; the ch 2 does not count as a stitch.
- Mark your squares. Put a stitch marker in the 5th stitch of each finished square — that is where the next square begins.
- Change color on the last stitch. Make the color change on the final yarn-over of the last stitch of the row, so the new color appears cleanly on the next row.
- Practice the FPdc and BPdc first. Work a few on your gauge swatch until wrapping around the post feels natural.
Step-by-Step Instructions
Stitch Notes
Waffle stitch is worked in double crochet (dc) with front-post double crochet (FPdc) and back-post double crochet (BPdc). Each waffle square is 3 dc worked between raised posts, framed by FPdc on both sides. The ch 3 at the start of a row counts as the first dc; the ch 2 does not count as a stitch. Unless otherwise noted, turn with ch 3. Color changes are made on the final yarn-over of the last stitch of a row.
Part 1 — Collar Band (worked first, in one piece)
With the 6.5 mm hook and Color A, ch 9.
Row 1: dc in the 4th ch from hook and in each ch across (6 dc). Ch 3, turn.
Row 2: dc in each dc across (6 dc). Ch 3, turn.
Rows 3–24: Repeat Row 2, changing to Color B on the last stitch of Row 24. (6 dc; band measures approx. 9 in / 23 cm long. To adjust length, add or subtract rows in multiples of 2.)
Do not fasten off; continue to Part 2.
Part 2 — Stepped Waffle Panel (worked along one long edge of the band)
The panel is built as a series of offset waffle squares that step down and across, creating the diagonal feature line. Each square is 4 sts wide and 4 rows tall. Work along the long edge of the band, attaching with slip stitches between squares.
Foundation along band edge: With Color B still attached, ch 1, turn the band so the long edge faces you. Work 1 sc in each row-end along the edge (24 sc). Ch 3, turn.
Square 1 (Color B, bottom-left of the step)
Row 1: dc in next 3 sc, FPdc around next sc, dc in next 3 sc, FPdc around next sc, dc in next 3 sc, FPdc around next sc, dc in next 3 sc, FPdc around next sc, dc in next 3 sc (20 sts). Ch 3, turn.
Row 2: dc in next 3 sts, BPdc around next st, dc in next 3 sts, BPdc around next st, dc in next 3 sts, BPdc around next st, dc in next 3 sts, BPdc around next st, dc in next 3 sts (20 sts). Ch 3, turn.
Row 3: Repeat Row 1. (20 sts)
Row 4: Repeat Row 2. (20 sts) Fasten off Color B.
Square 2 (Color A, offset one square up and to the right)
Join Color A with sl st in the 5th st of the last row of Square 1.
Row 1: ch 3, dc in next 2 sts, FPdc around next st, dc in next 3 sts, FPdc around next st, dc in next 3 sts, FPdc around next st, dc in next 3 sts, FPdc around next st, dc in next 2 sts (16 sts). Ch 3, turn.
Row 2: dc in next 2 sts, BPdc around next st, dc in next 3 sts, BPdc around next st, dc in next 3 sts, BPdc around next st, dc in next 3 sts, BPdc around next st, dc in next 2 sts (16 sts). Ch 3, turn.
Row 3: Repeat Row 1. (16 sts)
Row 4: Repeat Row 2. (16 sts) Fasten off Color A.
Square 3 (Color B, offset one square up and to the right)
Join Color B with sl st in the 5th st of the last row of Square 2. Work Rows 1–4 as for Square 2, using Color B (16 sts). Fasten off Color B.
Square 4 (Color A, offset one square up and to the right)
Join Color A with sl st in the 5th st of the last row of Square 3. Work Rows 1–4 as for Square 2, using Color A (16 sts). Fasten off Color A.
Square 5 (Color B, final step, narrowest point)
Join Color B with sl st in the 5th st of the last row of Square 4.
Row 1: ch 3, dc in next 2 sts, FPdc around next st, dc in next 3 sts, FPdc around next st, dc in next 2 sts (12 sts). Ch 3, turn.
Row 2: dc in next 2 sts, BPdc around next st, dc in next 3 sts, BPdc around next st, dc in next 2 sts (12 sts). Ch 3, turn.
Row 3: Repeat Row 1. (12 sts)
Row 4: Repeat Row 2. (12 sts) Fasten off Color B and weave in all ends.
Part 3 — Edging
With the 6.5 mm hook and Color B, join with sl st at the bottom-left corner of the panel.
Round 1: ch 1, sc evenly around the entire outer edge of the panel and band (approx. 1 sc per st or row-end, working 2 sc in each corner to turn cleanly). Join with sl st to first sc. Fasten off and weave in ends.
Part 4 — Button Loop and Button
Loop: With the 5.5 mm hook and Color A, ch 8; sl st in the 2nd ch from hook and each ch across (7 sl st). Fasten off, leaving a 6 in / 15 cm tail. Fold the loop in half and sew the two ends securely to the right end of the band, centered on the band width.
Button: With the 5.5 mm hook and Color B, make a magic ring.
Round 1: 6 sc in ring (6).
Round 2: 2 sc in each sc around (12).
Round 3: sc in each sc around (12).
Stuff lightly with yarn scraps.
Round 4: sc2tog around (6).
Round 5: sc2tog around (3). Fasten off, draw the tail through remaining sts, and pull tight. Sew the button to the left end of the band, centered, opposite the loop.
Assembly and Finishing
Seaming: There is no seaming in this project — the band and panel are worked in one continuous piece, and the loop and button are the only pieces you attach. Thread each yarn tail onto your tapestry needle and sew it back and forth through the back of the fabric for about 1 in, then trim close.
Weaving in ends: Work on the wrong side of the collar so no tails show on the front. Change direction once as you weave so the tail cannot work loose.
Blocking: Lightly steam-block the panel to open the waffle texture. Hold a steam iron an inch above the fabric (never press it down) and let the steam relax the stitches, being careful not to flatten the chenille. Let it dry completely.
Final check: Test the button closure and adjust the loop size if needed for a comfortable fit. Always supervise pets while wearing the collar and remove it for sleep.
Pro Tips and Variations
- Change the colors: Swap terracotta and mustard for sage and cream, or charcoal and blush, to match your cat's coat or your home.
- Adjust the size: For a larger neck, add rows to the band in multiples of 2 (each pair adds about ¾ in / 2 cm) and add one more waffle square to the step.
- Substitute yarn: Any super bulky (weight 6) yarn works; just check your gauge again, since chenille and smooth yarns behave differently.
- Make it a dog collar: Work a longer band and add a second button for a bolder, adjustable fit on small dogs.


