Emberfall Geometric Throw Free Pattern – A Modern Knit Blanket
Emberfall Geometric Throw Free Pattern – A Modern Knit Blanket
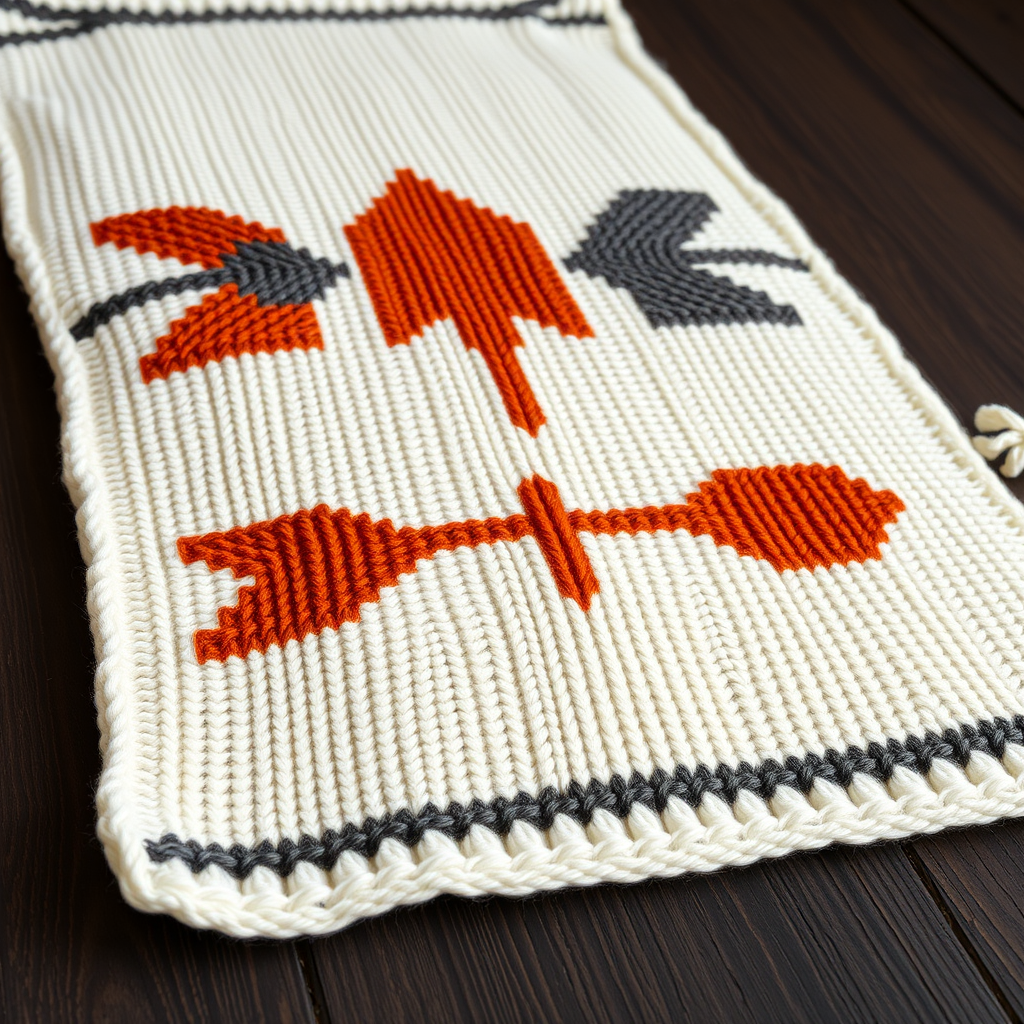
Wrap yourself in the warmth of a modern geometric design with this stunning knit blanket, featuring a bold arrow motif that evokes ancient tribal artistry. This cozy throw is perfect for adding a touch of contemporary craftsmanship to any living space. Whether you're an experienced knitter looking for a rewarding project or a beginner ready to tackle your first large-scale piece, the Emberfall Geometric Throw offers a satisfying blend of simple techniques and striking visual impact. The rich cream background, punctuated by burnt orange and charcoal gray arrows, creates a piece that feels both timeless and on-trend, making it a beautiful addition to any sofa, armchair, or bed.
Materials Needed
Before you begin, gather the following materials to ensure a smooth and enjoyable knitting experience. Having everything ready will help you maintain your flow and focus on the creative process.
- Yarn: Worsted weight yarn in three colors:
- Color A (Cream - MC): Approximately 1200 yards
- Color B (Burnt Orange - CC1): Approximately 800 yards
- Color C (Charcoal Gray - CC2): Approximately 600 yards
- Needles: US Size 8 (5.0 mm) knitting needles. A circular needle (at least 32 inches long) is recommended to accommodate the large number of stitches, though you will be working flat.
- Gauge: 18 stitches and 24 rows = 4 inches in stockinette stitch. Always take time to check your gauge to ensure your finished blanket matches the intended dimensions.
- Notions: Stitch markers (optional but helpful), a tapestry needle for weaving in ends, and blocking pins for finishing.
Step-by-Step Instructions
This blanket is knitted in one piece using intarsia and duplicate stitch to create the arrow motif. The pattern is worked flat in rows. Follow these detailed instructions carefully, and you'll be amazed at the beautiful result. Remember to take your time, especially with the color changes, to ensure a polished finish.
Abbreviations
- K = knit
- P = purl
- St(s) = stitch(es)
- RS = right side
- WS = wrong side
- MC = main color (Cream)
- CC1 = contrast color 1 (Burnt Orange)
- CC2 = contrast color 2 (Charcoal Gray)
Getting Started: Cast On and Border
Cast On: With MC, cast on 120 stitches. Use a method you're comfortable with, such as the long-tail cast on, ensuring it's not too tight to maintain a stretchy edge.
Border: Work in garter stitch (knit every row) for 10 rows. This creates a sturdy, non-curling edge that frames your design beautifully. After completing these 10 rows, you'll be ready to begin the main body of the blanket.
Main Body: Creating the Arrow Motif
The main body is where the magic happens. You'll be working with multiple balls of yarn simultaneously, using the intarsia technique. The key to a clean finish is twisting the yarns at every color change to prevent holes from forming.
Row 1 (RS): Knit 10 MC, then follow the chart for the arrow motif across the next 100 stitches, knit last 10 MC. (Use separate balls of yarn for each color section, twisting yarns at color changes to avoid holes.)
Understanding the Arrow Motif Chart (Worked over 100 stitches and 100 rows)
The motif consists of a central arrow pointing upward, flanked by smaller arrows on each side. Here’s a breakdown of how to construct each element:
- Central Arrow (CC2 - Charcoal Gray): Work a shaft of 4 stitches wide, starting at row 1 and increasing to 10 stitches wide at the arrowhead (rows 40-60), then decreasing back to 4 stitches at row 100. The arrowhead is formed by increasing 1 stitch on each side of the shaft every other row for 20 rows, then decreasing symmetrically.
- Flanking Arrows (CC1 - Burnt Orange): These are smaller, each 2 stitches wide at the base, expanding to 6 stitches at the head (rows 30-50), then decreasing. Position them symmetrically on either side of the central arrow.
- Background: Worked in MC (Cream).
Rows 2-100: Continue following the chart, working the border stitches in MC garter stitch on each side. On WS rows, purl the background stitches and knit the border stitches. Remember to always twist your yarns when switching colors to keep the fabric seamless.
Detailed Guide for the Central Arrow (Rows 1-100)
To help you visualize, here's a more detailed breakdown of the central arrow's construction. Assume the central arrow is centered within the 100-stitch motif area.
- Rows 1-20 (Shaft): Work a 4-stitch wide shaft in CC2. This means you'll have 48 MC stitches on the left, 4 CC2 stitches, and 48 MC stitches on the right (within the 100-stitch section).
- Rows 21-40 (Shaft Expansion): Begin increasing 1 stitch on each side of the shaft every other row. On RS rows, after working the left MC section, add a CC2 stitch (by picking up the yarn from the previous row), work the shaft, then add another CC2 stitch before the right MC section. You'll now have 6 stitches in the shaft.
- Rows 41-60 (Arrowhead Formation): Continue increasing on each side every other row until you have 10 stitches in the shaft. This forms the widest part of the arrowhead.
- Rows 61-80 (Arrowhead Decrease): Now, begin decreasing 1 stitch on each side of the shaft every other row. To decrease, simply work 2 stitches together in CC2 at the beginning and end of the shaft section.
- Rows 81-100 (Shaft Decrease): Continue decreasing until you are back to 4 stitches wide. Work the remaining rows with a 4-stitch shaft to complete the arrow's tail.
Detailed Guide for the Flanking Arrows (Rows 1-100)
These smaller arrows follow a similar logic but are scaled down. Position them about 10-15 stitches away from the central arrow on each side.
- Rows 1-30 (Base): Work a 2-stitch wide shaft in CC1.
- Rows 31-50 (Expansion): Increase 1 stitch on each side every other row until you have 6 stitches.
- Rows 51-70 (Decrease): Decrease 1 stitch on each side every other row until you are back to 2 stitches.
- Rows 71-100 (Tail): Work the remaining rows with a 2-stitch shaft.
Pro Tip: Use a row counter or a piece of paper to track your rows. This is crucial for maintaining the symmetry of the arrows. Also, consider using separate small balls or bobbins for each color section to prevent tangling.
Completing the Blanket: Top Section and Border
After Row 100: You've completed the intricate motif. Now, work in MC stockinette stitch (knit on RS, purl on WS) for 20 rows. This provides a clean, calm space above the arrows, allowing the design to breathe.
Border: Work in garter stitch for 10 rows. This mirrors the bottom border and completes the frame of your blanket.
Bind Off: Bind off loosely in knit on the RS. A loose bind-off is essential to prevent the edge from pulling or curling. You can use a larger needle to bind off if you tend to knit tightly.
Finishing Touches
Weave in All Ends: Using your tapestry needle, carefully weave in all loose ends on the wrong side of the blanket. Take your time to ensure they are secure and invisible from the front.
Block the Blanket: Blocking is a crucial step that will transform your work. Soak the blanket in lukewarm water with a gentle wool wash, then gently squeeze out excess water (do not wring). Lay it flat on a clean towel, roll it up to remove more water, then lay it flat on a blocking mat. Pin the corners to ensure straight edges and the correct dimensions (approximately 50 inches wide and 60 inches long). Allow it to dry completely before unpinning.
Your Emberfall Geometric Throw is now complete! This beautiful, handcrafted piece is a testament to your skill and patience. It's perfect for cozying up on the couch, draping over a chair, or giving as a cherished handmade gift. Enjoy the warmth and beauty of your creation!