Cobblestone Comfort Throw Free Pattern – A Knitted Textured Heirloom
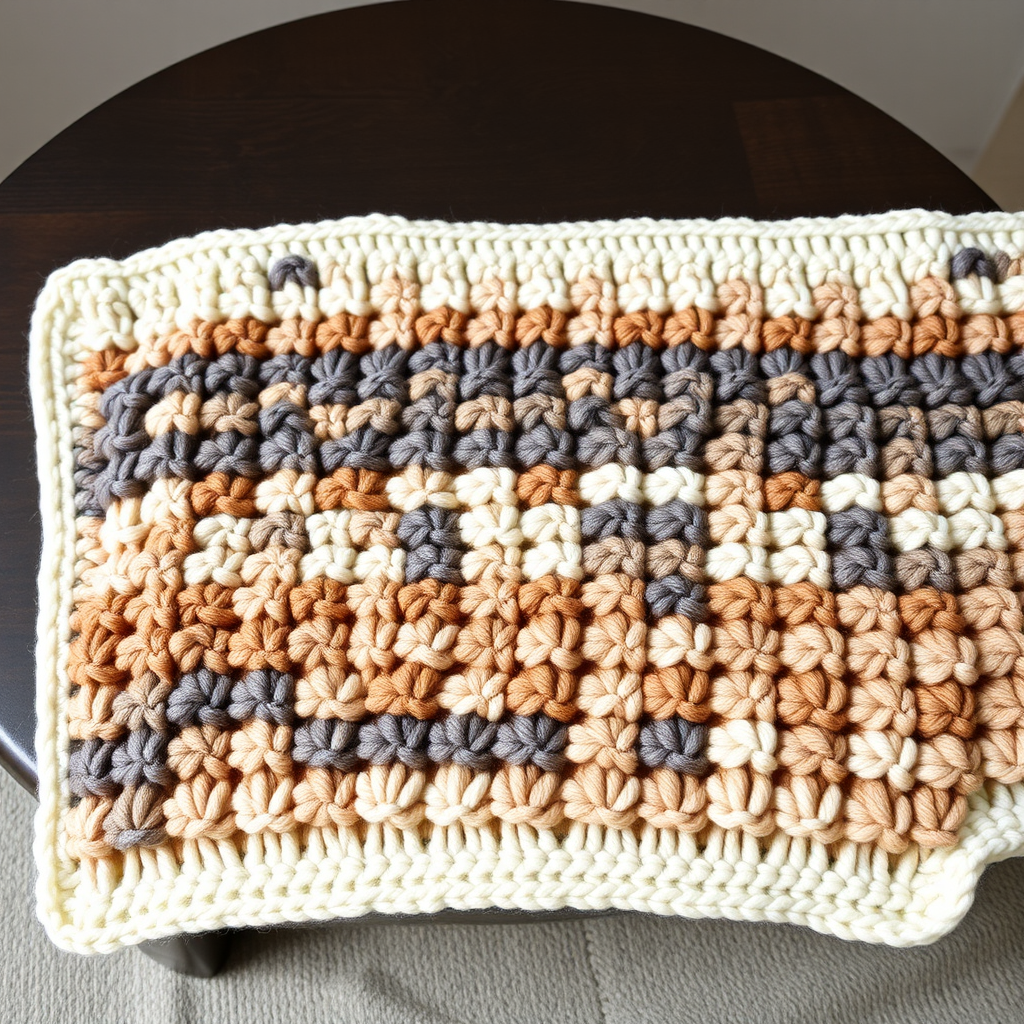
Cobblestone Comfort Throw Free Pattern – A Knitted Textured Heirloom
Wrap yourself in the timeless charm of a hand-knitted cobblestone-inspired throw, where each stitch mimics the cozy irregularity of a stone path. This pattern offers a meditative, rhythmic knit that yields a plush, tactile blanket perfect for chilly evenings. The Cobblestone Comfort Throw is more than just a blanket—it's an heirloom piece that combines rustic aesthetics with modern comfort, creating a stunning centerpiece for any living space.
This free knitting pattern is designed for intermediate knitters who are comfortable with basic stitches and eager to explore texture. The clever use of slipped stitches and yarn overs creates a raised, pebbled surface that's visually striking and wonderfully warm. With three earthy tones working in harmony, this throw will become your go-to companion for cozy nights in.
Materials Needed
Before you begin your knitting journey, gather these essential supplies:
Yarn
- Worsted weight yarn in 3 earthy tones:
- Color A: Cream – approximately 400g
- Color B: Warm Taupe – approximately 400g
- Color C: Soft Charcoal – approximately 400g
- Total yarn needed: approximately 1200g
Knitting Needles
- US 8 (5mm) circular knitting needles with a 32-inch cable
Additional Supplies
- Tapestry needle for weaving in ends
- Stitch markers (optional, but helpful for pattern repeats)
- Scissors
- Measuring tape
- Blocking mats and pins (for finishing)
Gauge
- 18 stitches and 24 rows = 4 inches in stockinette stitch
- Always knit a gauge swatch to ensure your finished blanket matches the intended size
Step-by-Step Instructions
Pattern Overview
Finished Size: Approximately 50" x 60" (can be adjusted by adding or removing pattern repeats)
Abbreviations:
- CO: cast on
- K: knit
- P: purl
- K2tog: knit two together
- P2tog: purl two together
- Sl: slip stitch purlwise
- YO: yarn over
- Rep: repeat
- RS: right side
- WS: wrong side
- wyib: with yarn in back
- wyif: with yarn in front
Pattern Notes:
- Worked flat in one piece, back and forth on circular needles
- The cobblestone texture is created by alternating slipped stitches and yarn overs in a staggered pattern
- Use a separate ball of yarn for each color section; do not carry yarn across
- Always slip stitches purlwise unless otherwise stated
- When slipping stitches, keep the yarn on the correct side (wyib for RS rows, wyif for WS rows)
Getting Started: Cast On and Border
Step 1: Cast On
CO 180 stitches with Color A (Cream). Use a long-tail cast on for a stretchy, neat edge that will match the garter stitch border beautifully.
Step 2: Bottom Border
Work the border in Color A:
- Rows 1-6: Knit all stitches (garter stitch). This creates a smooth, flat border that frames the textured body of the blanket.
Main Body: Creating the Cobblestone Texture
The main body consists of a 12-row pattern repeat (Rows 9-20) that you'll work until the blanket reaches your desired length. Each pair of rows uses a different color, creating the beautiful horizontal striping effect.
Step 3: Foundation Rows (Color A)
- Row 7 (RS): With Color A, knit all stitches.
- Row 8 (WS): With Color A, purl all stitches.
These two rows create a smooth stockinette base that separates the border from the textured pattern.
Step 4: First Pattern Repeat – Color B (Warm Taupe)
- Row 9 (RS): Change to Color B. K1, *Sl 1 wyib, K1, YO, K2tog, K1, Sl 1 wyib, K3; rep from * to last 2 sts, K2.
- Row 10 (WS): With Color B, P1, *Sl 1 wyif, P1, P2tog, YO, P1, Sl 1 wyif, P3; rep from * to last 2 sts, P2.
Step 5: Second Pattern Repeat – Color C (Soft Charcoal)
- Row 11 (RS): Change to Color C. K2, *K1, Sl 1 wyib, K3, YO, K2tog, K1; rep from * to last 3 sts, K3.
- Row 12 (WS): With Color C, P2, *P1, Sl 1 wyif, P3, P2tog, YO, P1; rep from * to last 3 sts, P3.
Step 6: Third Pattern Repeat – Color A (Cream)
- Row 13 (RS): Change to Color A. K3, *YO, K2tog, K1, Sl 1 wyib, K3, K1; rep from * to last 4 sts, K4.
- Row 14 (WS): With Color A, P3, *YO, P2tog, P1, Sl 1 wyif, P3, P1; rep from * to last 4 sts, P4.
Step 7: Fourth Pattern Repeat – Color B (Warm Taupe)
- Row 15 (RS): Change to Color B. K1, *Sl 1 wyib, K3, YO, K2tog, K1, Sl 1 wyib, K1; rep from * to last 2 sts, K2.
- Row 16 (WS): With Color B, P1, *Sl 1 wyif, P3, P2tog, YO, P1, Sl 1 wyif, P1; rep from * to last 2 sts, P2.
Step 8: Fifth Pattern Repeat – Color C (Soft Charcoal)
- Row 17 (RS): Change to Color C. K2, *K3, YO, K2tog, K1, Sl 1 wyib, K1; rep from * to last 3 sts, K3.
- Row 18 (WS): With Color C, P2, *P3, P2tog, YO, P1, Sl 1 wyif, P1; rep from * to last 3 sts, P3.
Step 9: Sixth Pattern Repeat – Color A (Cream)
- Row 19 (RS): Change to Color A. K4, *K1, Sl 1 wyib, K3, YO, K2tog, K1; rep from * to last 2 sts, K2.
- Row 20 (WS): With Color A, P4, *P1, Sl 1 wyif, P3, P2tog, YO, P1; rep from * to last 2 sts, P2.
Continuing the Pattern
Step 10: Repeat Rows 9-20
Continue repeating Rows 9-20 until the blanket measures approximately 58 inches from the cast-on edge, ending with a Row 20 repeat. This ensures you finish with a complete color sequence and the pattern is properly aligned for the border.
Pro tip: Place a stitch marker every 20 stitches to help you keep track of your pattern repeats and catch any mistakes early.
Finishing Touches: Top Border and Bind Off
Step 11: Top Border
Switch to Color A and knit 6 rows of garter stitch (all knit). This mirrors the bottom border and creates a balanced, finished look.
Step 12: Bind Off
Bind off loosely in knit. To ensure a stretchy edge that matches the cast-on, use a larger needle for binding off or use a stretchy bind-off method like the "Jeny's Surprisingly Stretchy Bind-Off."
Finishing: Weaving and Blocking
Step 13: Weave in Ends
Using a tapestry needle, carefully weave in all loose ends. Be sure to weave in ends on the wrong side of the work, following the path of the yarn to keep them invisible from the right side.
Step 14: Blocking
Block gently to shape. Pin the edges to even out the texture and ensure straight, neat sides. Use a spray bottle to mist the blanket with cool water, or soak it gently if your yarn allows. Allow to dry completely before unpinning.
Step 15: Final Inspection
Once dry, inspect your blanket for any missed stitches or loose areas. Gently tug on the fabric to ensure all yarn overs and slipped stitches are secure.
Tips for Success
- Keep your tension consistent: The slipped stitches and yarn overs create the cobblestone texture, so maintaining even tension is key to a beautiful result.
- Count your stitches regularly: The pattern repeat is 10 stitches, so counting every few rows will help you catch mistakes early.
- Use separate balls of yarn: Don't try to carry yarn across the row—this will create unsightly loops and distort the texture.
- Block generously: This pattern truly shines after blocking, which opens up the stitches and showcases the dimensional cobblestone effect.
Your Cobblestone Comfort Throw is now complete! This heirloom-quality piece will provide warmth and beauty for generations to come. The meditative rhythm of the pattern makes it a joy to knit, and the stunning result is well worth the time invested. Whether you're curling up on the couch or draping it over a favorite chair, this throw brings rustic elegance to any space.
Happy knitting, and enjoy your beautiful new heirloom!


