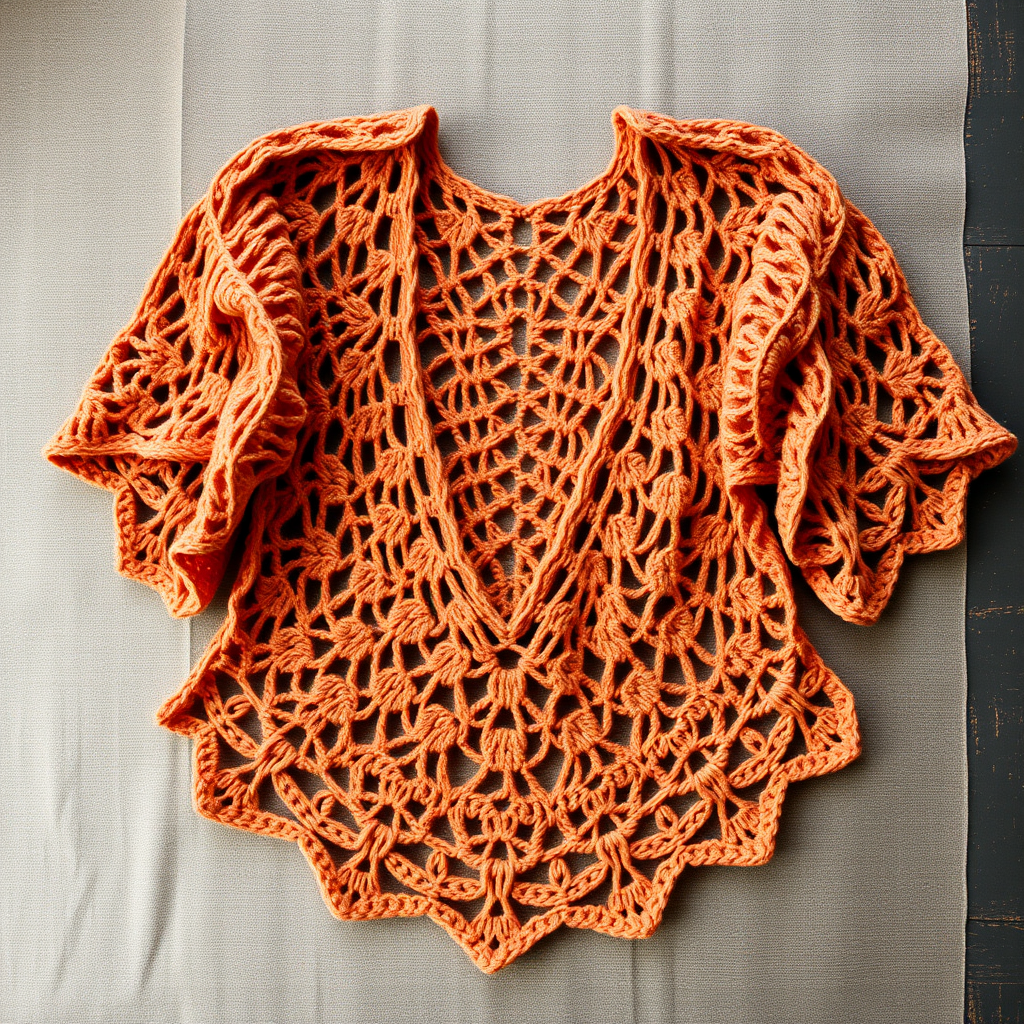
Drifting Dune Crochet Pullover Top Free Pattern – Textured Beachy Boho

Drifting Dune Crochet Pullover Top Free Pattern – Textured Beachy Boho
Imagine the warm, shifting sands of a coastal dune, captured in a wearable piece of art. That's the magic of the Drifting Dune Crochet Pullover Top. This breezy, textured pullover is more than just a garment; it's a statement of bohemian elegance and handmade charm. With its unique combination of shell and rib stitches, this top creates a subtle wave-like effect that's both visually stunning and incredibly comfortable. Whether you're layering it over a swimsuit for a beach day or pairing it with your favorite jeans for a cool evening out, this relaxed, boxy pullover is the perfect addition to any warm-weather wardrobe.
Designed with the beginner in mind, this pattern is broken down into simple, manageable steps. The construction is cleverly simple—two rectangular panels seamed together—yet the result looks intricate and professionally crafted. The use of worsted-weight cotton yarn ensures a soft, natural drape and breathability, making it ideal for those balmy summer months. Get ready to hook your way to a chic, handmade staple that you'll reach for all season long.
Materials Needed
Before you begin your crochet journey, gather these essential supplies. Having everything ready will make your crafting experience smooth and enjoyable.
- Yarn: Worsted weight cotton or cotton-blend yarn (e.g., Lion Brand 24/7 Cotton) in a warm sand color. You will need approximately 600-800 yards for sizes S/M.
- Crochet Hooks: You will need two sizes:
- A 5.5 mm (I-9) hook for the main body of the top.
- A 5.0 mm (H-8) hook for the ribbed edging.
- Other: A yarn needle for weaving in ends and seaming, and a pair of scissors.
Gauge & Sizing
To ensure your top fits perfectly, it's crucial to check your gauge. Using the 5.5mm hook, your gauge should be 14 stitches x 10 rows = 4 inches in the shell-rib stitch pattern. This pattern is written for sizes S/M (M/L), with the sample shown in S/M.
Step-by-Step Instructions
Let's dive into creating your very own Drifting Dune Pullover. Follow these detailed instructions carefully, and you'll be amazed at what you can create. The pattern is worked in two flat panels and then seamed together.
Stitch Abbreviations
Familiarize yourself with these standard crochet abbreviations before you start.
- ch = chain
- sc = single crochet
- dc = double crochet
- sl st = slip stitch
- sk = skip
- st(s) = stitch(es)
- rep = repeat
- RS = right side
- WS = wrong side
Special Stitches
This pattern uses two special stitches to create its unique texture. Practice these to get comfortable before starting your project.
- Shell Stitch (sh): Work 3 double crochet (dc) in the same stitch.
- Rib Stitch (rib): Work a single crochet (sc) in the back loop only (BLO) of each stitch. This creates a stretchy, ribbed effect.
Pattern Notes
- The top is worked in two rectangular panels (front and back) from the bottom up, then seamed at the shoulders and sides, leaving openings for the armholes.
- The shell-rib pattern creates a stretchy, textured fabric that drapes beautifully.
- Always work the "sc in next sc" as indicated in the pattern, as this is the stitch that sits between the shells.
Front Panel (Make 1)
Using your 5.5mm hook, begin your project.
- Foundation Chain: Chain 72 (80).
- Row 1 (RS): Single crochet (sc) in the 2nd chain from your hook and in each chain across. Turn. You should have 71 (79) stitches.
- Row 2: Ch 1, sc in the first stitch. *Skip the next 2 stitches, work a shell stitch (3 dc) in the next stitch, skip the next 2 stitches, sc in the next stitch. Repeat from * across, ending with a sc in the last stitch. Turn.
- Row 3: Ch 1, sc in the first stitch. *Ch 1, skip the next dc, sc in the next dc (which is the center of the shell), ch 1, skip the next dc, sc in the next sc (the single crochet between shells). Repeat from * across, ending with a sc in the last stitch. Turn.
- Row 4: Ch 1, sc in the first stitch. *Work a shell stitch (3 dc) in the next sc (the sc between the shells), sc in the next sc. Repeat from * across, ending with a sc in the last stitch. Turn.
- Rows 5-40 (48): Repeat Rows 3 and 4 alternately until your piece measures approximately 14 (16) inches from the start. Ensure you end with a Row 3 pattern repeat. Do not fasten off.
Shoulder Shaping (Front Panel Only)
Now we will shape the shoulders to create a comfortable neckline.
- Next Row (RS): Slip stitch (sl st) across the first 6 (8) stitches. Ch 1, sc in the same stitch, work in pattern across until 6 (8) stitches remain, turn, leaving the remaining stitches unworked. You should now have 59 (63) stitches.
- Next Row: Ch 1, sc2tog (single crochet two together to decrease), work in pattern across to the last 2 stitches, sc2tog. Turn. You now have 57 (61) stitches.
- Next Row: Ch 1, work in pattern across. Turn.
- Next Row: Ch 1, sc2tog, work in pattern across to the last 2 stitches, sc2tog. Turn. You now have 55 (59) stitches.
- Next Row: Ch 1, work in pattern across. Fasten off.
Back Panel (Make 1)
Work the back panel exactly as you did the front panel, but omit the shoulder shaping. Simply work straight in the pattern until the piece measures the same length as the front panel before shaping. Fasten off.
Finishing and Assembly
Now for the exciting part—bringing your panels together to form the top.
- Shoulder Seams: With the right sides (RS) of the front and back panels together, sew or crochet the outer 6 (8) stitches of each shoulder seam together on each side. Leave the center 43 (45) stitches open for the neckline.
- Side Seams: With RS together, sew or crochet the side seams from the bottom edge up to 7 (8) inches from the shoulder seam. This leaves the top portion open for the armholes.
Neckline Ribbing
Switch to your 5.0mm hook to add the beautiful ribbed finish.
- Join your yarn at one shoulder seam.
- Ch 1, work a round of single crochet (sc) evenly around the entire neckline opening. Work 2 sc in each corner stitch to help the edge lay flat. Join with a sl st to the first sc.
- Work 3 more rounds of sc in the back loop only (BLO). Fasten off.
Armhole Ribbing
Repeat the same process for each armhole opening.
- Join your yarn at the underarm seam.
- Ch 1, work a round of sc evenly around the armhole opening. Join with a sl st.
- Work 3 rounds of sc in the back loop only (BLO). Fasten off.
- Repeat for the other armhole.
Bottom Ribbing
Finish the bottom edge of your top with a slightly longer ribbed hem.
- Join your yarn at the side seam.
- Ch 1, work a round of sc evenly across the bottom edge. Join with a sl st.
- Work 4 rounds of sc in the back loop only (BLO). Fasten off.
Final Touches
Weave in all loose ends with your yarn needle. Block the top lightly to shape it and let it dry completely. This will help even out your stitches and give your top a professional, polished finish.
Congratulations! You've just completed your very own Drifting Dune Crochet Pullover Top. This beautiful, textured piece is a testament to your skill and creativity. Wear it with pride, knowing you've created a unique, handmade garment that's as beautiful as it is comfortable. Happy crocheting!