Whispering Willow Wrap Free Pattern – Knit a Misty Meadow Shawl
Whispering Willow Wrap Free Pattern – Knit a Misty Meadow Shawl
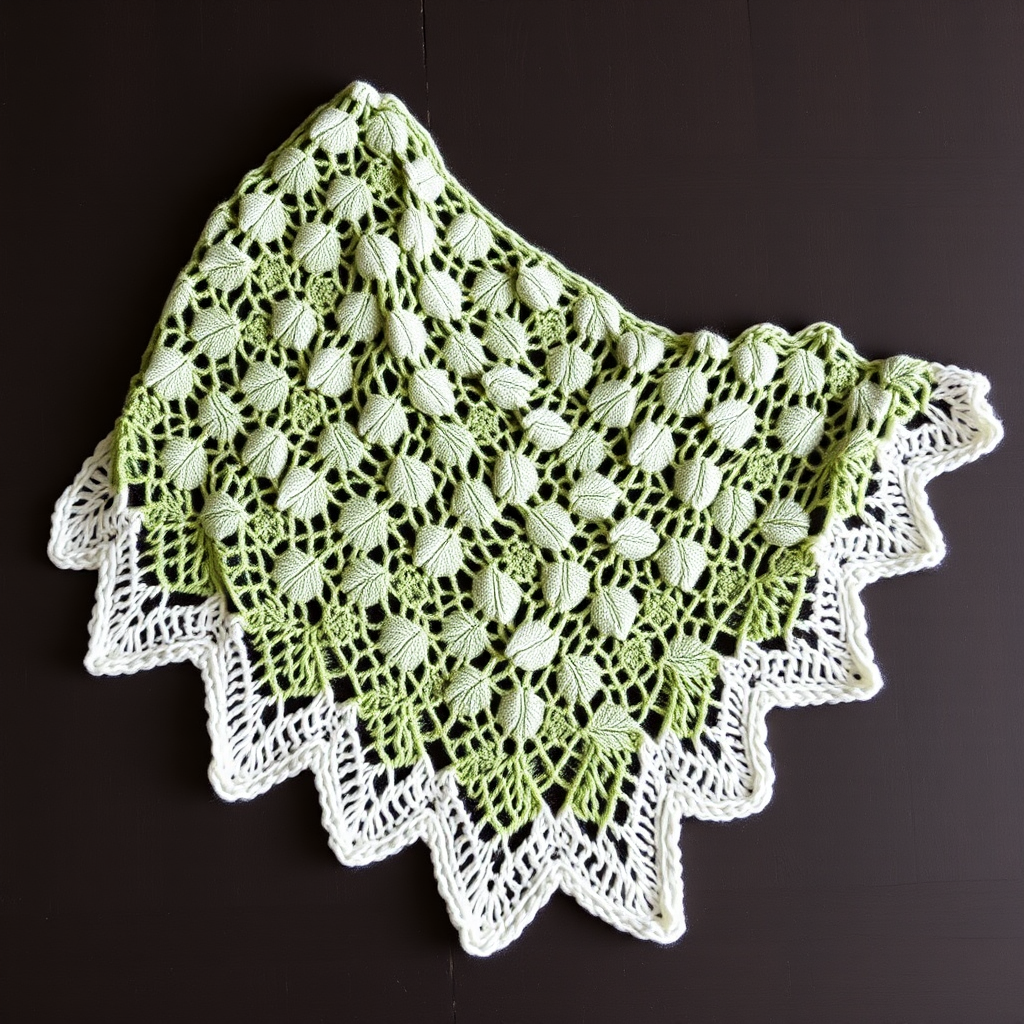
Drape yourself in the soft hues of a misty morning with this ethereal knitted wrap, featuring delicate leaf motifs and a gentle waterfall edge. This pattern guides you through a meditative knit that blooms into a wearable piece of art. The Whispering Willow Wrap is the perfect project for knitters who want to explore lace techniques while creating something truly breathtaking. With its soft sage green body transitioning to a delicate dewdrop white edge, this shawl evokes the calm beauty of a misty meadow at dawn.
Whether you're a seasoned knitter looking for a relaxing project or a confident beginner ready to stretch your skills, this pattern offers clear instructions, beautiful construction, and a stunning result. The triangular shape is worked from the top down, with increases at the edges and center creating a graceful, flowing silhouette. The leaf lace pattern adds texture and visual interest, while the garter stitch borders keep everything neat and tidy.
Materials Needed
Before you begin your knitting journey, gather these materials to ensure a smooth and enjoyable experience:
Yarn
- Color A (Misty Sage): 550 yards of fingering weight yarn
- Color B (Dewdrop White): 200 yards of fingering weight yarn
Tip: Choose a soft, breathable yarn like merino wool or a wool-silk blend for the best drape and stitch definition. The fingering weight allows the lace pattern to shine while keeping the finished shawl lightweight and cozy.
Needles
- US 6 (4.0 mm) circular knitting needle, 32-inch or longer
The long circular needle is essential for accommodating the growing number of stitches as the shawl expands. If you prefer, you can use interchangeable needles with a longer cable.
Other Supplies
- Stitch markers (at least 4)
- Yarn needle for weaving in ends
- Blocking mats and pins (for finishing)
- Scissors
Gauge
20 stitches and 28 rows = 4 inches in stockinette stitch (after blocking)
While gauge is important for achieving the correct size, this shawl is quite forgiving. The blocking process will help shape and open up the lace, so don't stress too much about perfection. However, taking a few minutes to check your gauge will ensure your finished shawl matches the intended dimensions.
Step-by-Step Instructions
This shawl is knitted from the top center down, with increases at the edges and center to create a triangular shape. The leaf lace pattern is worked in sections, with garter stitch borders for a clean edge. Follow these detailed instructions carefully, and you'll be amazed at what you can create.
Abbreviations
- k = knit
- p = purl
- yo = yarn over
- k2tog = knit two together (right-leaning decrease)
- ssk = slip, slip, knit (left-leaning decrease)
- k3tog = knit three together (decrease)
- pm = place marker
- sm = slip marker
- RS = right side
- WS = wrong side
Setup Section
Using Color A (Misty Sage), cast on 3 stitches.
Row 1 (RS): k1, yo, k1, yo, k1 (5 stitches)
Row 2 (WS): k2, p1, k2
Row 3 (RS): k2, yo, k1, yo, k2 (7 stitches)
Row 4 (WS): k2, p3, k2
Row 5 (RS): k2, yo, k3, yo, k2 (9 stitches)
Row 6 (WS): k2, p5, k2
Row 7 (RS): k2, yo, k5, yo, k2 (11 stitches)
Row 8 (WS): k2, p7, k2
Row 9 (RS): k2, yo, k7, yo, k2 (13 stitches)
Row 10 (WS): k2, p9, k2
Row 11 (RS): k2, yo, k9, yo, k2 (15 stitches)
Row 12 (WS): k2, p11, k2
Note: The garter stitch edges (k2 at the beginning and end of each row) create a clean, non-curling border. The yarn overs in the center create the increases that will form the top point of your triangular shawl.
Body Section
Now you will establish the pattern. Place markers after the first 2 stitches and before the last 2 stitches to mark the garter edge.
Row 1 (RS): k2, pm, yo, k1, yo, sm, k1, pm, yo, k1, yo, sm, k2 (19 stitches)
Row 2 (WS): k2, sm, p to last 2 sts, sm, k2
Row 3 (RS): k2, sm, yo, k to marker, yo, sm, k1, sm, yo, k to marker, yo, sm, k2 (23 stitches)
Row 4 (WS): k2, sm, p to last 2 sts, sm, k2
Repeat Rows 3 and 4 until you have 43 stitches (or 15 repeats of the increase rows).
Understanding the structure: You now have three sections separated by markers: the left garter edge, the center stitch, and the right garter edge. The increases happen on either side of the center stitch and at both edges, creating the triangular shape. The center stitch will always be knit on RS rows and purled on WS rows.
Leaf Lace Pattern
Now you will work the leaf lace pattern in the center section. The pattern is a multiple of 8 stitches plus 1. This beautiful motif creates delicate leaf shapes with eyelet holes that catch the light beautifully.
Row 1 (RS): k2, sm, yo, k1, yo, sm, *k1, yo, ssk, k3, k2tog, yo, k1* repeat from * to * until 1 stitch before marker, k1, sm, yo, k1, yo, sm, k2
Row 2 (WS): k2, sm, p to last 2 sts, sm, k2
Row 3 (RS): k2, sm, yo, k1, yo, sm, *k2, yo, ssk, k1, k2tog, yo, k2* repeat from * to * until 1 stitch before marker, k1, sm, yo, k1, yo, sm, k2
Row 4 (WS): k2, sm, p to last 2 sts, sm, k2
Row 5 (RS): k2, sm, yo, k1, yo, sm, *k3, yo, ssk, k2tog, yo, k3* repeat from * to * until 1 stitch before marker, k1, sm, yo, k1, yo, sm, k2
Row 6 (WS): k2, sm, p to last 2 sts, sm, k2
Row 7 (RS): k2, sm, yo, k1, yo, sm, *k4, yo, k2tog, k1, ssk, yo, k4* repeat from * to * until 1 stitch before marker, k1, sm, yo, k1, yo, sm, k2
Row 8 (WS): k2, sm, p to last 2 sts, sm, k2
Row 9 (RS): k2, sm, yo, k1, yo, sm, *k5, yo, k2tog, ssk, yo, k5* repeat from * to * until 1 stitch before marker, k1, sm, yo, k1, yo, sm, k2
Row 10 (WS): k2, sm, p to last 2 sts, sm, k2
Row 11 (RS): k2, sm, yo, k1, yo, sm, *k6, yo, k3tog, yo, k6* repeat from * to * until 1 stitch before marker, k1, sm, yo, k1, yo, sm, k2
Row 12 (WS): k2, sm, p to last 2 sts, sm, k2
Repeat Rows 1-12 of the Leaf Lace Pattern until the shawl measures approximately 20 inches from the cast-on edge, ending with a WS row. You will have increased the stitch count by 4 stitches every RS row, so the pattern will naturally expand.
Pro tip: As the shawl grows, the lace pattern repeats will increase. Don't worry if you need to count your stitches occasionally to ensure you're staying on track. The markers help you keep your place, and the rhythm of the pattern becomes meditative after a few repeats.
Color Transition
Switch to Color B (Dewdrop White) and knit 4 rows in garter stitch (knit every row) across all stitches, maintaining the edge increases on RS rows (k2, yo, k to marker, yo, k1, yo, k to marker, yo, k2).
Tip: When switching colors, leave a tail of about 6 inches to weave in later. You can also gently twist the old and new yarns together on the first stitch to avoid any gaps.
Waterfall Edge
Continue with Color B. This section creates the beautiful, wavy scalloped edge that cascades gracefully.
Row 1 (RS): k2, sm, yo, k to marker, yo, sm, k1, sm, yo, k to marker, yo, sm, k2
Row 2 (WS): k2, sm, p to last 2 sts, sm, k2
Row 3 (RS): k2, sm, yo, *k2tog, yo* repeat from * to * until 2 stitches before marker, k2, sm, yo, k1, yo, sm, k2, *yo, ssk* repeat from * to * until 2 stitches before marker, k2, sm, yo, k2
Row 4 (WS): k2, sm, p to last 2 sts, sm, k2
Repeat Rows 1-4 until the edge measures 4 inches, ending with a WS row.
Understanding the waterfall edge: The yarn overs paired with decreases create the eyelet pattern that gives the edge its delicate, lacy appearance. The alternating k2tog and ssk decreases ensure the edge lies flat while the yarn overs add the extra stitches needed for the wavy scallop effect.
Bind Off
Loosely bind off all stitches knitwise. This loose bind off is crucial for maintaining the stretch and drape of the waterfall edge. If you bind off too tightly, the edge will pucker and lose its beautiful flow.
Tip for a stretchy bind off: Use a needle one or two sizes larger for the bind off row, or use a stretchy bind off method like the "Jeny's Surprisingly Stretchy Bind Off" for the best results.
Finishing
Weave in all ends carefully using a yarn needle. Take your time to weave in ends securely, following the path of the yarn through similar colored stitches to keep them invisible.
Blocking: This step is essential for the Whispering Willow Wrap. The lace pattern needs to be opened up and shaped to reveal its full beauty.
- Soak the shawl in lukewarm water with a gentle wool wash for 20-30 minutes.
- Gently squeeze out excess water (never wring or twist).
- Roll the shawl in a clean towel to remove additional moisture.
- Lay the shawl on blocking mats and pin it into shape, stretching the points and opening up the lace pattern.
- Pay special attention to the waterfall edge, pinning each scallop to create the wavy effect.
- Allow to dry completely before unpinning.
Once dry, your Whispering Willow Wrap is ready to wear or gift. The soft sage green transitioning to dewdrop white creates a stunning gradient effect that evokes misty meadows and gentle morning light.
Final Thoughts
The Whispering Willow Wrap is more than just a knitting project—it's a journey. From the meditative rhythm of the setup rows to the satisfying complexity of the leaf lace pattern and the joyful cascade of the waterfall edge, every stitch brings you closer to a wearable piece of art. The finished shawl drapes beautifully over shoulders, adding an ethereal touch to any outfit.
Whether you're knitting this for yourself or as a thoughtful handmade gift, the Whispering Willow Wrap is sure to become a treasured piece. The combination of delicate lace, soft colors, and flowing shape makes it truly special. So gather your materials, find a cozy spot, and let the soothing rhythm of the needles carry you to a misty meadow of your own.
Happy knitting!