Aurora Boreal Wrap Free Pattern – Knit with Shifting Sky Lace
The Aurora Boreal Wrap: A Knitted Tribute to the Northern Lights
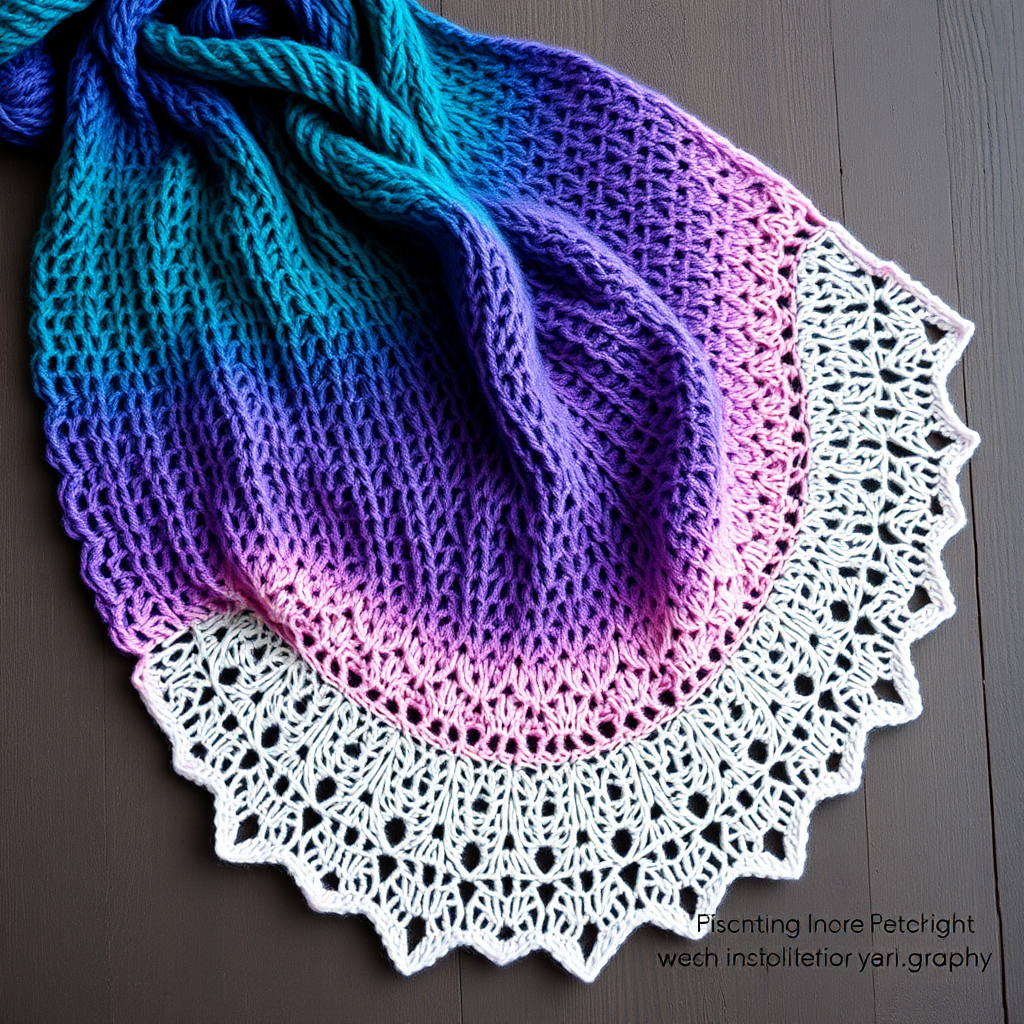
Imagine wrapping yourself in the ethereal dance of the aurora borealis—a cascade of deep teal melting into muted purple, then blooming into soft pink. The Aurora Boreal Wrap is more than a knitted shawl; it's a wearable piece of art that captures the shifting sky in delicate lace. This free pattern is designed for knitters ready to explore gradient colorwork and open, cloud-like textures. Whether you're cozying up on a cool evening or seeking a meditative project, this triangular wrap delivers both beauty and tranquility. Let's cast on and bring the northern lights home.
Materials Needed
Before you begin, gather these essentials to ensure a smooth knitting experience:
- Yarn: Fingering weight yarn in 3 colors (approx. 400g total):
- Color A: Deep Teal (for the top section)
- Color B: Muted Purple (for the middle section)
- Color C: Soft Pink (for the bottom section and edging)
- Needle: US 6 (4.0 mm) circular knitting needle, 32-inch cable (or longer for larger projects)
- Notions: Stitch markers (at least 2), tapestry needle for weaving ends, blocking mats and pins
- Gauge: 20 stitches and 28 rows = 4 inches in stockinette stitch (blocked). Gauge is crucial for achieving the correct drape and size.
Step-by-Step Instructions
This shawl is worked from the top center down, increasing on each side to form a triangular shape. The lace pattern is a simple 4-row repeat that creates a drifting, cloud-like texture. Follow along carefully, and you'll be amazed at how quickly the pattern emerges.
Abbreviations
- k = knit
- p = purl
- yo = yarn over
- k2tog = knit two together (right-leaning decrease)
- ssk = slip, slip, knit (left-leaning decrease)
- pm = place marker
- sm = slip marker
- RS = right side
- WS = wrong side
Setup Section: Creating the Foundation
With Color A (deep teal), cast on 3 stitches. We'll build the center spine and establish the increase rhythm.
- Row 1 (RS): k1, yo, k1, yo, k1 (5 stitches)
- Row 2 (WS): k2, p1, k2
- Row 3 (RS): k2, yo, k1, yo, k2 (7 stitches)
- Row 4 (WS): k2, p3, k2
- Row 5 (RS): k2, yo, k3, yo, k2 (9 stitches)
- Row 6 (WS): k2, p5, k2
- Row 7 (RS): k2, yo, k5, yo, k2 (11 stitches)
- Row 8 (WS): k2, p7, k2
- Row 9 (RS): k2, yo, k7, yo, k2 (13 stitches)
- Row 10 (WS): k2, p9, k2
- Row 11 (RS): k2, yo, k9, yo, k2 (15 stitches)
- Row 12 (WS): k2, p11, k2
- Row 13 (RS): k2, yo, k11, yo, k2 (17 stitches)
- Row 14 (WS): k2, p13, k2
- Row 15 (RS): k2, yo, k13, yo, k2 (19 stitches)
- Row 16 (WS): k2, p15, k2
- Row 17 (RS): k2, yo, k15, yo, k2 (21 stitches)
- Row 18 (WS): k2, p17, k2
- Row 19 (RS): k2, yo, k17, yo, k2 (23 stitches)
- Row 20 (WS): k2, p19, k2
Tip: The 2-stitch garter border (knit on both sides) creates a neat, non-curling edge. The yarn overs on each side of the center stitch form the increase points.
Body Section: Color A Transition
Continue with Color A for 10 more rows of stockinette (knit on RS, purl on WS), maintaining the 2-stitch garter border on each side. On every RS row, work a yarn over increase on each side of the center stitch. Place a marker at the center stitch to help you track the increases.
Row pattern for these 10 rows:
- RS: k2, yo, knit to 1 stitch before center marker, yo, sm, k1, yo, knit to last 2 stitches, yo, k2
- WS: k2, purl to last 2 stitches, k2
After these 10 rows, you'll have a solid teal section with a clear center spine.
Body Section: Color B Lace Pattern
Switch to Color B (muted purple). Now we introduce the lace pattern that mimics drifting clouds. Maintain the 2-stitch garter border and the center increase throughout.
- Row 1 (RS): k2, yo, *k2tog, yo* repeat to center marker, yo, sm, k1, yo, *yo, ssk* repeat to last 2 stitches, yo, k2
- Row 2 (WS): k2, purl to last 2 stitches, k2
- Row 3 (RS): k2, yo, *yo, k2tog* repeat to center marker, yo, sm, k1, yo, *ssk, yo* repeat to last 2 stitches, yo, k2
- Row 4 (WS): k2, purl to last 2 stitches, k2
Repeat these 4 rows for 20 repeats (or until you have used most of Color B, leaving enough for the final section). The yarn overs and decreases create an airy, open fabric that opens up beautifully when blocked.
Note: The pattern alternates the direction of the decreases (k2tog on one side, ssk on the other) to keep the lace balanced and symmetrical.
Body Section: Color C Finale
Switch to Color C (soft pink). Continue the same lace pattern for 15 repeats. Then, work 10 rows of stockinette with the same increases and garter borders as before. This solid section grounds the shawl and prepares it for the edging.
Edging: Picot Bind-Off
The picot bind-off creates a delicate, scalloped edge that echoes the points of the aurora. Here's how:
- Knit 2 stitches.
- *Return these 2 stitches to the left needle.
- Knit these 2 stitches together through the back loop (k2tog tbl).
- Knit 1 stitch from the left needle.
- Repeat from * until all stitches are bound off.
This technique forms a series of small, elegant points along the bottom edge. Take your time—it's worth the effort for the polished finish.
Finishing: Blocking for Perfection
Blocking is essential for lace knitting—it opens up the pattern and gives the shawl its ethereal drape.
- Weave in all ends with a tapestry needle.
- Soak the shawl in lukewarm water with a drop of wool wash for 20-30 minutes.
- Gently squeeze out excess water (do not wring or twist).
- Lay the shawl on a clean towel and roll it up to remove more water.
- Pin the shawl to shape on blocking mats, stretching the lace to open up the pattern. Focus on the points of the picot edge and the center spine.
- Allow to dry completely before unpinning.
Final Thoughts
Your Aurora Boreal Wrap is now complete—a stunning gradient piece that transitions from deep teal through muted purple to soft pink, just like the northern lights. The lace pattern, once blocked, will reveal its full cloud-like texture, and the picot edge adds a touch of elegance. Wear it draped over your shoulders on cool evenings, or gift it to someone who loves the magic of the night sky. This pattern is a journey, and you've just created a masterpiece. Happy knitting!