Twin Square Reverse Bandana Free Pattern: Reversible Sunburst Crochet for Cats
A Reversible Little Bandana Your Cat Will Actually Tolerate
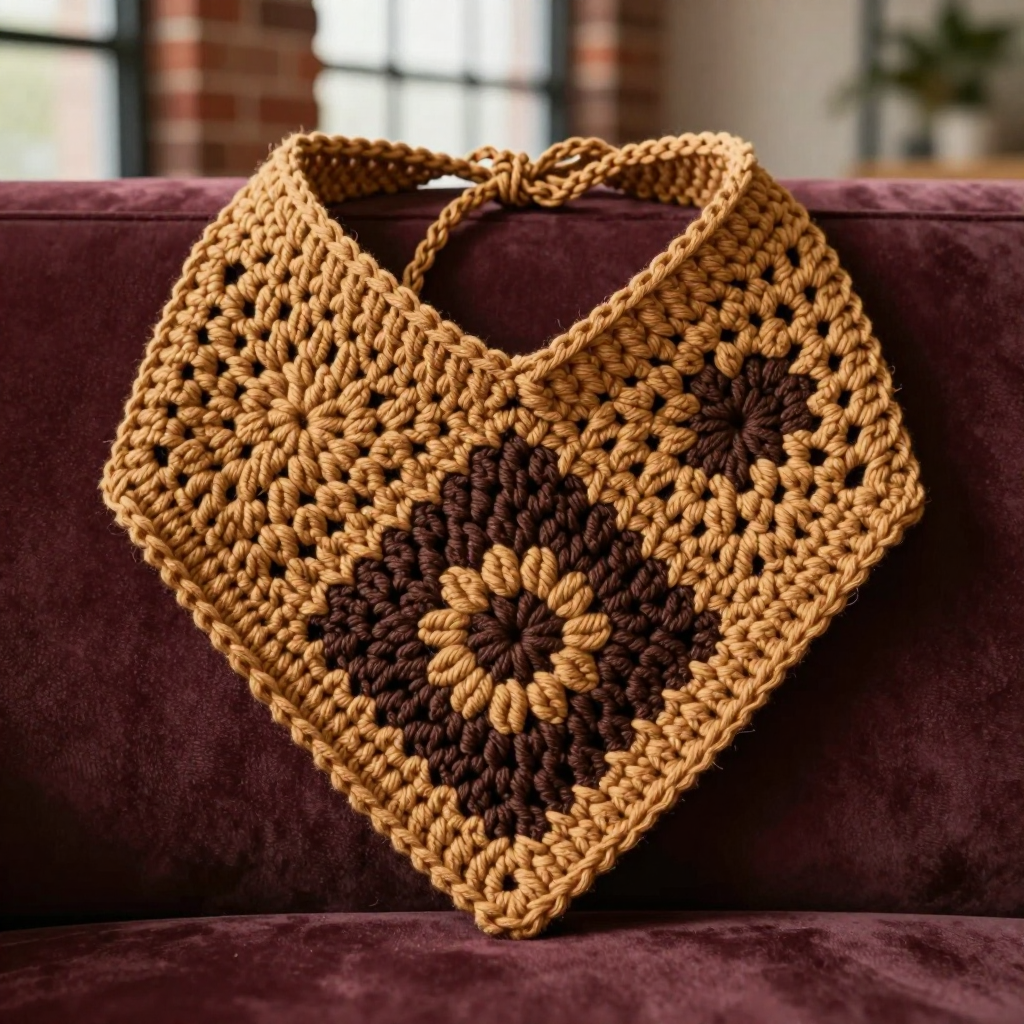
If you have ever wanted to dress up your cat (and who hasn't?), this project is made for you. The Twin Square Reverse Bandana is a soft, plush triangle built from two identical sunburst granny squares joined back-to-back and folded into shape — chocolate brown on one side, warm caramel on the other, so it is reversible with zero extra work. It is perfect for complete beginners who have never held a crochet hook, because every stitch is a basic double crochet or single crochet worked in simple joined rounds. The finished piece is thick, velvety, and lightweight, sitting gently across your cat's chest with a simple crocheted cord that ties at the back of the neck. It looks handmade in the best way and feels like a tiny plush blanket.
Materials Needed
- Yarn: Chenille plush yarn (super bulky / weight 6), approximately 60 yd (55 m) in Chocolate and 60 yd (55 m) in Caramel. The sample uses a soft polyester chenille.
- Hook: Size J/10 (6.0 mm) crochet hook, or the size you need to match gauge.
- Stitch markers: At least 4, to mark your first stitch and your corners.
- Tapestry needle: A blunt-tipped needle with a large eye, for weaving in ends.
- Scissors: Any sharp pair for cutting yarn.
- Finished size: Bandana triangle is 7 in (18 cm) wide across the top edge and 5 in (12.5 cm) deep from the top edge to the lower point. Neck cord is 11 in (28 cm) long and adjustable. Fits cats and small pets with a neck circumference of 8–11 in (20–28 cm).
Abbreviations and Beginner Glossary
Read this list once before you start. Every term used in the pattern is explained here in plain English — no prior knowledge assumed.
- ch – chain: yarn over the hook, pull the loop through the loop already on your hook. This makes a small link in a chain.
- sl st – slip stitch: insert your hook into the stitch, yarn over, and pull the loop straight through both the stitch and the loop on your hook. It joins things without adding height.
- sc – single crochet: insert hook into the stitch, yarn over, pull up a loop (2 loops on hook), yarn over, pull through both loops. One loop remains.
- dc – double crochet: yarn over, insert hook into the stitch, yarn over, pull up a loop (3 loops on hook), yarn over, pull through 2 loops, yarn over, pull through the last 2 loops.
- st / sts – stitch / stitches: one completed unit of crochet work.
- sp / sps – space / spaces: the gap under a chain from the previous round. You work into the gap, not into the chain itself.
- magic ring – an adjustable loop of yarn you crochet into, then pull tight to close the center hole.
- yarn over – wrap the working yarn over your hook from back to front.
- join – connect the last stitch of a round to the first with a slip stitch.
- fasten off – cut the yarn leaving a tail, then pull the tail all the way through the last loop to lock it.
- right side – the front, prettier face of the work that will show when finished.
- wrong sides together – placing two pieces so their back faces touch and their front faces point outward.
- blocking – dampening and pinning the finished piece so it dries into a neat, even shape.
Gauge
One solid granny sunburst square measures 5 in (12.5 cm) square after blocking. Within the square: 4 dc = 1 in (2.5 cm) and 4 rounds = 1 in (2.5 cm).
Why gauge matters: gauge is how big your stitches come out. If your stitches are larger than the pattern's, the bandana will be too big for your cat's neck; if smaller, it will be too tight. How to check: work Rounds 1–4 of one square, then measure across the circle. It should be about 2.5 in (6 cm) across. If it is bigger, switch to a smaller hook; if smaller, switch to a larger hook. Chenille yarn is stretchy, so measure gently without pulling.
Beginner Tips Before You Start
- Place a stitch marker in the top of your beginning chain every round. It is the stitch you join into, and it is very easy to lose in plush yarn.
- Do not pull the yarn too tight. Chenille sheds and snaps if you yank it. Keep your tension relaxed and even.
- Count out loud. Each round has a clear stitch count in parentheses — check it before moving on.
- Work over your starting tail for the first few stitches of Round 1 so you have less to weave in later.
- Mark your corners on Round 8 with a stitch marker in each ch-2 corner space so the square stays even.
- Make both squares before joining. It is easier to match sizes when you can lay them side by side.
Step-by-Step Instructions
Square (Make 2: One in Chocolate, One in Caramel)
Each square is worked in joined rounds from a center ring outward. Turning chains count as the first stitch of the round unless noted. Join each round with a slip stitch to the top of the beginning chain.
Round 1 (right side): With chosen color, make a magic ring. Ch 3 (counts as first dc), work 11 dc into the ring. Join with sl st to top of ch 3. (12 dc)
Round 2: Ch 3 (counts as first dc), dc in same st. 2 dc in each st around. Join with sl st to top of ch 3. (24 dc)
Round 3: Ch 3 (counts as first dc), dc in same st, dc in next st, *2 dc in next st, dc in next st; repeat from * around. Join with sl st to top of ch 3. (36 dc)
Round 4: Ch 3 (counts as first dc), dc in same st, dc in next 2 sts, *2 dc in next st, dc in next 2 sts; repeat from * around. Join with sl st to top of ch 3. (48 dc)
Round 5 (sunburst points): Ch 1, sc in same st. *Ch 3, skip 1 st, sc in next st; repeat from * around, ending with ch 3, skip 1 st, join with sl st to first sc. (24 ch-3 spaces)
Round 6 (solid granny square shaping): Sl st into first ch-3 space. Ch 3 (counts as first dc), 2 dc in same space. *Ch 1, 3 dc in next ch-3 space; repeat from * around, ending with ch 1, join with sl st to top of ch 3. (24 groups of 3 dc, 24 ch-1 spaces)
Round 7: Sl st to next dc. Ch 3 (counts as first dc), dc in next 2 dc. *Ch 1, 3 dc in next ch-1 space; repeat from * around, ending with ch 1, join with sl st to top of ch 3. (24 groups of 3 dc, 24 ch-1 spaces)
Round 8 (corner round): Sl st to next dc. Ch 3 (counts as first dc), dc in next 2 dc, ch 2, dc in same ch-1 space (corner made). *Ch 1, 3 dc in next ch-1 space; repeat from * around, working (3 dc, ch 2, 3 dc) in each corner ch-1 space and 3 dc in each side ch-1 space, ending with ch 1, join with sl st to top of ch 3. Fasten off and weave in ends. Square measures approximately 5 in (12.5 cm) square.
Joining the Two Squares
Place the Chocolate square and the Caramel square wrong sides together, aligning all edges. With Chocolate held at the front, join the two squares along two adjacent sides only (one full side and one adjacent side), leaving the other two sides open.
Join row: Insert hook through both layers, pull up a loop of Chocolate, ch 1, then sc evenly along the edge, working 1 sc in each dc and 1 sc in each ch-1 space, with 3 sc in each corner. Join with sl st to first sc. Fasten off and weave in ends.
Turn the piece right side out through the open edges. The joined seam sits along the two folded sides; the open edges form the top opening of the bandana.
Folding and Shaping
Fold the joined square diagonally so the two joined sides meet, forming a triangle with the point at the bottom and the open edges at the top. The Chocolate face shows on one side and the Caramel face on the other, making the bandana reversible. Lightly steam or block the triangle to hold its shape, keeping the top opening flat.
Neck Cord
Cord: With Caramel, leave a 6 in (15 cm) tail, ch 40 (approximately 11 in / 28 cm). Fasten off, leaving a 6 in (15 cm) tail. (40 ch)
Thread one end of the cord through the top opening of the bandana from one side to the other, then tie the ends together to secure. The cord can be adjusted by retying.
Alternative: Make two cords — ch 25 for each side — attach one to each top corner of the bandana, and tie at the back of the neck.
Assembly and Finishing
Seaming: The single crochet join is the seam. Work it with the two squares held wrong sides together so the seam hides inside and both pretty faces stay clean. Keep your sc stitches loose enough that the seam does not pucker.
Weaving in ends: Thread each tail onto the tapestry needle and run it through the back of several stitches in one direction, then back through a few stitches in the other direction to lock it. Trim close. Do not leave long tails that a pet could chew.
Blocking: Lightly mist the triangle with cool water (or steam gently), pin it flat to a towel or blocking mat with the point straight and the top opening level, and let it dry completely away from direct heat. This opens up the sunburst texture and squares the corners.
Final check: Gently shape the triangle and cord. Check that the cord is secure and the bandana sits comfortably without pulling.
Care: Hand wash gently in cool water with mild soap. Do not wring. Roll in a towel to remove excess water and lay flat to dry away from direct heat.
Pro Tips and Variations
- Color play: Swap Chocolate and Caramel for any two contrasting super bulky colors — a cream and sage pair looks lovely, and the reversible design means you get two looks from one bandana.
- Size adjustments: For a smaller kitten, work only Rounds 1–7 and skip the corner round; for a larger pet, add one more round of 3-dc groups before the corner round, which adds about 1 in (2.5 cm) per side.
- Yarn substitution: Any super bulky (weight 6) yarn works, but chenille gives the plush feel. If you use a smoother yarn, check gauge again — smooth yarns behave differently than fuzzy ones.
- Safer fastening: Instead of a tied cord, crochet a short ch 25 strap on each top corner and join them with a small button or a slip-stitch loop for a quick-release fit.