Free Pattern: Bootstitch Cable Knit Sundress with Mint Straps
Bootstitch Cable Knit Sundress with Mint Straps: A Free Beginner Pattern
Introduction
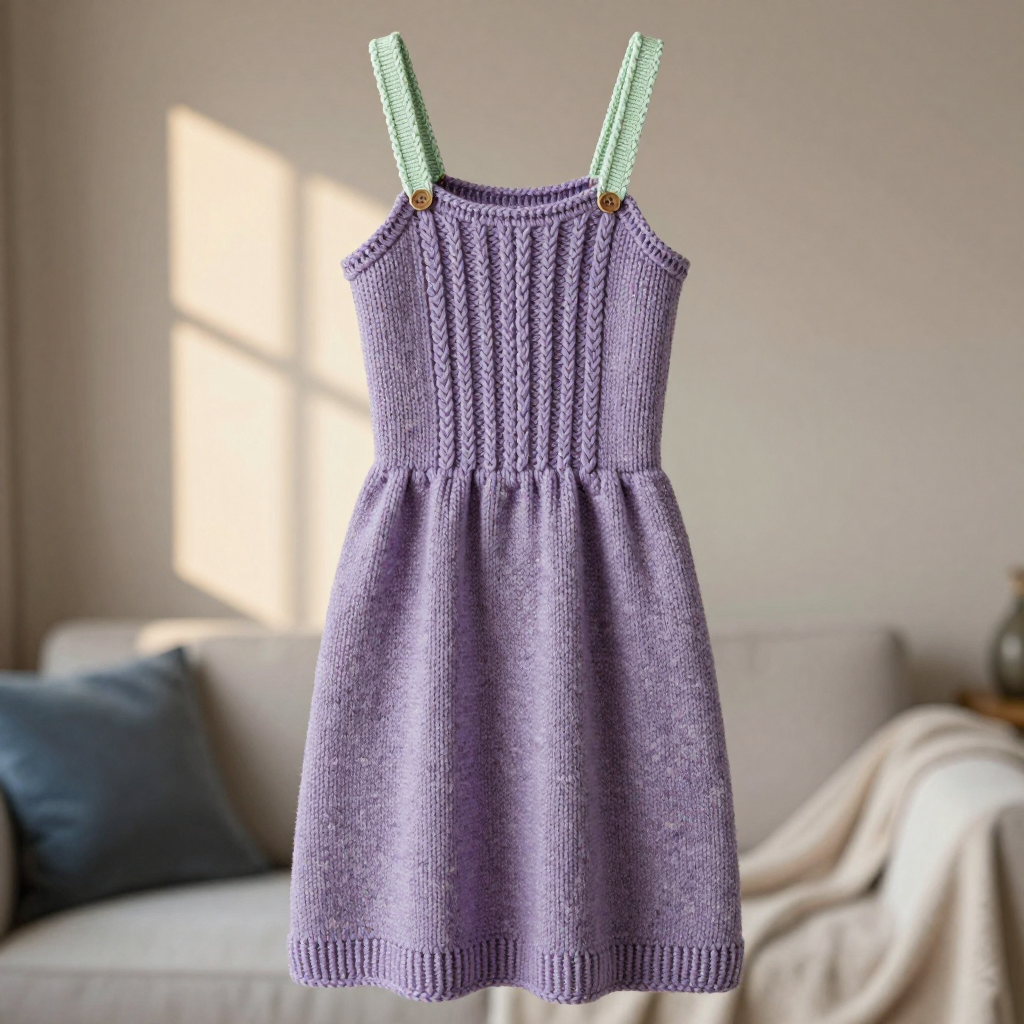
If you have ever looked at a knitted dress and thought "that looks way too hard for me," this pattern is here to change your mind. The Bootstitch Cable Knit Sundress is built from two simple shapes: a flat rectangle for the bodice and a plain knit tube for the skirt. That's it. The only "fancy" part is one single cable running down the center of the bodice, and we will walk you through every single stitch of it. Made in a flecked lavender tweed wool with thin mint garter-stitch straps, the finished dress has a rustic, slightly western feel, a gently flared A-line skirt, and a soft, cozy hand that drapes beautifully. It is perfect for a first garment, a first cable, or a first time working in the round, and it looks like something you bought at a boutique.
Materials Needed
- Yarn (main color): Lavender tweed wool, worsted weight (Category 4), approximately 200 yds / 100 g per skein. You will need about 420 yards (roughly 2 skeins plus a little).
- Yarn (strap color): Mint worsted tweed wool, about 30 yards.
- Circular needle: US 8 (5.0 mm), 24-inch length, for the bodice and skirt.
- Double-pointed needles (DPNs): Set of US 8 (5.0 mm), for the straps.
- Cable needle (CN): Any short, double-pointed needle used to hold stitches temporarily while you make a cable.
- Stitch markers: At least 4. These are small removable rings you slide onto your needle to mark places in your work.
- Tapestry needle: A large, blunt-tipped sewing needle with an eye big enough for yarn, used for sewing seams and weaving in ends.
- Scissors for cutting yarn.
- 2 small buttons (optional) for a decorative strap closure.
Finished size (Teen): Fits bust 30–32 in, waist 24–26 in. Bodice measures 15 in wide flat (30 in around) and 10 in tall. Skirt is about 18 in long from the pick-up edge to the hem, with a hem circumference of about 40 in. Total length from underarm to hem is approximately 22 in.
Abbreviations and Beginner Glossary
- k – knit. Insert the right needle into the front of the stitch from left to right, wrap yarn around, and pull the loop through.
- p – purl. Insert the right needle into the front of the stitch from right to left, wrap yarn around the front, and pull the loop through to the back.
- st(s) – stitch(es). One loop on your needle.
- RS – right side. The "public" side of the fabric that faces out when worn.
- WS – wrong side. The inside of the fabric.
- PM – place marker. Slide a stitch marker onto your needle to mark a spot.
- kfb – knit into front and back. Knit the stitch normally, but do not slide it off; then knit into the back loop of the same stitch and slide it off. This makes two stitches from one (an increase).
- C6F – Cable 6 Front. Slip 3 stitches onto the cable needle and hold them in front of your work, knit the next 3 stitches from the left needle, then knit the 3 stitches from the cable needle. This makes the cable twist to the left.
- C6B – Cable 6 Back. Slip 3 stitches onto the cable needle and hold them in back of your work, knit the next 3 stitches from the left needle, then knit the 3 stitches from the cable needle. This makes the cable twist to the right.
- Stockinette stitch – knit on RS rows, purl on WS rows. Gives a smooth, flat fabric.
- Garter stitch – knit every row. Gives a bumpy, stretchy fabric that does not curl.
- Bind off – the way to finish an edge so stitches do not unravel. Knit two stitches, lift the first over the second, and repeat across.
- Pick up and knit – insert your needle into the edge of finished fabric, wrap yarn, and pull up a loop, creating a new stitch.
Gauge
18 stitches and 24 rows = 4 inches (10 cm) in stockinette stitch on US 8 needles. The 24-stitch cable panel measures approximately 4.5 inches wide.
Why gauge matters: Gauge is how many stitches and rows fit into one inch of your knitting. If your gauge is off, your dress will be too big or too small, even though you followed every instruction. How to swatch: Cast on 30 stitches and work in stockinette for about 5 inches, then bind off. Lay it flat without stretching, place a ruler across the middle, and count how many stitches fit in 4 inches. If you have more than 18, your stitches are tight; switch to a larger needle. If you have fewer than 18, switch to a smaller needle. Repeat until you match.
Beginner Tips Before You Start
- Use stitch markers to track the cable panel. Place a marker on each side of the 24 cable stitches so you always know exactly where the cable begins and ends.
- Do not pull your yarn too tight. Tension is the number one beginner struggle. Let the yarn flow; tight stitches make cables and increases painful.
- Count your stitches at the end of every row. If the number is wrong, fix it right away rather than discovering it ten rows later.
- Write down your row numbers. Keep a tally on paper so you always know whether you are on a cable row (Row 3 of the panel) or a plain row.
- Trust the increase math. Each skirt increase round adds exactly 8 stitches. If your count is off, you skipped or added an increase.
- Block before you decide you don't like it. Tweed blooms and evens out dramatically after a light blocking.
Step-by-Step Instructions
Part 1: Bodice (worked flat as a rectangle)
Center Cable Panel (worked over 24 sts):
- Row 1 (RS): k3, p2, k6, p2, k6, p2, k3.
- Row 2 (WS): p3, k2, p6, k2, p6, k2, p3.
- Row 3: k3, p2, C6F, p2, C6B, p2, k3.
- Row 4: p3, k2, p6, k2, p6, k2, p3.
- Rows 5–8: Repeat Rows 1–2 twice more (work stitches as they appear; cable crossings happen only on Row 3).
- Repeat Rows 1–8 for the cable pattern.
Bodice:
- Row 1 (RS): Cast on 70 sts using the long-tail method. Work as follows: k8, PM, work Row 1 of the Center Cable Panel over the next 24 sts, PM, k8, p2, k10, p2, k10, p2, k8. (70 sts: 8 + 24 + 8 + 2 + 10 + 2 + 10 + 2 + 8)
- Row 2 (WS): p8, k2, p10, k2, p10, k2, p8, work Row 2 of the cable panel, p8. (70 sts)
- Rows 3–60: Continue in the established pattern, working the 24-st cable panel in pattern and all other stitches in stockinette (knit on RS, purl on WS), until the piece measures 10 inches from the cast-on edge, ending with a WS row. (70 sts)
- Final row: Bind off all stitches loosely in pattern. (0 sts)
Part 2: Skirt (worked in the round from the bodice lower edge)
With RS facing and using the circular needle, pick up and knit 70 stitches evenly along the lower cast-on edge of the bodice. Join to work in the round, and PM for the beginning of the round. (70 sts)
- Round 1: Knit. (70 sts)
- Round 2 (increase): *k7, kfb; repeat from * to end. (80 sts)
- Rounds 3–8: Knit. (80 sts)
- Round 9 (increase): *k8, kfb; repeat from * to end. (88 sts)
- Rounds 10–15: Knit. (88 sts)
- Round 16 (increase): *k10, kfb; repeat from * to end. (96 sts)
- Rounds 17–22: Knit. (96 sts)
- Round 23 (increase): *k11, kfb; repeat from * to end. (104 sts)
- Rounds 24–29: Knit. (104 sts)
- Round 30 (increase): *k12, kfb; repeat from * to end. (112 sts)
- Rounds 31–36: Knit. (112 sts)
- Round 37 (increase): *k13, kfb; repeat from * to end. (120 sts)
- Rounds 38–44: Knit. (120 sts)
- Round 45 (increase): *k14, kfb; repeat from * to end. (128 sts)
- Rounds 46–52: Knit. (128 sts)
- Round 53 (increase): *k15, kfb; repeat from * to end. (136 sts)
- Rounds 54–60: Knit. (136 sts)
- Round 61 (increase): *k16, kfb; repeat from * to end. (144 sts)
- Rounds 62–68: Knit. (144 sts)
- Round 69 (increase): *k17, kfb; repeat from * to end. (152 sts)
- Rounds 70–76: Knit. (152 sts)
- Round 77 (increase): *k18, kfb; repeat from * to end. (160 sts)
- Rounds 78–84: Knit. (160 sts)
- Round 85 (increase): *k19, kfb; repeat from * to end. (168 sts)
- Rounds 86–92: Knit. (168 sts)
- Round 93 (increase): *k20, kfb; repeat from * to end. (176 sts)
- Rounds 94–100: Knit. (176 sts)
- Round 101 (increase): *k21, kfb; repeat from * to end. (184 sts)
- Rounds 102–110: Knit. (184 sts)
- Final round: Bind off all stitches loosely knitwise. (0 sts)
The skirt measures approximately 18 inches from the pick-up edge to the hem and approximately 40 inches in circumference at the hem.
Part 3: Straps (make 2)
With mint yarn and double-pointed needles, cast on 4 stitches.
- Rows 1–12 inches: Work in garter stitch (knit every row) until the strap measures 12 inches. (4 sts)
- Final row: Bind off. (0 sts)
Make a second strap identically.
Assembly and Finishing
- Weave in all ends. Thread each yarn tail onto the tapestry needle and run it through the back of several stitches, then trim. Never knot your ends; knots create lumps.
- Block the pieces. Pin the bodice and skirt to the measurements above on a towel or blocking mat, mist lightly with water, and let dry completely. This opens the cable and evens the tweed.
- Try on the dress. Pin one end of each strap to the front top corners of the bodice, about 3 inches in from each side edge, and the other end to the back top edge. Cross the straps in back if you like. Adjust the length until it feels comfortable.
- Sew the straps securely in place with matching yarn, using several small stitches so they hold up to wear.
- Optional: Attach a small button at each front strap join for a western detail.
- Steam the cable panel gently to open the stitches and make the cable pop.
Pro Tips and Variations
- Change the colors: Try a cream bodice with rust straps, or a charcoal tweed with mustard straps. The two-color contrast is what makes this dress look designed.
- Adjust the length: To make the skirt longer or shorter, add or remove knit rounds between increase rounds. Each extra set of 7 rounds adds about 1 inch of length.
- Adjust the size: For a larger bodice, cast on in multiples of 10 extra stitches and add those stitches to the stockinette sections on either side of the cable. The skirt pick-up count will change to match.
- Substitute yarn: Any worsted-weight wool or wool blend works. Avoid slippery acrylics for the cable, as they show stitch definition less clearly. Always swatch a new yarn to confirm gauge.