Thistle Fringe Clutch Free Crochet Pattern: A Fairycore Sage & Cream Bag
Thistle Fringe Clutch: A Fairycore Sage & Cream Crochet Bag
Introduction
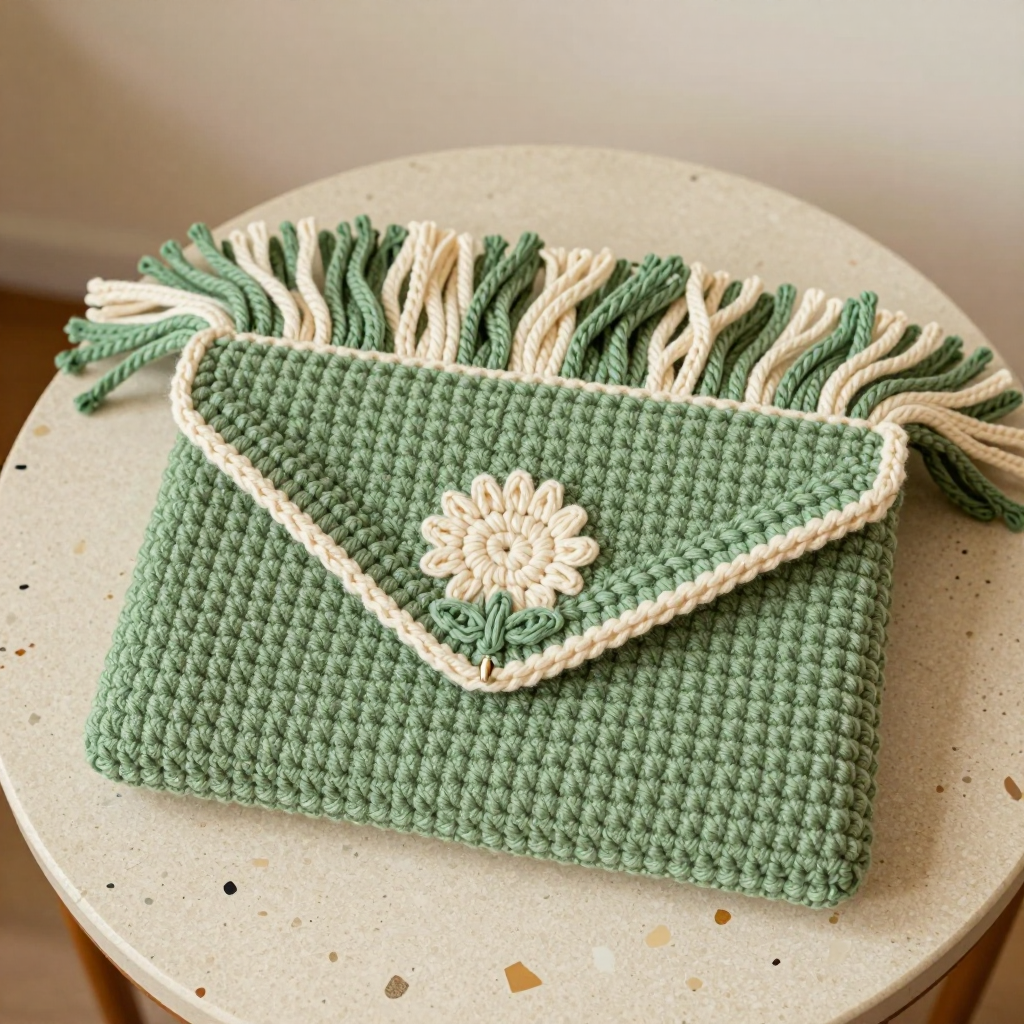
This Thistle Fringe Clutch is the perfect project for anyone who has mastered the basic crochet stitches and is ready to make something truly special. It is a slim, flat clutch worked in soft sage green, folded and seamed into a simple envelope shape, then dressed up with a cream crocheted thistle appliqué and a gentle sage-and-cream fringe along the opening. The finished piece is about 12 inches wide and 8 inches tall (not counting the fringe), with a dense, even single-crochet texture that feels sturdy in your hand yet soft and romantic to look at. It has a dreamy fairycore feel — like something you would carry to a woodland picnic or a summer wedding. Even if you have only made a few practice swatches before, every single step below is spelled out so you can follow along with confidence.
Materials Needed
- Yarn: Bulky (weight 5) acrylic or cotton-blend yarn — approximately 180 yd [165 m] sage green (Color A) and 45 yd [41 m] cream (Color B). A small scrap of extra cream is handy for the thistle crown.
- Crochet hook: US K/10.5 (6.5 mm), or whatever size gives you the gauge below.
- Stitch markers (at least 4) — small clips or safety pins work fine.
- Tapestry needle (also called a yarn needle) — a large, blunt needle with an eye big enough for bulky yarn.
- Scissors
- Optional: one small hidden snap closure for the opening.
- Finished size: Approximately 12 in [30.5 cm] wide x 8 in [20.5 cm] tall, excluding fringe. Fringe adds about 4 in [10 cm].
Abbreviations and Beginner Glossary
- ch — chain: wrap the yarn over your hook and pull it through the loop already on your hook. This makes a small linked loop.
- sc — single crochet: insert your hook into the stitch, yarn over, pull up a loop (2 loops on hook), yarn over again, pull through both loops. One loop remains.
- sl st — slip stitch: insert hook into the stitch, yarn over, and pull the yarn straight through both the stitch and the loop on your hook at the same time. It joins without adding height.
- dc — double crochet: yarn over first, insert hook into stitch, yarn over and pull up a loop (3 loops on hook), yarn over and pull through 2 loops, yarn over and pull through the last 2 loops.
- tr — treble crochet: yarn over twice, insert hook, pull up a loop, then yarn over and pull through 2 loops three times. (Listed for reference; not used in this pattern.)
- sc2tog — single crochet 2 stitches together (a decrease): insert hook into the first stitch, pull up a loop, insert hook into the next stitch, pull up a loop (3 loops on hook), yarn over and pull through all 3 loops. This turns 2 stitches into 1.
- st(s) — stitch(es).
- sp — space (the gap between stitches).
- magic ring — an adjustable loop of yarn you crochet into, then pull tight so no hole remains in the center.
- turn — flip your work over so you can crochet back across the row you just made.
- fasten off — cut the yarn a few inches from your work and pull the tail all the way through the last loop to lock it.
- right side — the "pretty" front face of your work that will show on the finished bag.
Gauge
11 sc and 12 rows = 4 in [10 cm] in single crochet.
Gauge means how many stitches and rows fit into a 4-inch square. It matters because it controls the finished size: if your stitches are bigger than this, your clutch will come out wider and taller than planned, and the flap may not line up. To check, crochet a small square about 5 in wide in single crochet, then lay a ruler across the middle and count how many stitches fit in 4 inches and how many rows fit in 4 inches. If you have more stitches than 11, switch to a larger hook; if you have fewer, switch to a smaller hook. Always make this swatch before starting the bag.
Beginner Tips Before You Start
- Count your first row twice. Row 1 sets the width of the whole clutch. You should have exactly 33 stitches — count them before moving on.
- Use a stitch marker in the first stitch of every row. It stops you from accidentally adding or losing a stitch at the edges, which is the most common beginner mistake.
- Do not pull the yarn too tight. Keep an even, relaxed tension so the fabric stays flat and does not curl at the corners.
- Keep your turning chain small. For single crochet, chain only 1 at the start of each row, and do not count it as a stitch.
- Work the thistle on a flat surface. The small rounds are easier to keep tidy when the piece is not dangling.
- Leave the long tails. The 24-inch tail on the body and the 10-inch tails on the thistle are your sewing thread — do not trim them short.
Step-by-Step Instructions
Body (make 1 in Color A)
Row 1: Ch 34. Sc in the 2nd ch from your hook and in each ch across. (33 sc)
Row 2: Ch 1, turn. Sc in each st across. (33 sc)
Rows 3–48: Repeat Row 2. (33 sc per row) The piece will measure approximately 12 in [30.5 cm] wide x 16 in [40.5 cm] tall.
Fasten off, leaving a 24 in [61 cm] tail for seaming.
Folding and Seaming the Body
Step 1: Lay the rectangle flat with the right side facing up. Fold the lower edge up so the piece measures approximately 8 in [20.5 cm] from the fold to the top opening. The remaining 8 in [20.5 cm] becomes the front flap.
Step 2: Thread the long tail onto your tapestry needle. Whipstitch or mattress-stitch the two side edges closed, from the fold up to the opening, working through both layers. Do not seam the top opening or the front flap.
Step 3: Weave in the ends securely.
Thistle Appliqué (make 1 in Color B)
The thistle has three parts: a rounded flower head, a small pointed crown, and a leafy base.
Flower head:
Rnd 1: Make a magic ring. Ch 1, work 6 sc into the ring. Join with sl st to the first sc. (6 sc)
Rnd 2: Ch 1, 2 sc in each st around. Join with sl st to the first sc. (12 sc)
Rnd 3: Ch 1, [sc in next st, 2 sc in next st] around. Join with sl st to the first sc. (18 sc)
Rnd 4: Ch 1, sc in each st around. Join with sl st to the first sc. (18 sc)
Rnd 5: Ch 1, [sc in next st, sc2tog] around. Join with sl st to the first sc. (12 sc)
Rnd 6: Ch 1, sc2tog around. Join with sl st to the first sc. (6 sc)
Stuff lightly with a tiny scrap of yarn or leave flat. Fasten off, leaving a 10 in [25 cm] tail.
Crown (thistle top): With B, join yarn to any st on Rnd 3 of the flower head. *Ch 4, sl st in the 2nd ch from hook, sc in the next ch, dc in the next ch, skip 1 st on the flower head, sl st in the next st; repeat from * around to create 6 small pointed crown spikes. Fasten off and weave in ends.
Leafy base:
Row 1: With B, ch 7. Sc in the 2nd ch from hook and in each ch across. (6 sc)
Row 2: Ch 1, turn. Sc2tog, sc in the next 2 sts, sc2tog. (4 sc)
Row 3: Ch 1, turn. Sc2tog twice. (2 sc)
Row 4: Ch 1, turn. Sc2tog. (1 sc)
Fasten off, leaving a 10 in [25 cm] tail. Sew the leafy base to the lower edge of the flower head.
Attaching the Thistle
Center the thistle appliqué on the front flap, approximately 2 in [5 cm] below the opening edge. Pin it in place and sew securely around the flower head and leafy base using the cream tails. Weave in the ends.
Fringe
Cut 24 strands each of A and B, each approximately 10 in [25 cm] long. Hold one A strand and one B strand together. Fold the pair in half to form a loop. Insert the hook from the wrong side to the right side along the top opening edge, pull the loop through, then pull the strand ends through the loop and tighten gently. Space the fringe pairs evenly across the opening edge, approximately every 1 in [2.5 cm], alternating the order of sage and cream strands for a soft mixed look. Trim the fringe ends evenly to approximately 4 in [10 cm].
Assembly and Finishing
Seaming: Use the long body tail and a whipstitch (a simple over-and-over stitch through both layers) or a mattress stitch (a flat seam worked by picking up one loop from each edge) to close the side edges. Work from the folded bottom up to the opening, keeping your stitches small and even so the seam lies flat and does not pucker.
Weaving in ends: Thread each tail onto the tapestry needle and run it through the back of several stitches, then back through a few more in the opposite direction to lock it. Trim close to the fabric.
Blocking: Lightly steam-block the clutch to settle the stitches and flatten the seams. Hold a steam iron an inch or two above the fabric (never press it directly onto acrylic, which can melt) and let the steam relax the fibers, then pat the clutch into shape and let it dry flat.
Optional closure: If you would like the clutch to stay shut, sew one half of a small hidden snap to the inside of the front flap and the other half to the inside back, centered at the opening.
Pro Tips and Variations
- Change the colors: Swap the sage and cream for dusty lavender and ivory, or blush pink and oatmeal, to shift the mood while keeping the same fairycore feel.
- Adjust the size: To make a wider clutch, add chains in multiples of 2 to Row 1 and add matching rows to the body; to make it taller, work extra repeat rows before folding. Keep the fold at roughly half the total height so the flap stays balanced.
- Substitute yarn: A worsted (weight 4) yarn held double, or a smooth cotton bulky, works beautifully — just re-check your gauge swatch, since fiber content changes how the fabric drapes.
- Personalize the fringe: Try all-cream fringe for a softer look, or add a few tiny cream beads to the thistle crown for extra sparkle.