The Spectral Gaze Throw Pillow Free Pattern – A Knitted Halloween Eyeball Cushion with Iridescent Pupil
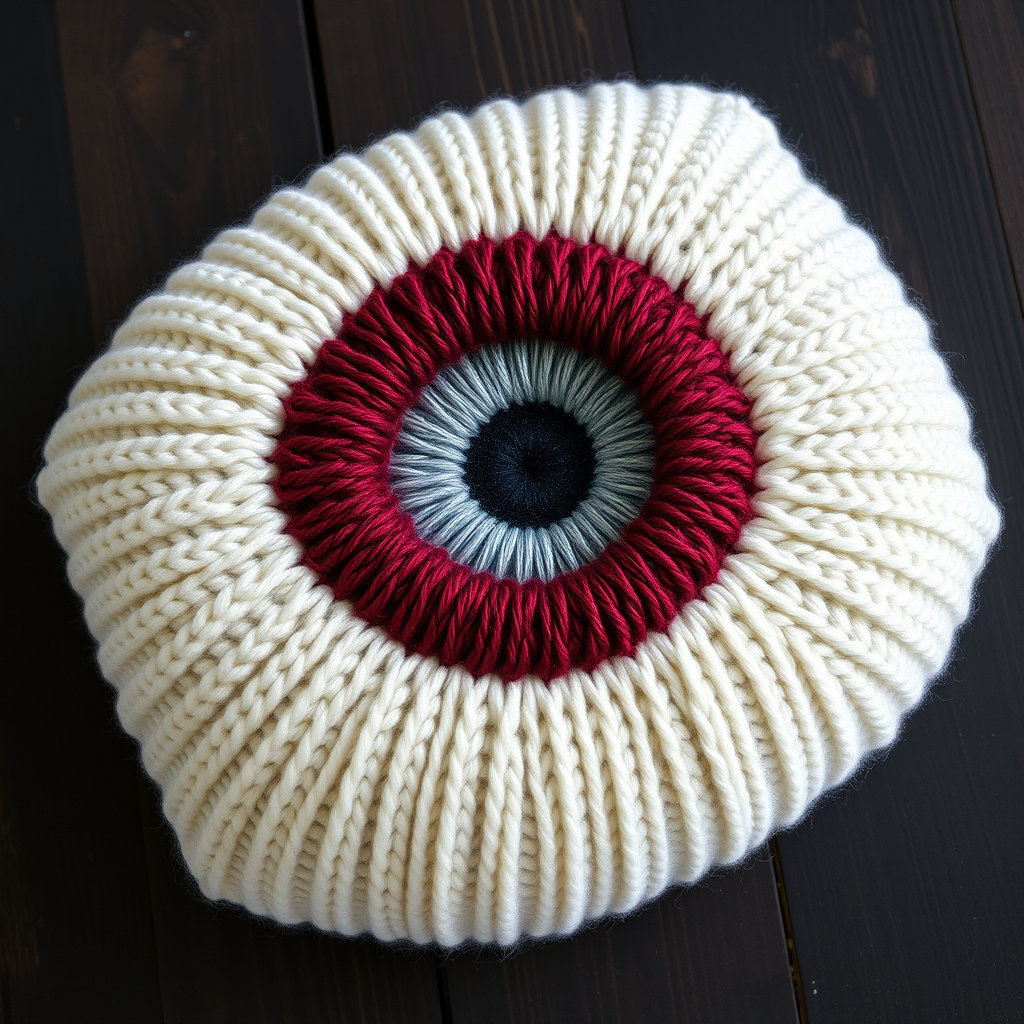
The Spectral Gaze Throw Pillow: A Knitted Halloween Eyeball with Iridescent Pupil
Transform your living space into a bewitching sanctuary with this knitted eyeball throw pillow, featuring a hauntingly beautiful iridescent pupil that catches the light. This cozy, textured cushion is the perfect blend of eerie elegance and handmade warmth for the Halloween season. Whether you're a seasoned knitter or a brave beginner looking for a spooky project, this pattern will guide you through creating a stunning piece of home decor that will have guests doing a double-take. The combination of soft cream, deep burgundy, and shimmering silver creates a visually striking piece that feels both luxurious and delightfully creepy.
Materials Needed
Before you begin your spectral creation, gather the following materials. All items are readily available at craft stores or online, and the worsted weight yarn ensures a quick, satisfying knit.
- Yarn: Worsted weight yarn in three colors:
- Cream for the sclera (white of the eye) – e.g., Lion Brand Heartland in Yosemite
- Deep burgundy for the iris – e.g., Vanna's Choice in Burgundy
- Iridescent silver for the pupil – e.g., Patons Metallic or any metallic blend yarn
- Needles: US 8 (5 mm) knitting needles
- Notions: Tapestry needle for seaming, stitch markers (optional but helpful)
- Gauge: 18 stitches and 24 rows = 4 inches in stockinette stitch (knit on RS, purl on WS). Always check your gauge to ensure the pillow is the correct size.
- Filling: Polyester fiberfill for stuffing the pillow
Step-by-Step Instructions
This pattern creates a circular eyeball pillow front with a knitted iris and pupil, then attaches to a simple backing. Worked flat in pieces and seamed, this project is broken down into manageable sections. Take your time, and you'll have a spectacular result.
Pupil (Make 1, in Iridescent Silver)
The pupil is the shimmering centerpiece of your pillow. It starts small and grows with simple increases, forming a square that you'll gently shape into a circle during assembly.
- Cast on 6 stitches.
- Row 1 (RS): Knit all.
- Row 2: Purl all.
- Row 3: K1, M1, K4, M1, K1 (8 sts). (M1 = Make 1: pick up the bar between stitches and knit into the back of it to avoid a hole.)
- Row 4: Purl all.
- Row 5: K1, M1, K6, M1, K1 (10 sts).
- Row 6: Purl all.
- Row 7: K1, M1, K8, M1, K1 (12 sts).
- Row 8: Purl all.
- Row 9: K1, M1, K10, M1, K1 (14 sts).
- Row 10: Purl all.
- Row 11: K1, M1, K12, M1, K1 (16 sts).
- Row 12: Purl all.
- Row 13: K1, M1, K14, M1, K1 (18 sts).
- Row 14: Purl all.
- Row 15: K1, M1, K16, M1, K1 (20 sts).
- Row 16: Purl all.
- Row 17: K1, M1, K18, M1, K1 (22 sts).
- Row 18: Purl all.
- Row 19: K1, M1, K20, M1, K1 (24 sts).
- Row 20: Purl all.
- Row 21: K1, M1, K22, M1, K1 (26 sts).
- Row 22: Purl all.
- Row 23: K1, M1, K24, M1, K1 (28 sts).
- Row 24: Purl all.
- Row 25: K1, M1, K26, M1, K1 (30 sts).
- Row 26: Purl all.
- Bind off loosely. Weave in ends. This forms a square-ish pupil; you can gently block it into a circle later.
Iris (Make 1, in Deep Burgundy)
The iris surrounds the pupil with rich, dark color. It follows a similar increase pattern but starts larger to create the layered effect.
- Cast on 30 stitches.
- Work in stockinette stitch (knit RS, purl WS) for 10 rows.
- Row 11 (RS): K1, M1, K28, M1, K1 (32 sts).
- Row 12: Purl all.
- Row 13: K1, M1, K30, M1, K1 (34 sts).
- Row 14: Purl all.
- Row 15: K1, M1, K32, M1, K1 (36 sts).
- Row 16: Purl all.
- Row 17: K1, M1, K34, M1, K1 (38 sts).
- Row 18: Purl all.
- Row 19: K1, M1, K36, M1, K1 (40 sts).
- Row 20: Purl all.
- Row 21: K1, M1, K38, M1, K1 (42 sts).
- Row 22: Purl all.
- Row 23: K1, M1, K40, M1, K1 (44 sts).
- Row 24: Purl all.
- Row 25: K1, M1, K42, M1, K1 (46 sts).
- Row 26: Purl all.
- Row 27: K1, M1, K44, M1, K1 (48 sts).
- Row 28: Purl all.
- Bind off loosely. Weave in ends. This creates a larger square that will be shaped into a circle when seamed.
Sclera (The White of the Eye, Make 1 in Cream)
The sclera is the largest piece, forming the main body of the pillow front. It's a simple stockinette square with increases at the end to give it a rounded appearance.
- Cast on 48 stitches.
- Work in stockinette stitch for 20 rows.
- Row 21 (RS): K1, M1, K46, M1, K1 (50 sts).
- Row 22: Purl all.
- Row 23: K1, M1, K48, M1, K1 (52 sts).
- Row 24: Purl all.
- Row 25: K1, M1, K50, M1, K1 (54 sts).
- Row 26: Purl all.
- Row 27: K1, M1, K52, M1, K1 (56 sts).
- Row 28: Purl all.
- Row 29: K1, M1, K54, M1, K1 (58 sts).
- Row 30: Purl all.
- Row 31: K1, M1, K56, M1, K1 (60 sts).
- Row 32: Purl all.
- Row 33: K1, M1, K58, M1, K1 (62 sts).
- Row 34: Purl all.
- Row 35: K1, M1, K60, M1, K1 (64 sts).
- Row 36: Purl all.
- Row 37: K1, M1, K62, M1, K1 (66 sts).
- Row 38: Purl all.
- Row 39: K1, M1, K64, M1, K1 (68 sts).
- Row 40: Purl all.
- Bind off loosely. Weave in ends.
Assembly
Now for the magical part – bringing your eyeball to life! This is where the pieces come together to form the layered, dimensional look.
- Layer the pieces: Place the pupil in the center of the iris, and the iris in the center of the sclera. Use a whip stitch with matching yarn to sew them together, creating a layered eyeball. To make it circular, gently gather the edges of each piece as you sew, pulling slightly to round the corners. This is a crucial step – don't rush it. The gentle gathering is what transforms the squares into the organic curves of an eye.
- Create the pillow back: Cast on 68 stitches in cream and work in stockinette stitch for 40 rows (or until it matches the front size). Bind off. This will be the plain back of your pillow.
- Seam the pillow: Place front and back pieces with right sides together. Sew around the edge, leaving a 6-inch opening. Turn right side out, stuff with polyester fiberfill until plump and squishy, and sew the opening closed using a ladder stitch for an invisible finish.
- Add optional veins: For a more realistic and gruesome look, add a few knitted 'veins' in burgundy. You can do this by crocheting a simple chain or knitting an i-cord, then sewing them onto the sclera in a branching pattern. This is a fun way to add extra character to your pillow.
And there you have it – your very own Spectral Gaze Throw Pillow! This project is a wonderful way to add a touch of spooky sophistication to your Halloween decor. The iridescent pupil is a real conversation starter, and the soft, chunky texture makes it a cozy addition to any sofa or bed. Happy knitting, and enjoy your bewitching new creation!


