Ochre Toe-Cap Utility Stocking Free Crochet Pattern
Ochre Toe-Cap Utility Stocking: A Free Beginner Crochet Pattern
Introduction
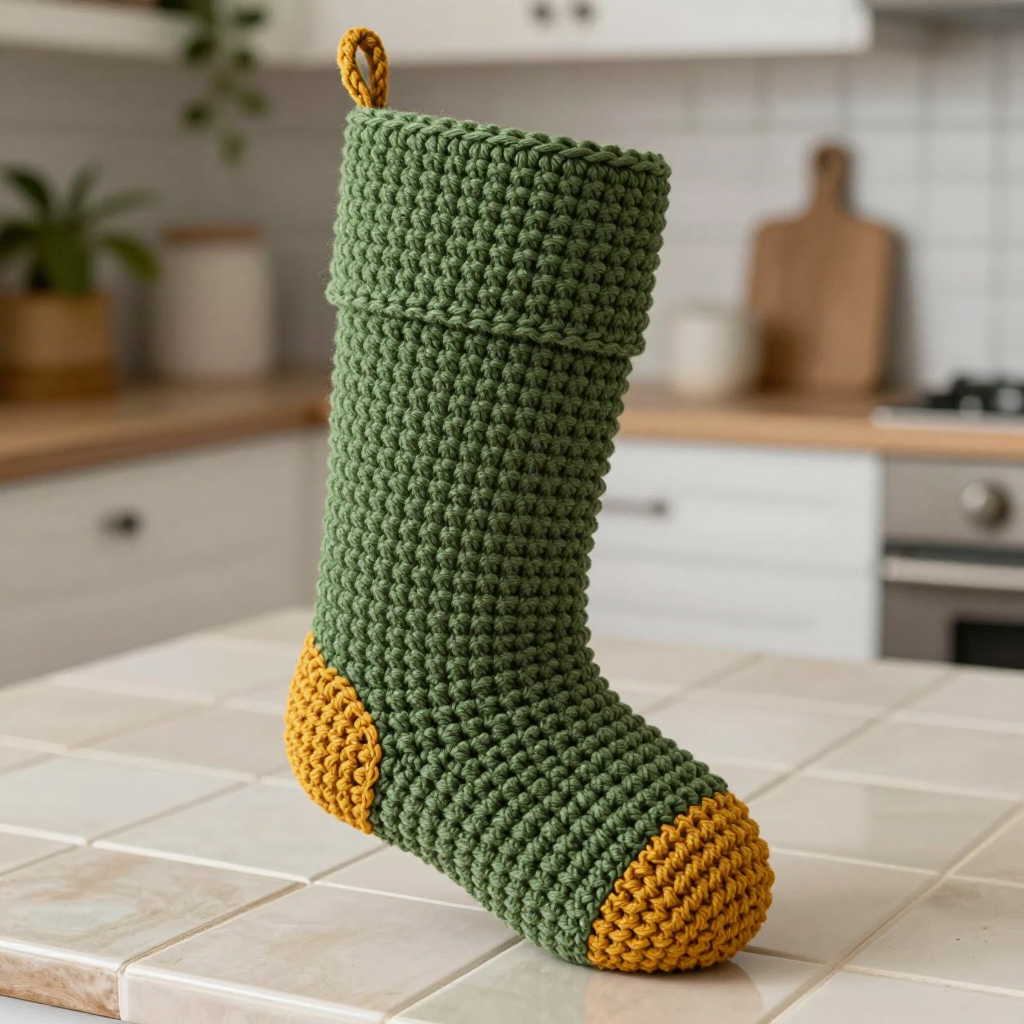
If you have never held a crochet hook before, this is the perfect first project to make you feel like a maker. The Ochre Toe-Cap Utility Stocking is a simple, flat-worked stocking in olive green worsted yarn, finished with a contrasting mustard toe cap that gives it a cozy, workwear-inspired look. It is worked entirely in single crochet — the most basic stitch there is — so you only need to learn one stitch to finish the whole thing. The finished stocking is about 16 inches long, soft and dense, with a slightly ridged texture and a folded cuff that makes it feel sturdy and handmade. Hang it by the fire, fill it with small gifts, or make a matching pair for the whole family.
Materials Needed
- Yarn: Worsted weight (Category 4) acrylic or wool blend — approximately 220 yards olive green (Color A) and 40 yards ochre/mustard yellow (Color B).
- Crochet hook: US J/10 (6.0 mm).
- Stitch markers (at least 4) — small plastic clips or safety pins used to mark a stitch so you do not lose your place.
- Tapestry needle — a large, blunt needle with an eye big enough for yarn, used for sewing seams and weaving in ends.
- Scissors — sharp, for cutting yarn.
- Finished size: Approximately 16 inches (40.5 cm) from cuff to toe, 7 inches (18 cm) wide across the foot, with a 12-inch (30.5 cm) leg circumference when flat.
Abbreviations and Beginner Glossary
- ch — chain. Make a loop of yarn on your hook, wrap yarn over the hook, and pull it through the loop. That is one chain.
- sc — single crochet. Insert your hook into the next stitch, wrap yarn over the hook, pull up a loop (you now have 2 loops on the hook), wrap yarn over again, and pull through both loops. One single crochet made.
- sc2tog — single crochet two stitches together (a decrease). Insert hook into the first stitch, pull up a loop, insert hook into the next stitch, pull up a loop (3 loops on hook), wrap yarn over and pull through all 3 loops. This turns two stitches into one and makes the piece narrower.
- st / sts — stitch / stitches. The little V-shapes you see along the top of your work.
- turn — flip your work over so you can crochet back the other way. You do this at the end of every row when working flat.
- fasten off — cut the yarn a few inches from your work, pull the tail all the way through the last loop, and tug gently to lock it.
- right side (RS) — the front, prettier face of the fabric that will show on the finished stocking.
- whipstitch — a simple sewing stitch: bring the needle up through both layers, wrap the yarn over the edge, and go back down, repeating along the seam like a spiral.
- weave in ends — thread a yarn tail onto a tapestry needle and sew it back and forth through the inside of the fabric so it disappears.
Gauge
Gauge: 13 single crochet stitches x 14 rows = 4 inches (10 cm).
Gauge means how many stitches and rows fit into a square of fabric. It matters because it controls the finished size: if your stitches are bigger than this, your stocking will come out too large; if smaller, too small. To check, crochet a small practice square about 5 inches wide and 5 inches tall in single crochet. Lay a ruler across the middle and count how many stitches fit in 4 inches, then how many rows fit in 4 inches. If you have more than 13 stitches, try a larger hook; if fewer, try a smaller hook. Do not skip this step — it takes ten minutes and saves your whole project.
Beginner Tips Before You Start
- Count every row. Single crochet rows all look alike, so keep a tally on paper or use a row counter app. Losing your place is the number one beginner mistake.
- Do not pull the yarn too tight. Keep your loops relaxed and even. Tight tension makes the fabric stiff and hard to sew through later.
- Use stitch markers. Place one in the first stitch of each row so you always know where the row begins and ends.
- The turning chain does not count. The ch 1 at the start of each row is just a little step-up; do not crochet into it or count it as a stitch.
- Work in good light. Olive green yarn is dark, and good lighting helps you see your stitches clearly.
- Keep your first row loose. The starting chain should be relaxed so the cuff edge is not tight.
Step-by-Step Instructions
Notes: The stocking is worked flat in single crochet, then seamed along the back and foot. The ch 1 at the beginning of each row does not count as a stitch. The toe cap is a separate flat piece sewn onto the finished stocking tip.
Stocking Body (worked flat with Color A)
Row 1: Ch 25. Sc in 2nd ch from hook and in each ch across. (24 sc)
Row 2: Ch 1, turn. Sc in each st across. (24 sc)
Rows 3–40: Repeat Row 2. (24 sc per row; piece measures approx. 12 inches long)
Shape the Heel
Row 41: Ch 1, turn. Sc in first 12 sts. Leave remaining 12 sts unworked. (12 sc)
Rows 42–52: Ch 1, turn. Sc in each st across. (12 sc)
Row 53: Ch 1, turn. Sc in each st across, then sc 12 sts along the unworked edge of Row 40 to rejoin. (24 sc)
Shape the Foot
Rows 54–66: Ch 1, turn. Sc in each st across. (24 sc per row; foot section measures approx. 4 inches)
Shape the Toe
Row 67: Ch 1, turn. Sc2tog, sc in next 20 sts, sc2tog. (22 sc)
Row 68: Ch 1, turn. Sc in each st across. (22 sc)
Row 69: Ch 1, turn. Sc2tog, sc in next 18 sts, sc2tog. (20 sc)
Row 70: Ch 1, turn. Sc in each st across. (20 sc)
Row 71: Ch 1, turn. Sc2tog, sc in next 16 sts, sc2tog. (18 sc)
Row 72: Ch 1, turn. Sc in each st across. (18 sc)
Row 73: Ch 1, turn. Sc2tog, sc in next 14 sts, sc2tog. (16 sc)
Row 74: Ch 1, turn. Sc in each st across. (16 sc)
Row 75: Ch 1, turn. Sc2tog, sc in next 12 sts, sc2tog. (14 sc)
Row 76: Ch 1, turn. Sc in each st across. (14 sc)
Row 77: Ch 1, turn. Sc2tog, sc in next 10 sts, sc2tog. (12 sc)
Row 78: Ch 1, turn. Sc in each st across. (12 sc)
Row 79: Ch 1, turn. Sc2tog, sc in next 8 sts, sc2tog. (10 sc)
Row 80: Ch 1, turn. Sc in each st across. (10 sc)
Row 81: Ch 1, turn. Sc2tog, sc in next 6 sts, sc2tog. (8 sc)
Row 82: Ch 1, turn. Sc in each st across. (8 sc)
Row 83: Ch 1, turn. Sc2tog, sc in next 4 sts, sc2tog. (6 sc)
Row 84: Ch 1, turn. Sc in each st across. (6 sc)
Row 85: Ch 1, turn. Sc2tog, sc in next 2 sts, sc2tog. (4 sc)
Row 86: Ch 1, turn. Sc in each st across. (4 sc)
Row 87: Ch 1, turn. Sc2tog twice. (2 sc)
Fasten off, leaving a long tail for seaming.
Cuff (worked flat with Color A)
Row 1: With right side facing, join A at the top edge of the stocking body. Ch 1, work 24 sc evenly across the top edge. (24 sc)
Rows 2–6: Ch 1, turn. Sc in each st across. (24 sc)
Fasten off, leaving a long tail.
Toe Cap (worked flat with Color B)
Row 1: Ch 9. Sc in 2nd ch from hook and in each ch across. (8 sc)
Row 2: Ch 1, turn. Sc in each st across. (8 sc)
Row 3: Ch 1, turn. Sc2tog, sc in next 4 sts, sc2tog. (6 sc)
Row 4: Ch 1, turn. Sc in each st across. (6 sc)
Row 5: Ch 1, turn. Sc2tog, sc in next 2 sts, sc2tog. (4 sc)
Row 6: Ch 1, turn. Sc in each st across. (4 sc)
Row 7: Ch 1, turn. Sc2tog twice. (2 sc)
Fasten off, leaving a long tail for sewing.
Assembly and Finishing
- Sew the back seam. Fold the stocking body in half with right sides together. Thread Color A onto your tapestry needle and whipstitch from the cuff down the back to the heel, then continue along the foot to the toe. Keep your stitches small and even so the seam lies flat. Turn the stocking right side out.
- Finish the cuff. Fold the cuff in half toward the inside and stitch it in place with a few small whipstitches, or leave it folded up as a decorative cuff.
- Attach the toe cap. Center the ochre toe cap over the tip of the stocking, aligning its pointed end with the toe. Pin it in place. Using Color B and your tapestry needle, whipstitch around the entire edge of the toe cap to secure it, working through both the cap and the stocking.
- Weave in all ends. Thread each yarn tail onto the tapestry needle and sew it back and forth through the inside of the fabric for about an inch, then trim close to the fabric.
- Block lightly if desired. Dampen the stocking with a spray bottle of water, gently shape it with your hands, and lay it flat to dry. This evens out the stitches and softens the fabric.
Pro Tips and Variations
- Change the colors. Swap the olive for deep red or forest green, and the ochre toe cap for cream or white, for a more traditional holiday look.
- Adjust the size. To make a smaller stocking, start with a shorter chain (for example, ch 21 for a narrower stocking) and work fewer body rows. To make it larger, add chains and rows in multiples that keep the stitch count even.
- Substitute yarn. Any worsted weight (Category 4) yarn works — cotton gives a crisper, more utility look, while a wool blend is softer and warmer. Always check your gauge again if you change yarn.
- Add a hanging loop. Crochet a short chain of about 12 stitches in Color B and sew it to the inside of the cuff for hanging.