Free Pattern: Round-Toe Bulky Ombre Knit Stocking
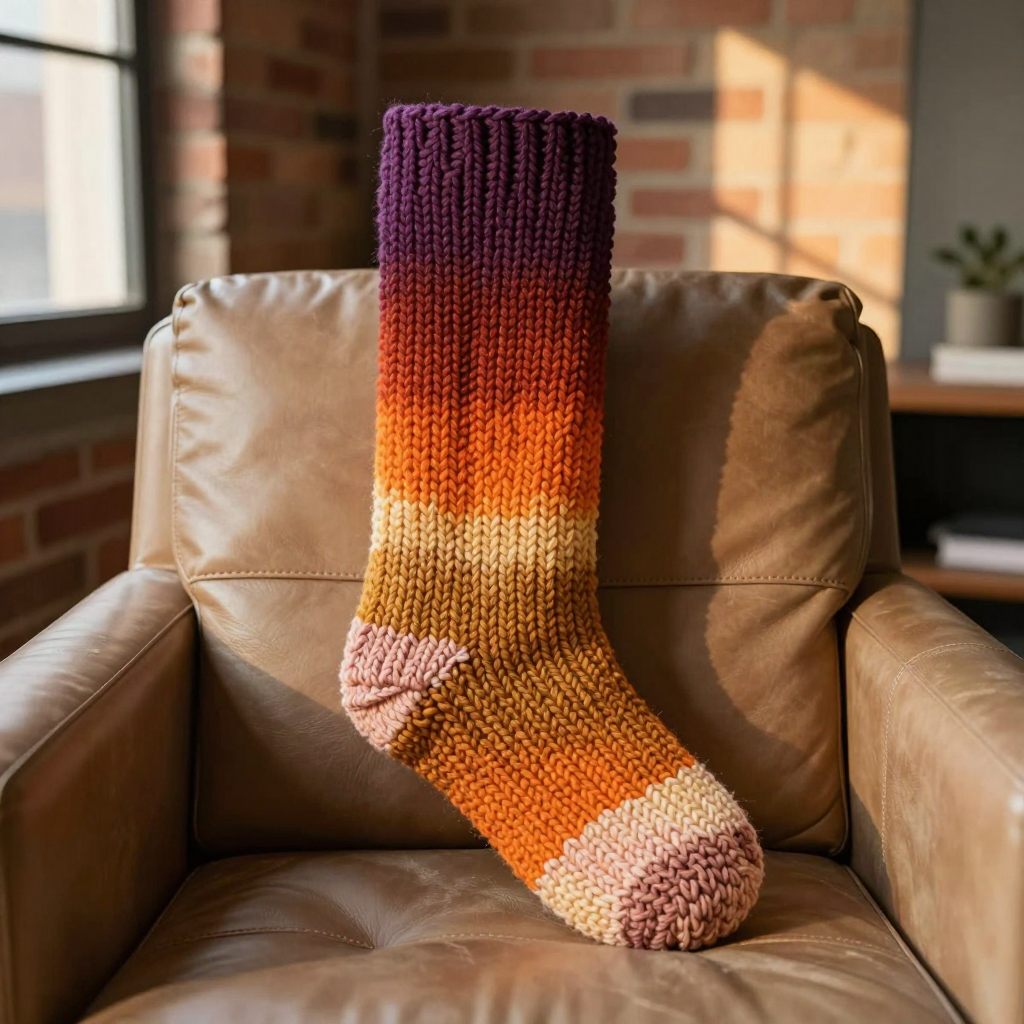
Free Pattern: Round-Toe Bulky Ombre Knit Stocking
Introduction
If you have never knitted a stitch in your life, this is the project to start with. This stocking is a simple straight tube worked in seed stitch, a wonderfully forgiving texture that looks impressive but only uses two stitches you will learn in the first five minutes. The magic comes from the yarn: five sunset shades that shift from deep plum at the cuff through burnt orange, pumpkin, and golden amber to a pale peach toe, with the stripes growing wider as you go. The finished stocking is about 16 inches long and 12 inches around, with a bumpy, matte, woolly surface that feels warm and substantial in your hands. There is no heel to turn, no complicated shaping, and no colorwork charts, just round after round of soothing texture and a gathered toe that closes with one pull of a needle.
Materials Needed
- Yarn: Bulky weight (category 5) wool, approximately 120–140 yards total, in five sunset ombre shades:
- Color A (deep plum): 20 yds
- Color B (burnt orange): 25 yds
- Color C (pumpkin): 30 yds
- Color D (golden amber): 30 yds
- Color E (pale peach): 25 yds
- Needles: US 10 (6.0 mm) 16-inch circular needle, plus a set of US 10 (6.0 mm) double-pointed needles (or the size needed to obtain gauge). You will use the circular needle for the flat cuff and the double-pointed needles once the tube becomes too small to stretch around the circular.
- Stitch marker: 1 removable or locking marker to mark the beginning of the round.
- Tapestry needle: A blunt-tipped needle with a large eye, for gathering the toe and weaving in ends.
- Scissors for cutting yarn.
- Finished size: 16 inches long from cuff to toe; 12 inches circumference (6 inches flat width).
Abbreviations and Beginner Glossary
- st / sts – stitch / stitches. One stitch is one loop on your needle.
- K (knit) – Insert the right needle into the front of the stitch on the left needle, wrap the yarn around the right needle, and pull the loop through to the front. The old stitch slides off.
- P (purl) – Insert the right needle into the front of the stitch from right to left, wrap the yarn around, and pull the loop through to the back. The old stitch slides off.
- RS – right side. The side of the fabric that faces out when the stocking is worn.
- WS – wrong side. The inside of the fabric.
- rep – repeat. Do the instruction again.
- * to * – repeat the instructions between the asterisks as many times as directed.
- rnd / rnds – round / rounds. One complete circle of knitting when working in the round.
- cast on – the very first step: creating the starting row of loops on your needle.
- bind off – the final step that locks stitches so they cannot unravel.
- seed stitch – a texture made by alternating knit and purl stitches, offset on every row so bumps form. Full instructions are in the pattern below.
- mattress stitch – an invisible seaming method that joins two edges side by side.
- gauge – how many stitches and rows fit in 4 inches of your knitting.
Gauge
14 sts and 20 rows = 4 inches in seed stitch, blocked.
Gauge matters because it decides the final size of your stocking. If your stitches are bigger than the pattern expects, the stocking will come out wider and longer; if smaller, it will be tight and short. To check, cast on about 24 stitches with your bulky yarn and US 10 (6.0 mm) needles, work in seed stitch for about 4 inches, then lay the swatch flat without stretching it and count how many stitches fit across 4 inches and how many rows fit in 4 inches. If you have more stitches than 14, go up a needle size; if fewer, go down. Block the swatch lightly before measuring, because seed stitch relaxes when wet.
Beginner Tips Before You Start
- Count your stitches every few rounds. You should always have 42. If you gain or lose one, fix it right away; a dropped stitch is much easier to rescue on the round it happens.
- Do not pull the yarn tight. Tension should feel relaxed. Tight knitting makes seed stitch stiff and hard to work, and it will make the stocking smaller than the measurements.
- Use the stitch marker. Place it at the beginning of the round so you always know where a round starts and ends. Move it up as you knit.
- Carry colors loosely up the inside. When you change colors, do not cut the old yarn. Leave a loose loop inside the stocking and pick the color back up when its stripe comes around again.
- Remember the offset rule. In seed stitch, you knit the purls and purl the knits. If the stitch below looks like a bump (a purl), knit it; if it looks like a smooth V (a knit), purl it.
- Switch to double-pointed needles when the tube gets tight. When the circular needle feels stretched, divide the 42 stitches across three double-pointed needles (14 on each) and continue with the fourth.
Step-by-Step Instructions
Stitch Guide: Seed Stitch
Worked flat (even number of sts): Row 1 (RS): *K1, p1; rep from * to end. Row 2: *P1, k1; rep from * to end. Repeat Rows 1–2 for pattern.
Worked in the round (even number of sts): Rnd 1: *K1, p1; rep from * to end. Rnd 2: *P1, k1; rep from * to end. Repeat Rnds 1–2 for pattern.
Cuff
With Color A, cast on 42 sts using the long-tail method. Do not join; work flat.
Row 1 (RS): *K1, p1; rep from * to end. (42 sts)
Row 2: *P1, k1; rep from * to end. (42 sts)
Rows 3–8: Repeat Rows 1–2 three more times. (42 sts; 8 rows total)
The piece now measures about 1.5 inches from the cast-on edge, ending after a wrong-side row.
Body: Join and Begin Stripes
Join to work in the round, being careful not to twist the cast-on edge. Place a marker for the beginning of the round. Work in seed stitch in the round, changing colors as indicated below. Carry colors loosely up the inside; do not cut after each stripe.
Rnds 1–2: Color A. Work in seed stitch in the round. (42 sts)
Rnds 3–5: Color B. (42 sts)
Rnds 6–9: Color C. (42 sts)
Rnds 10–14: Color D. (42 sts)
Rnds 15–20: Color E. (42 sts)
Rnds 21–27: Color D. (42 sts)
Rnds 28–35: Color C. (42 sts)
Rnds 36–44: Color B. (42 sts)
Rnds 45–54: Color A. (42 sts)
After Rnd 54, the piece measures approximately 14.5 inches from the cast-on edge. Do not bind off.
Shape Rounded Toe (Gathered Crown)
Final step: Cut the yarn, leaving a 24-inch tail. Thread the tail onto a tapestry needle. Slip all 42 live stitches onto the tail, then pull tightly to gather the toe closed. Bring the needle through the center of the gathered circle to the inside and weave in securely. (0 live sts)
Hanging Loop (Optional)
With Color A, pick up 6 sts along the inside of the cuff. Work 2 inches in seed stitch flat, repeating Rows 1–2 of the flat seed stitch pattern. Bind off and seam the end to the cuff to form a loop.
Assembly and Finishing
Seam the cuff: The 1.5-inch flat cuff has two open edges. Thread a tapestry needle with Color A and use mattress stitch to join them: bring the needle under one horizontal bar at the edge of each piece, alternating sides, and pull gently every few stitches. The seam should disappear into the fabric.
Weave in ends: Thread each yarn tail onto the tapestry needle and run it through the inside of the fabric for about 2 inches, following the bumps of the seed stitch. Trim close to the fabric. Do not knot the ends.
Block lightly: Mist the stocking with water until damp but not soaking. Shape the toe into a gentle curve with your fingers and lay the stocking flat to dry. Do not over-stretch the seed stitch; the texture should stay bumpy and soft.
Pro Tips and Variations
- Change the palette: Swap the sunset shades for winter colors such as deep green, forest, moss, sage, and cream, keeping the same widening stripe sequence.
- Adjust the size: To make a wider stocking, cast on 48 sts instead of 42 and work the same stripe sequence; the extra stitches add about 1.7 inches of circumference at this gauge.
- Substitute yarn: Any bulky weight wool works. Check your gauge swatch first, since fiber blends can knit up at a different size than pure wool.
- Add a cuff fold: Work the cuff for 3 inches instead of 1.5 inches and fold it over for a thicker, more traditional stocking top.


