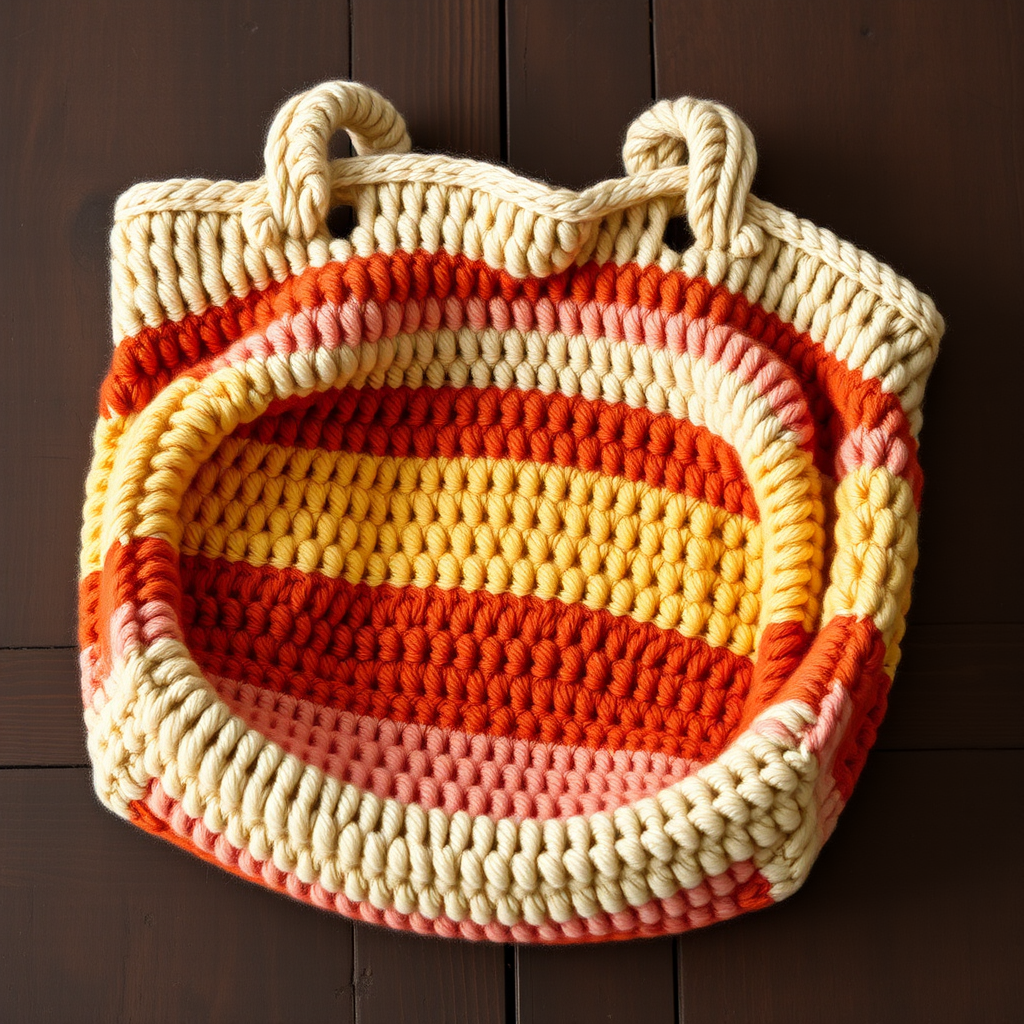
The Quotidian Satchel Free Pattern – A Textured Everyday Crochet Carryall

The Quotidian Satchel: A Textured Everyday Crochet Carryall
There are some crochet projects that are purely decorative, and then there are those that become trusted companions—the bags you reach for day after day because they're beautiful, functional, and perfectly suited to your life. The Quotidian Satchel is exactly that kind of project. With its dense, textured fabric created by alternating front-post and back-post double crochet stitches, this bag is sturdy enough to carry your daily essentials while maintaining an elegant, artisan aesthetic that pairs beautifully with everything from jeans to dresses.
The earthy color palette—heathered oat, deep forest, and rustic clay—gives this satchel a timeless, grounded feel that never goes out of style. Whether you're a seasoned crocheter looking for a satisfying project or a confident beginner ready to stretch your skills, this pattern offers clear instructions and a rewarding result. Let's dive in and create a bag you'll be proud to carry for years to come.
Materials Needed
Before you begin, gather the following supplies. Having everything ready will make your crochet session smooth and enjoyable.
Yarn
- Main Color (MC) – Heathered Oat: Approximately 400g of worsted weight cotton or cotton-blend yarn
- Contrast A – Deep Forest: Approximately 150g
- Contrast B – Rustic Clay: Approximately 100g
Pro tip: Cotton yarn is ideal for this project because it holds its shape well, is durable, and gets softer with each wash. A cotton-blend with a touch of acrylic or linen also works beautifully.
Tools and Notions
- 5.0 mm crochet hook (or size needed to obtain gauge)
- Stitch markers (at least 2)
- Tapestry needle for weaving in ends
- Scissors
- Optional: Fabric for lining, magnetic snap or button closure
Gauge
16 sc x 18 rows = 4 x 4 inches (10 x 10 cm) in pattern stitch. Always make a gauge swatch before starting—this ensures your bag turns out the correct size. If your gauge is off, adjust your hook size accordingly.
Step-by-Step Instructions
This pattern is worked in continuous rounds unless otherwise stated. Use a stitch marker to mark the beginning of each round—this is crucial for keeping track of your place, especially when working in the round.
Part 1: The Base (Worked in MC)
The base of your satchel is an oval shape that provides a sturdy foundation. Follow these rounds carefully, and don't rush—a well-made base ensures your bag stands up properly.
Round 1: Chain 2, work 6 single crochet (sc) in the second chain from your hook. (6 stitches)
Round 2: Work 2 sc in each stitch around. (12 stitches)
Round 3: *Sc in the next stitch, 2 sc in the next stitch* — repeat from * to * around. (18 stitches)
Round 4: *Sc in the next 2 stitches, 2 sc in the next stitch* — repeat from * to * around. (24 stitches)
Continue increasing in this manner: Each round, add one more single crochet between the increases. For example:
- Round 5: *Sc in next 3 stitches, 2 sc in next stitch* (30 stitches)
- Round 6: *Sc in next 4 stitches, 2 sc in next stitch* (36 stitches)
- Round 7: *Sc in next 5 stitches, 2 sc in next stitch* (42 stitches)
Continue this pattern until your oval base measures approximately 12 inches long and 5 inches wide. For a standard satchel, you'll need about 12 rounds total. The exact number may vary slightly depending on your gauge, so trust your measurements over the round count.
When your base reaches the correct size, end with a slip stitch to join the round. Do not fasten off—you'll continue directly into the sides.
Part 2: The Sides (Worked in Pattern Stitch)
Now we'll create the textured sides of your satchel. This is where the magic happens—the alternating front-post and back-post double crochet stitches create that beautiful, dense ribbed effect.
Round 1: Chain 1 (this does not count as a stitch). Working in the back loops only, single crochet in each stitch around. Join with a slip stitch to the first single crochet. This creates a crisp, defined edge where the base meets the sides.
Round 2: Chain 1. *Front post double crochet (FPdc) around the next stitch, back post double crochet (BPdc) around the next stitch* — repeat from * to * around. Join with a slip stitch to the first stitch.
Round 3: Chain 1. *BPdc around the next stitch, FPdc around the next stitch* — repeat from * to * around. Join with a slip stitch.
Repeat Rounds 2 and 3 alternately until the sides measure 8 inches high from the base. This alternating pattern creates a subtle basketweave texture that's both beautiful and sturdy.
Remember: A front post double crochet is worked by inserting your hook from front to back around the post of the stitch in the row below. A back post double crochet is worked by inserting your hook from back to front around the post. If you're new to post stitches, practice a few on a swatch first—it's easier than it looks!
When your sides reach 8 inches, fasten off the Main Color yarn.
Part 3: Color Block Stripe (Optional but Recommended)
This stripe adds visual interest and a modern, designer touch to your satchel. The earthy tones of Deep Forest and Rustic Clay complement the Heathered Oat beautifully.
Step 1: Attach Contrast A (Deep Forest) at the side seam of your bag.
Step 2: Work 2 rounds of single crochet in Contrast A.
Step 3: Switch to Contrast B (Rustic Clay) and work 2 rounds of single crochet.
Step 4: Switch back to Contrast A and work 2 rounds of single crochet.
Step 5: Fasten off Contrast A and Contrast B. Rejoin your Main Color yarn.
Tip: When changing colors, work the last yarn-over of the previous stitch with the new color to create a seamless transition. Weave in ends as you go to minimize finishing work later.
Part 4: Top Edge
With your Main Color yarn reattached, work 2 rounds of single crochet evenly around the top edge of the bag. This creates a clean, finished band that stabilizes the opening.
Do not fasten off—you'll use this yarn to create the handles.
Part 5: Handle Attachment (Make 2)
The handles are crocheted directly onto the bag, creating a sturdy, integrated design. Here's how:
Step 1: Mark the center 6 stitches on each side of the bag for handle placement. Use stitch markers to clearly identify these spots.
Step 2: Attach your yarn at one marked stitch on the first side.
Step 3: Chain 40 (or your desired handle length—measure against your shoulder for comfort).
Step 4: Slip stitch to the other marked stitch on the same side of the bag.
Step 5: Work 1 round of single crochet around the entire handle chain, working 2 single crochet in each chain stitch. This creates a thicker, more comfortable handle that won't dig into your shoulder.
Step 6: Fasten off and weave in the ends.
Step 7: Repeat the entire process for the other side of the bag.
Pro tip: For extra durability, you can work a second round of single crochet around the handle, or even reinforce it with a fabric strap sewn inside.
Part 6: Lining (Optional but Highly Recommended)
While the crochet fabric is dense, a lining adds polish and prevents small items from slipping through the stitches. Here's how to add one:
Step 1: Measure the inside of your finished bag—width, height, and depth.
Step 2: Cut a piece of fabric (cotton or linen works well) to these measurements, adding a 1-inch seam allowance on all sides.
Step 3: Fold the fabric in half with right sides together. Sew the side seams, leaving the top open.
Step 4: To create a flat bottom, pinch the bottom corners and sew across them diagonally, about 1 inch from the point.
Step 5: Turn the lining right side out and insert it into your bag.
Step 6: Fold the top edge of the lining under and whip stitch it to the inside of the bag's top edge, just below the single crochet band.
Part 7: Finishing Touches
Your Quotidian Satchel is almost complete! Follow these final steps for a professional finish:
Step 1: Weave in all remaining ends with your tapestry needle. Take your time—neat ends make a huge difference in the final look.
Step 2: Block the bag lightly to shape. To do this, gently wet the bag and shape it with your hands, then allow it to dry completely. This helps the stitches settle and the bag hold its form.
Step 3: If desired, attach a magnetic snap or button closure to the top edge. Position it in the center of the bag's opening, about 1 inch below the top edge. This keeps your belongings secure and adds a professional touch.
Care Instructions
To keep your Quotidian Satchel looking its best:
- Spot clean with mild soap and cold water
- Reshape and lay flat to dry
- Store stuffed with tissue paper to maintain shape
- Avoid machine washing or drying
Final Thoughts
Congratulations! You've created a beautiful, functional satchel that will serve you for years to come. The Quotidian Satchel is more than just a bag—it's a statement piece that reflects your creativity and skill. Every time you carry it, you'll be reminded of the care and intention you put into making something truly special.
This pattern is wonderfully versatile. Once you've mastered the basic construction, feel free to experiment with different color combinations, add a longer strap for crossbody wear, or embellish with tassels or embroidery. The possibilities are endless!
Happy crocheting, and enjoy your new favorite everyday companion.