Burgundy & Gold Drawstring Produce Pouch: Free Crochet Pattern
Burgundy & Gold Drawstring Produce Pouch: A Beginner-Friendly Free Crochet Pattern
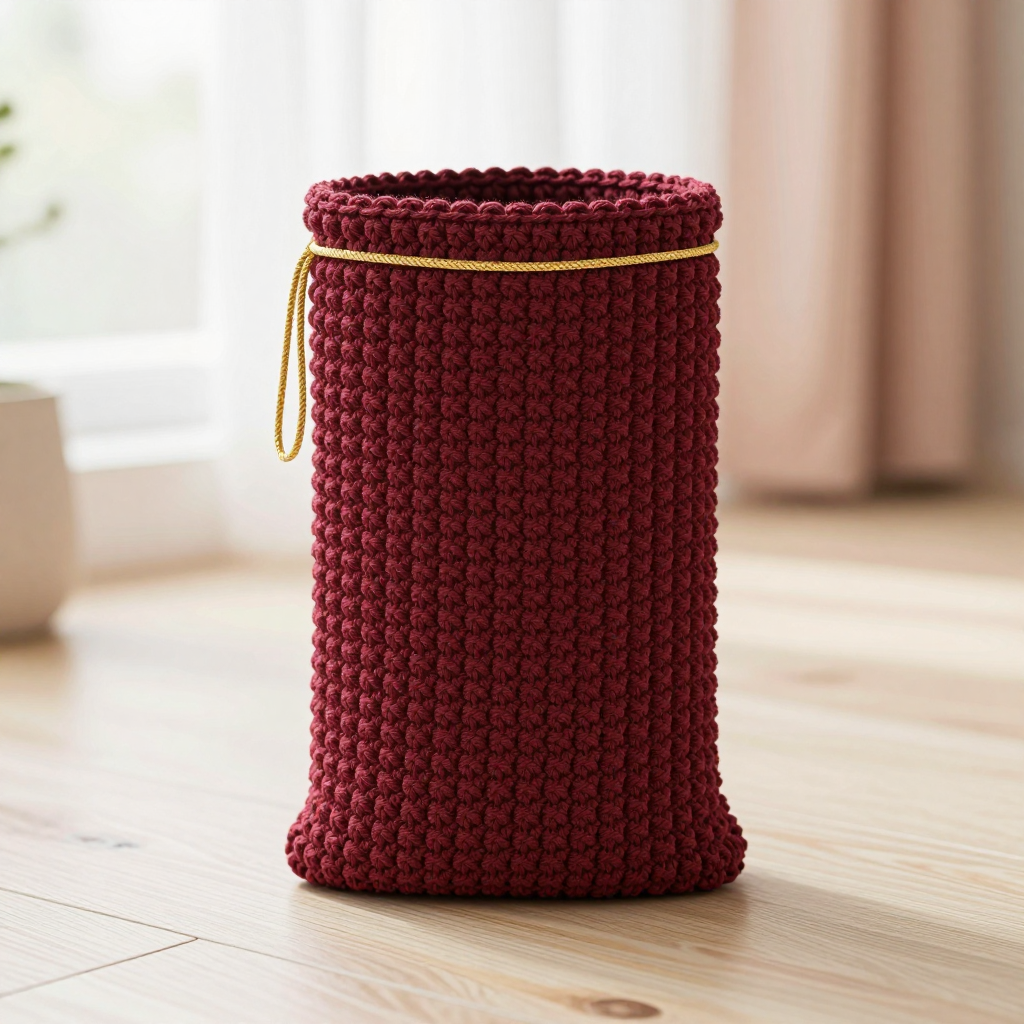
If you have never held a crochet hook before, this is the perfect first real project for you. This little produce pouch is worked almost entirely in one simple stitch, so you only need to learn one motion and then repeat it until the bag is done. It is special because it is genuinely useful: a sturdy, reusable bag that holds apples, lemons, garlic, or small groceries without stretching out of shape. When finished, it looks like a deep burgundy tube with a flat oval bottom and a thin gold cord threaded through the top, giving it a clean, minimalist look you will be proud to carry to the market. The fabric feels dense and slightly bumpy, firm enough to keep produce safe but soft enough to fold into your pocket when empty.
Materials Needed
- Yarn (body): Worsted weight (category 4) cotton yarn, approximately 150–180 yards of burgundy. Cotton is recommended because it is strong, washable, and does not stretch like acrylic.
- Yarn (drawstring): Worsted weight (category 4) cotton yarn, approximately 20–25 yards of gold.
- Crochet hook: Size H/8 (5.0 mm).
- Stitch marker: One removable marker (or a safety pin, or a short scrap of contrasting yarn).
- Tapestry needle: A large-eyed, blunt-tipped needle for weaving in ends.
- Scissors.
Finished size: Approximately 8 inches (20 cm) wide at the base, 10 inches (25 cm) tall, with a 22-inch (56 cm) circumference.
Abbreviations and Beginner Glossary
Read this list once before you begin. Every term used later in the pattern is explained here in plain English.
- ch – chain: Make a loop with the yarn on your hook (a "slip knot"), then wrap the yarn over the hook and pull it through the loop already on the hook. That is one chain. Chains look like a row of little V's.
- sc – single crochet: Insert your hook into the next stitch, wrap the yarn over the hook, pull it up through the stitch (you now have 2 loops on the hook), wrap the yarn over again, and pull it through both loops. One single crochet made.
- sl st – slip stitch: Insert your hook into the stitch, wrap the yarn over, and pull it straight through both the stitch and the loop on your hook in one motion. It makes a nearly invisible joining stitch.
- sc2tog – single crochet 2 stitches together (a decrease): Insert your hook into the next stitch, pull up a loop (2 loops on hook), insert your hook into the following stitch, pull up a loop (3 loops on hook), wrap the yarn over, and pull through all 3 loops. Two stitches become one. (Note: this pattern does not actually use sc2tog, but it is listed here so you recognize it in other patterns.)
- st(s) – stitch(es): A single completed stitch, or several of them.
- rnd – round: One complete circle of stitches worked around the tube.
- back loop only (BLO): Every stitch has two top loops, a front one (closer to you) and a back one (farther away). Working "in the back loop only" means you insert your hook under just the far loop, leaving the near loop untouched. This creates a visible ridge.
- 2 sc in next st (an increase): Work two single crochets into the same stitch. This makes the piece wider.
- 3 sc in last ch: Work three single crochets into the same chain. This turns the corner at the end of the base.
- join: After the last stitch of a round, work a slip stitch into the first stitch of that round to close the circle.
- fasten off: Cut the yarn a few inches from your work, then pull the tail all the way through the last loop to lock it.
- weave in ends: Thread a yarn tail onto the tapestry needle and sew it back and forth through the fabric so it disappears.
Gauge
16 single crochet stitches x 18 rounds = 4 inches (10 cm) worked in single crochet in the round.
Why gauge matters: Gauge is simply how big your stitches turn out. If your stitches are larger than the pattern expects, your bag will be too big and loose, and small produce could slip through gaps. If they are smaller, the bag will be too tight and stiff. Because this bag is meant to hold food securely, a dense, even fabric is the whole point.
How to make a gauge swatch: With your burgundy yarn and H/8 hook, chain 20. Work single crochet rows (turning at the end of each row) until the piece is about 4 inches tall. Lay it flat, do not stretch it, and count how many stitches fit across 4 inches and how many rows fit in 4 inches. If you have more than 16 stitches, your tension is tight — try a slightly larger hook. If you have fewer than 16, your tension is loose — try a slightly smaller hook. Then begin the pattern.
Beginner Tips Before You Start
- Use the stitch marker every single round. Because the bag is worked in a continuous spiral, there is no seam to tell you where a round begins. Clip the marker into the first stitch of each round and move it up as you go.
- Do not pull the yarn too tight. Hold the yarn with gentle, even tension. If you yank it, your hook will fight you and your hand will ache. Aim for "snug," not "strangled."
- Count your stitches at the end of every round. The base rounds change count (42, 48, 54, 60, 66), and the body stays at 66. Counting takes ten seconds and saves you from ripping out an hour of work.
- Work the base flat and untwisted. When you finish Round 1, the oval will want to curl. Lay it flat on the table and check that it forms a neat oval before you continue.
- Keep your tension dense. This is the one project where slightly firm stitches are your friend — a dense fabric means no holes for produce to poke through.
- Do not worry about perfection. Cotton yarn is forgiving, and blocking at the end evens out small wobbles.
Step-by-Step Instructions
Notes: The pouch is worked in continuous rounds from the base upward. Do not join rounds unless the pattern tells you to. Place your stitch marker in the first stitch of each round.
Base (flat oval)
With burgundy, ch 21.
Rnd 1: Sc in 2nd ch from hook, sc in each of next 18 ch, 3 sc in last ch. Working along the opposite side of the foundation chain, sc in each of next 18 ch, 2 sc in same ch as first sc. Place marker. (42 sts)
Rnd 2: 2 sc in first st, sc in each of next 18 sts, 2 sc in each of next 3 sts, sc in each of next 18 sts, 2 sc in each of last 2 sts. (48 sts)
Rnd 3: Sc in first st, 2 sc in next st, sc in each of next 18 sts, [sc in next st, 2 sc in next st] 3 times, sc in each of next 18 sts, [sc in next st, 2 sc in next st] 2 times. (54 sts)
Rnd 4: Sc in each of first 2 sts, 2 sc in next st, sc in each of next 18 sts, [sc in each of next 2 sts, 2 sc in next st] 3 times, sc in each of next 18 sts, [sc in each of next 2 sts, 2 sc in next st] 2 times. (60 sts)
Rnd 5: Sc in each of first 3 sts, 2 sc in next st, sc in each of next 18 sts, [sc in each of next 3 sts, 2 sc in next st] 3 times, sc in each of next 18 sts, [sc in each of next 3 sts, 2 sc in next st] 2 times. (66 sts)
Rnd 6: Sc in each st around. (66 sts)
The base now measures approximately 8 inches (20 cm) wide and 3 inches (7.5 cm) deep.
Body (straight tube)
Rnd 7: Working in the back loop only, sc in each st around. (66 sts)
Rnds 8–52: Sc in each st around. (66 sts)
That is 45 identical rounds in total (Rounds 8 through 52). The body now measures approximately 10 inches (25 cm) from the base to the top edge. Do not fasten off.
Top Edging
Rnd 53: Ch 1, sc in each st around, sl st to first sc to join. (66 sts) Fasten off burgundy. Weave in ends.
Drawstring Channel
With burgundy, join yarn with a sl st at any stitch on Rnd 52.
Rnd 1: Ch 1, sc in each st around, sl st to first sc to join. (66 sts)
Rnd 2: Ch 1, [sc in next st, ch 1, skip next st] around, sl st to first sc to join. (33 sc, 33 ch-1 spaces)
Rnd 3: Ch 1, sc in each st and ch-1 space around, sl st to first sc to join. (66 sts)
Fasten off burgundy. Weave in ends.
Gold Drawstring Cord
With gold, leave a 6-inch (15 cm) tail, then ch 60. Fasten off, leaving a second 6-inch (15 cm) tail.
Thread the cord through the ch-1 spaces of the drawstring channel, beginning and ending at the same point so both ends come out together. Tie the ends together securely and trim to your desired length.
Assembly and Finishing
Weaving in ends: Thread each yarn tail onto the tapestry needle. Working on the inside of the bag, push the needle through the backs of several nearby stitches, then change direction and go through a few more. This zig-zag locks the tail so it will not work loose in the wash. Trim the yarn close to the fabric.
Threading the drawstring: Use your fingers or a small safety pin attached to the cord end to guide the gold chain through each ch-1 space, one space at a time. Go all the way around and bring the end back out beside where you started. Pull gently to gather the top and check that it closes smoothly.
Blocking: Dampen the finished pouch lightly with cool water (a spray bottle works well). Stuff it loosely with a towel or a few plastic bags so it holds its tube shape, then set it on a dry towel to air-dry completely. This relaxes the cotton, evens out any uneven stitches, and gives the base a flat, crisp oval. Do not wring or twist the bag.
Final check: Give the bag a gentle tug to make sure the drawstring slides freely and the base sits flat. Your pouch is ready to use for produce, small groceries, or storage.
Pro Tips and Variations
- Change the colors: Swap the burgundy for any deep, rich shade — forest green, navy, or mustard — and choose a contrasting cord color for the drawstring. This is a great way to use up partial skeins.
- Make it bigger or smaller: To widen the bag, add one more base round following the same increase pattern (Rnd 7 would be: sc in each of first 4 sts, 2 sc in next st, and so on, giving 72 sts), then work the body on 72 stitches. To make a smaller bag, stop the base after Round 4 (60 sts) and work the body on 60 stitches.
- Substitute the yarn: Any worsted weight (category 4) cotton or cotton-blend works. Avoid pure acrylic, which stretches and can sag when loaded with heavy produce. If you use a thinner yarn, drop to a G/6 (4.0 mm) hook and check your gauge again.
- Add a hanging loop: Before fastening off the top edging, ch 12 and sl st back into the same stitch to form a small loop — perfect for clipping the pouch to a market tote or a belt.