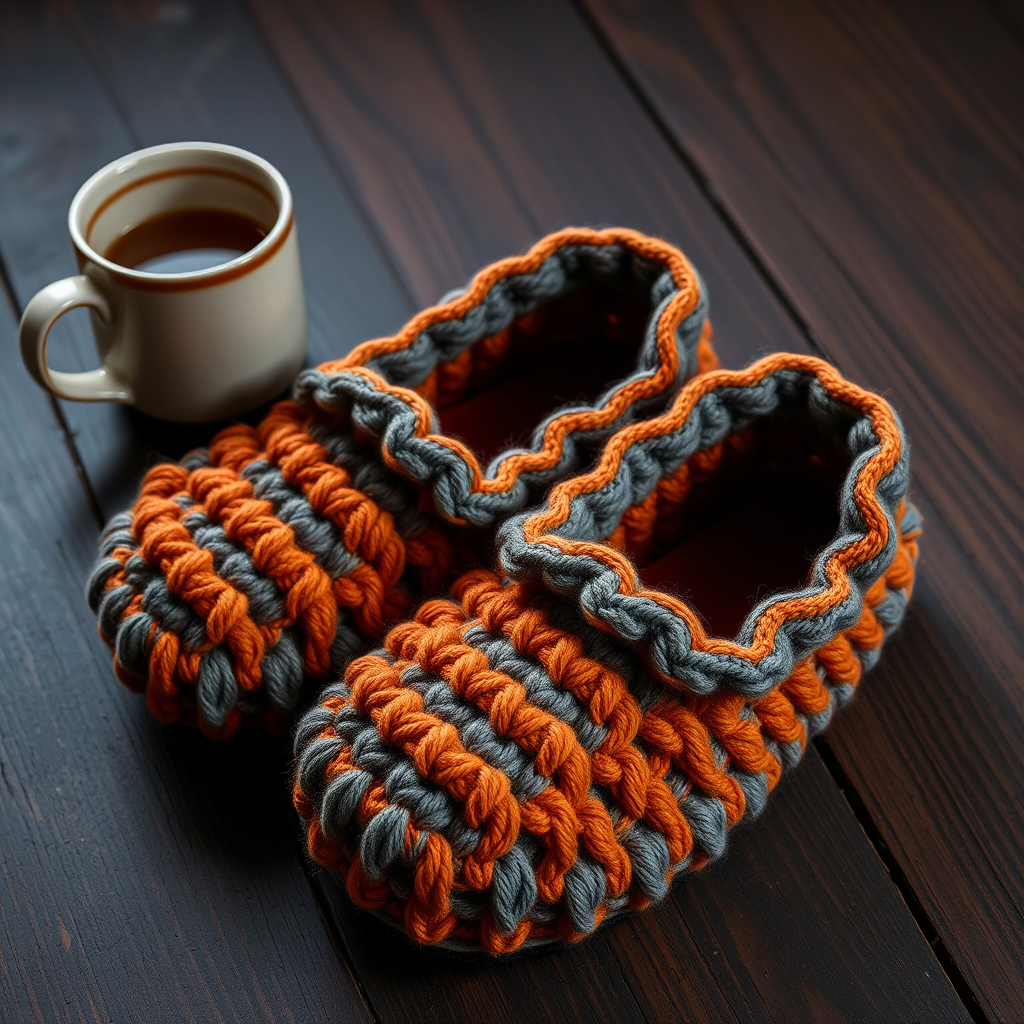
The Golden Hour Cocoon Slippers Free Pattern – A Crocheted Symphony of Honeycomb Textures

The Golden Hour Cocoon Slippers Free Pattern – A Crocheted Symphony of Honeycomb Textures
Wrap your feet in the warmth of a golden sunset with these plush, honeycomb-textured slippers. This pattern weaves together rich amber and cream yarns to create a cozy, handcrafted treasure for chilly evenings. The dimensional, waffle-like surface of the honeycomb stitch not only looks stunning but also provides extra warmth and cushioning. Whether you're a seasoned crocheter or a curious beginner, this pattern is designed to guide you through every step, resulting in a pair of slippers that feel like a warm embrace for your feet. Let's dive into this delightful project that combines functionality with artisanal beauty.
Materials Needed
Before you begin, gather the following materials to ensure a smooth and enjoyable crocheting experience:
- Yarn: Worsted weight yarn in two colors:
- Color A (Amber Gold) – approximately 200 yards
- Color B (Cream) – approximately 200 yards
- Hook: US Size H/8 (5.0 mm) crochet hook
- Gauge: 4 inches = 14 stitches and 10 rows in half double crochet (hdc)
- Other: Yarn needle for weaving in ends and sewing pieces together, scissors
Pro Tip: If you want a more durable sole, consider adding a piece of suede or using puff paint on the bottom of the finished slippers for slip resistance.
Step-by-Step Instructions
Follow these detailed instructions carefully. The pattern is divided into three main parts: the sole, the upper, and the honeycomb texture panel. Take your time, and don't hesitate to refer back to the gauge and stitch definitions if needed.
Slipper Sole (Make 2)
The sole is worked in continuous rounds of half double crochet, creating a dense, sturdy base for your slipper.
Round 1: With Color A, chain 11. Work 3 hdc in the 3rd chain from hook (the first 2 chains count as your first hdc), hdc in the next 7 chains, 3 hdc in the last chain. Now, working on the opposite side of the chain, hdc in the next 7 chains. Join with a slip stitch to the top of the first hdc. (20 hdc total)
Round 2: Chain 2 (counts as hdc), hdc in the same stitch, 2 hdc in the next 2 stitches, hdc in the next 7 stitches, 2 hdc in the next 3 stitches, hdc in the next 7 stitches, 2 hdc in the last stitch. Join with a slip stitch. (28 hdc total)
Round 3: Chain 2, hdc in the same stitch, hdc in the next stitch, 2 hdc in the next stitch, hdc in the next 2 stitches, 2 hdc in the next stitch, hdc in the next 7 stitches, (2 hdc in the next stitch, hdc in the next 2 stitches) twice, 2 hdc in the next stitch, hdc in the next 7 stitches, 2 hdc in the next stitch, hdc in the next 2 stitches, 2 hdc in the next stitch. Join with a slip stitch. (36 hdc total)
Round 4: Chain 2, hdc in each stitch around. Join with a slip stitch. Fasten off and weave in the end. (36 hdc total)
Note: The sole should now measure approximately 9-10 inches in length, perfect for an average adult foot. If you need a different size, adjust the initial chain length in multiples of 2.
Slipper Upper (Make 2)
The upper forms the body of the slipper that wraps around your foot. It's worked similarly to the sole but with a slightly different shape to accommodate the instep.
Round 1: With Color B, chain 10. Work 3 hdc in the 3rd chain from hook, hdc in the next 6 chains, 3 hdc in the last chain. Working on the opposite side, hdc in the next 6 chains. Join with a slip stitch. (18 hdc total)
Round 2: Chain 2, hdc in the same stitch, 2 hdc in the next 2 stitches, hdc in the next 6 stitches, 2 hdc in the next 3 stitches, hdc in the next 6 stitches, 2 hdc in the last stitch. Join with a slip stitch. (24 hdc total)
Round 3: Chain 2, hdc in the same stitch, hdc in the next stitch, 2 hdc in the next stitch, hdc in the next 2 stitches, 2 hdc in the next stitch, hdc in the next 6 stitches, (2 hdc in the next stitch, hdc in the next 2 stitches) twice, 2 hdc in the next stitch, hdc in the next 6 stitches, 2 hdc in the next stitch, hdc in the next 2 stitches, 2 hdc in the next stitch. Join with a slip stitch. (32 hdc total)
Round 4: Chain 2, hdc in each stitch around. Join with a slip stitch. Fasten off, leaving a long tail for sewing. (32 hdc total)
Tip: The upper should have a slight curve that will fit comfortably over the top of your foot. If it feels too tight, you can add an extra round of hdc without increases.
Honeycomb Texture Panel (Make 2)
This is the star of the pattern! The honeycomb texture is created by working clusters of hdc in the spaces between stitches, giving a beautiful waffle-like effect.
Row 1: With Color A, chain 13. Hdc in the 3rd chain from hook and in each chain across. Turn. (11 hdc)
Row 2: Chain 2, hdc in the first stitch, *skip 1 stitch, 2 hdc in the next stitch* repeat across. Turn. (11 hdc)
Row 3: Chain 2, hdc in the first stitch, *hdc in the space between the two hdc of the previous row, 2 hdc in the next space* repeat across. Turn. (11 hdc)
Rows 4-10: Repeat Row 3. Fasten off, leaving a long tail for sewing.
Understanding the Honeycomb Stitch: The key to this texture is working into the spaces between the clusters rather than into the stitches themselves. This creates the raised, dimensional honeycomb effect. Take your time with Row 3, as it sets the pattern for the remaining rows.
Assembly
Now it's time to bring all the pieces together. Follow these steps carefully to ensure a professional finish.
- Attach the Honeycomb Panel: With right sides together, sew the honeycomb panel to the top edge of the upper, matching the curved edge. Use a whip stitch with Color A. The panel should sit on top of the upper, covering the instep area.
- Join Upper to Sole: Place the upper on the sole, aligning the heel and toe. The sole should be slightly larger than the upper, which is normal. Sew them together using a whip stitch with Color B, leaving the top opening for the foot. Make sure to distribute the fabric evenly to avoid puckering.
- Repeat for Second Slipper: Follow the same steps to assemble the second slipper.
Finishing
Weave in all loose ends using your yarn needle. This step is crucial for durability and a clean look. If you want to add extra grip to the soles, you can sew a piece of suede to the bottom or apply a layer of puff paint in a decorative pattern. Allow any paint to dry completely before wearing.
Final Touch: Give your slippers a gentle steam block to even out the stitches and enhance the honeycomb texture. Simply hold a steam iron a few inches above the slippers and let the steam relax the yarn.
Conclusion
Congratulations! You've just created a pair of Golden Hour Cocoon Slippers that are as beautiful as they are functional. The rich amber and cream colors, combined with the intricate honeycomb texture, make these slippers a true work of art. Whether you're gifting them to a loved one or keeping them for yourself, these slippers are sure to bring warmth and joy. Happy crocheting!