Emberstone Path Slippers Free Pattern – Crochet Cozy Hearth Warmers
Emberstone Path Slippers Free Pattern – Crochet Cozy Hearth Warmers
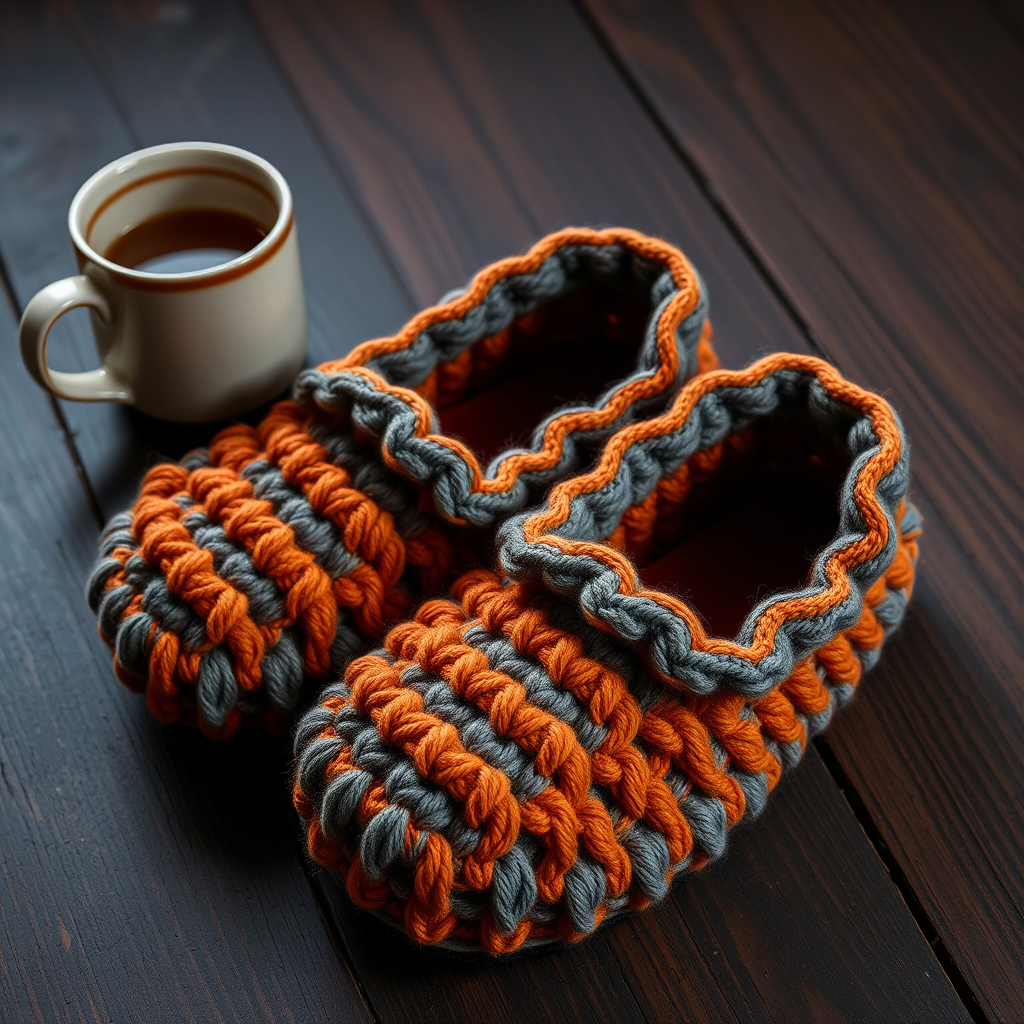
Step into the quiet comfort of a fireside evening with these crocheted slippers, whose textured stone-stitch soles and soft heathered yarns mimic the gentle glow of embers. Each pair is worked in one piece from the toe up, making them a satisfyingly simple yet richly detailed project for crafters of every level. Whether you're a seasoned hooker or picking up a crochet hook for the first time, these unisex slippers are the perfect weekend project to keep your toes toasty all season long.
Why You'll Love This Pattern
This pattern is thoughtfully designed with beginners in mind. The construction is intuitive—starting from the toe and working your way to the heel—so you can easily try them on as you go. The special "Ember Stitch" adds a subtle ripple texture that evokes the warm glow of coals, while the three-tone color palette (burnt orange, heathered gray, and deep charcoal) creates a sophisticated, earthy look that pairs beautifully with any loungewear. Plus, they make wonderful handmade gifts for friends and family!
Materials Needed
Before you begin, gather the following supplies. All items are readily available at your local craft store or online.
- Yarn: Worsted weight yarn in three shades:
- Ember (burnt orange) – for the upper and trim
- Stone (heathered gray) – for one sole
- Hearth (deep charcoal) – for the other sole and cuff
- Hook: 5.0 mm (H-8) crochet hook
- Other: Yarn needle for weaving in ends and sewing, scissors, stitch markers (optional but helpful)
Gauge
14 sc x 16 rows = 4 inches in single crochet. Be sure to check your gauge to ensure a proper fit. If your slippers are coming out too small, try a larger hook; if too big, go down a hook size.
Abbreviations & Special Stitches
Familiarize yourself with these standard crochet abbreviations before starting:
- ch = chain
- sc = single crochet
- hdc = half double crochet
- dc = double crochet
- sl st = slip stitch
- st(s) = stitch(es)
- rnd = round
- inc = increase (2 sc in same st)
- dec = decrease (sc2tog)
Special Stitch: Ember Stitch (worked in rows)
This stitch creates a beautiful ripple texture reminiscent of glowing coals. It's simple to memorize and adds a lovely detail to the cuff.
- Row 1: sc in each st.
- Row 2: ch 1, turn, sc in first st, *hdc in next st, dc in next st, hdc in next st, sc in next st* repeat across.
Sizes
This pattern includes three sizes. Choose the one that matches your foot measurements:
- Small: Women's 5-7
- Medium: Women's 8-10 / Men's 7-9
- Large: Men's 10-12
Adjust the foundation chain length as indicated in the pattern.
Step-by-Step Instructions
Part 1: The Sole (Make 2 – one in Stone, one in Hearth)
The sole is worked in continuous rounds, starting with a foundation chain and working around both sides to create an oval shape. This gives the slipper a sturdy, comfortable base.
Foundation: Ch 10 (12, 14) for Small (Medium, Large).
Rnd 1: Work 2 sc in 2nd ch from hook, sc in next 7 (9, 11) ch, 2 sc in last ch. Working on the opposite side of the chain, sc in next 7 (9, 11) ch. Join with sl st to first sc. (18, 22, 26 sts)
Rnd 2: Ch 1, inc in first st, sc in next 7 (9, 11) sts, inc in next st, sc in next 7 (9, 11) sts, inc in last st. Join with sl st. (21, 25, 29 sts)
Rnd 3: Ch 1, inc in first st, sc in next 8 (10, 12) sts, inc in next st, sc in next 8 (10, 12) sts, inc in last st. Join with sl st. (24, 28, 32 sts)
Rnd 4: Ch 1, sc in each st around. Join with sl st. Fasten off and weave in ends. Set aside.
💡 Pro Tip: To make your soles extra durable, you can work a second round of sc in the back loops only after Rnd 4. This creates a subtle ridge that adds structure.
Part 2: The Upper (worked in rows starting from the toe)
Using Ember yarn, you'll begin with a small chain and work back and forth in rows, increasing at the toe to create a rounded shape that will cover the top of your foot.
Foundation: With Ember yarn, ch 6 (7, 8).
Row 1: Sc in 2nd ch from hook and across. (5, 6, 7 sts)
Row 2: Ch 1, turn, inc in first st, sc across to last st, inc in last st. (7, 8, 9 sts)
Row 3: Ch 1, turn, sc in each st across.
Row 4: Repeat Row 2. (9, 10, 11 sts)
Rows 5-10 (12, 14): Ch 1, turn, sc in each st across. (This forms the toe box.)
Shape the Foot
Now you'll begin increasing on both sides to widen the upper to accommodate the widest part of your foot.
Row 11 (13, 15): Ch 1, turn, sc in first 3 sts, inc in next st, sc across to last 4 sts, inc in next st, sc in last 3 sts. (11, 12, 13 sts)
Row 12 (14, 16): Ch 1, turn, sc in each st across.
Repeat these two rows until the piece measures the length of your foot from toe to heel, ending with a wrong-side row. (Approximately 20-24 rows total for medium.)
💡 Pro Tip: Try the upper on your foot as you go. It should fit snugly but not tightly over the top of your foot. If it's too loose, work fewer increase rows; if too tight, add an extra increase row.
Heel
Next row: Ch 1, turn, sc across. Fasten off, leaving a long tail (about 18 inches) for sewing.
Part 3: Assembly
This is where your slipper starts to take shape! Take your time with the sewing to ensure a neat, comfortable finish.
- Attach Upper to Sole: With right sides together, sew the sides of the upper to the sole using a whip stitch. Match the center toe of the upper to the center toe of the sole. Leave the back heel open.
- Turn Right Side Out: Carefully turn the slipper right side out through the heel opening.
- Sew the Heel: Fold the heel edges together and sew the back seam using the same whip stitch, creating a snug heel cup that hugs your heel comfortably.
💡 Pro Tip: When sewing the heel, try the slipper on first to determine the exact seam placement. You want the heel cup to feel secure but not too tight. Adjust the seam depth as needed.
Part 4: The Cuff (worked in the round around the opening)
Now we'll add a cozy, slightly flared cuff using the Hearth yarn. This will keep the slipper securely on your foot and add a polished finish.
Rnd 1: With Hearth yarn, join with sl st at the back heel seam. Ch 1, sc evenly around the opening (approximately 30-36 sts). Join with sl st.
Rnd 2: Ch 1, working in back loops only, sc in each st around. Join with sl st. (This creates a neat fold line.)
Rnds 3-5: Ch 1, sc in each st around. Join with sl st.
Rnd 6: Ch 1, *sc in next 3 sts, inc* repeat around. Join with sl st. (This gives a gentle flare.)
Rnds 7-8: Ch 1, sc in each st around. Join with sl st. Fasten off and weave in ends.
Part 5: Ember Stitch Trim (optional but recommended)
This final touch adds the signature "ember" ripple that makes these slippers truly special. It's quick, easy, and elevates the whole design.
With Ember yarn, join at the cuff edge. Work one round of the Ember Stitch pattern (sc, hdc, dc, hdc, sc) around the top edge. Fasten off and weave in ends.
Repeat for the Second Slipper
Repeat all steps for the second slipper, but use Stone for the sole and Hearth for the upper to create a mirrored, earthy contrast. This gives each pair a unique, artisanal look.
Finishing Touches & Care
Once both slippers are complete, give them a gentle hand wash in cool water with a mild detergent, then lay them flat to dry. This will help the stitches settle and the slippers to keep their shape. Avoid machine washing or drying, as this can cause felting or shrinkage.
Final Thoughts
These Emberstone Path Slippers are more than just footwear—they're a warm hug for your feet on chilly evenings. The combination of textured stitches, rich colors, and thoughtful construction makes them a joy to create and an even greater joy to wear. Whether you're making them for yourself or as a heartfelt handmade gift, these slippers are sure to become a beloved staple in any cozy home.
Happy crocheting, and may your hearth always be warm! 🔥


