The Emberstone Coaster Set Free Pattern – A Knitted Hearth of Textured Tiles

The Emberstone Coaster Set Free Pattern – A Knitted Hearth of Textured Tiles
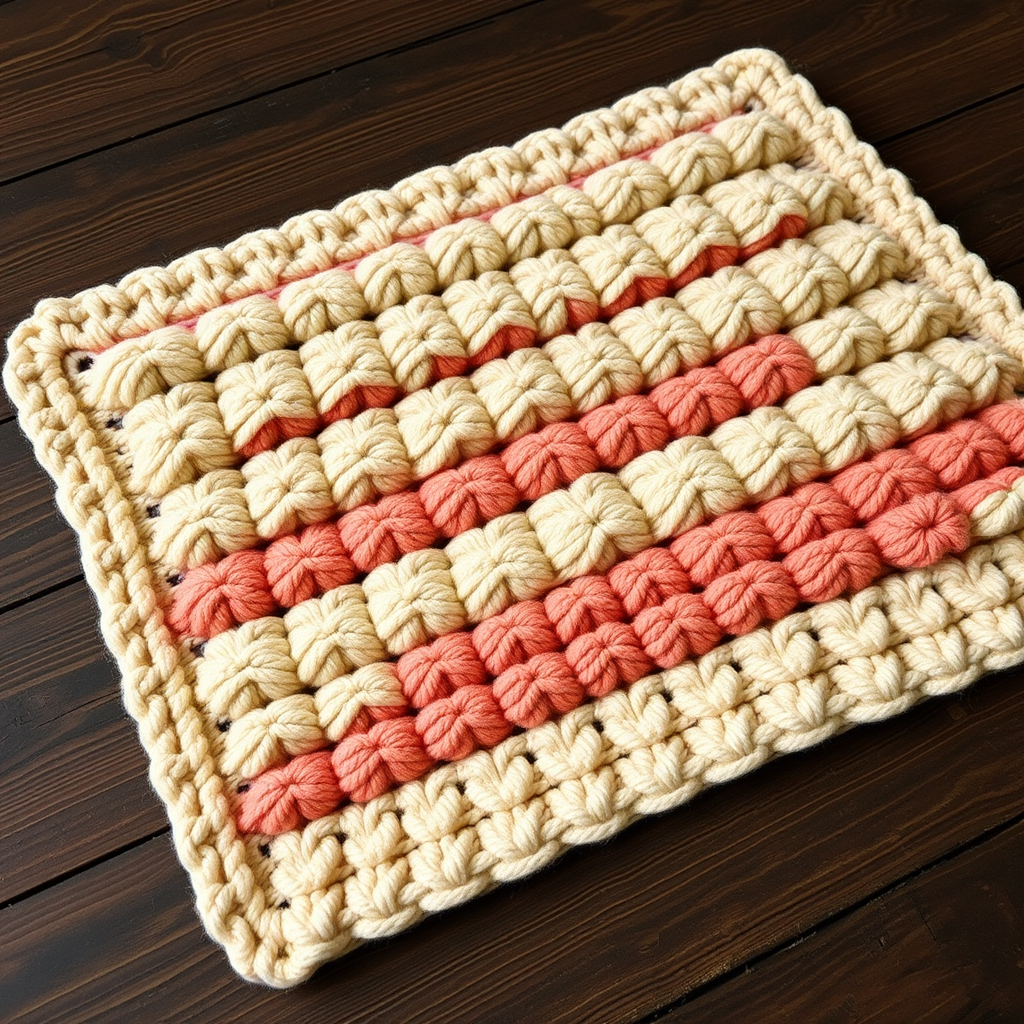
Bring the warmth of a crackling fireplace to your table with these knitted coasters, each a miniature mosaic of interlocking brick-like stitches. This pattern offers a meditative, rhythmic knit that transforms simple yarn into a cozy, tactile set of home accents. Whether you're looking for a quick weekend project, a handmade gift, or a way to use up small amounts of worsted-weight cotton, the Emberstone Coaster Set is the perfect choice. The slipped-stitch texture creates a raised, dimensional surface that not only looks beautiful but also provides excellent protection for your furniture.
This pattern is designed with beginners in mind, yet it offers enough visual interest to keep more experienced knitters engaged. The four heat-inspired shades—Ember Orange, Smoked Terracotta, Ash Grey, and Charcoal—evoke the cozy ambiance of autumn evenings and add a sophisticated, earthy touch to any room. Let's dive into this satisfying project that will have you creating a stunning set of textured tiles in no time.
Materials Needed
Before you begin, gather the following materials. The exact gauge is not critical for this project, but maintaining consistent tension throughout will ensure your coasters lie flat and look professional.
Yarn
- Worsted weight cotton yarn in four heat-inspired shades (approximately 20g of each color per coaster):
- Ember Orange
- Smoked Terracotta
- Ash Grey
- Charcoal
Note: Cotton yarn is ideal for coasters because it is absorbent, durable, and washes well. If you prefer, you can substitute with any worsted-weight yarn, but cotton is highly recommended for its functionality.
Needles
- US Size 7 (4.5mm) knitting needles
Gauge
- 20 stitches and 28 rows = 4 inches in stockinette stitch (exact gauge is not critical, but consistent tension is key)
Additional Supplies
- Tapestry needle for weaving in ends
- Pins for blocking (optional but recommended)
- Spray bottle with water (for blocking)
Step-by-Step Instructions
This pattern creates a square coaster with a raised brick-like texture using a combination of slipped stitches and purl bumps. Each coaster is worked flat from the bottom up. The slipped stitches are worked with the yarn held either in back (wyib) or in front (wyif) to create the distinctive raised ridges that mimic a brick wall.
Coaster Base (Make 4, one in each color)
Follow these instructions carefully for each coaster. The pattern is repetitive and rhythmic, making it perfect for relaxing knitting sessions.
Cast On
Cast on 30 stitches loosely. A loose cast-on is essential to prevent the bottom edge from curling or pulling in. If you tend to cast on tightly, consider using a larger needle (e.g., US Size 8) just for the cast-on row, then switch to your US Size 7 needles for the rest of the pattern.
Foundation Rows
Row 1 (Right Side): Knit all stitches.
Row 2 (Wrong Side): Purl all stitches.
These two rows establish a clean stockinette base that will frame the textured brick pattern.
First Brick Section
Row 3 (Brick Row 1): K2, *slip 2 stitches purlwise with yarn in back (wyib), K4; repeat from * to last 4 stitches, slip 2 wyib, K2.
Explanation: Knit the first 2 stitches. Then, slip the next 2 stitches as if to purl, but keep the yarn at the back of the work (wyib). This means you are simply moving the stitches from the left needle to the right needle without knitting them, while the yarn remains behind the fabric. Then knit the next 4 stitches. Repeat this sequence (slip 2, knit 4) across the row until you have 4 stitches remaining. Slip 2 wyib, then knit the final 2 stitches.
Row 4: P2, *slip 2 stitches purlwise with yarn in front (wyif), P4; repeat from * to last 4 stitches, slip 2 wyif, P2.
Explanation: Purl the first 2 stitches. Slip the next 2 stitches purlwise, but this time hold the yarn in front of the work (wyif). The yarn should be between you and the needle. Then purl the next 4 stitches. Repeat across the row until 4 stitches remain. Slip 2 wyif, then purl the final 2 stitches.
Row 5: Knit all stitches.
Row 6: Purl all stitches.
These two rows of stockinette separate the brick rows and allow the slipped stitches to pop forward, creating the dimensional texture.
Second Brick Section (Offset)
Row 7 (Brick Row 2 - offset): K6, *slip 2 wyib, K4; repeat from * to last 6 stitches, slip 2 wyib, K4.
Explanation: This row is offset from the first brick row to create the interlocking brick pattern. Knit the first 6 stitches. Then repeat the sequence (slip 2 wyib, knit 4) across the row until 6 stitches remain. Slip 2 wyib, then knit the final 4 stitches.
Row 8: P6, *slip 2 wyif, P4; repeat from * to last 6 stitches, slip 2 wyif, P4.
Explanation: Purl the first 6 stitches. Repeat (slip 2 wyif, purl 4) across the row until 6 stitches remain. Slip 2 wyif, then purl the final 4 stitches.
Rows 9-10: Repeat Rows 5-6 (knit one row, purl one row).
Repeat the Pattern
Rows 11-18: Repeat Rows 3-10 once more. This will give you two full sets of brick rows, creating a total of four brick bands.
Rows 19-20: Repeat Rows 5-6.
Rows 21-28: Repeat Rows 3-10 once more. This adds the third set of brick rows, giving you six brick bands in total.
Rows 29-30: Repeat Rows 5-6.
At this point, your coaster should measure approximately 5-6 inches square, depending on your tension. The pattern is symmetrical, with the brick pattern evenly distributed and framed by stockinette edges.
Bind Off
Bind Off: Bind off all stitches knitwise on the right side. To bind off knitwise, knit the first stitch, knit the second stitch, then pass the first stitch over the second and off the needle. Continue this across the row. This creates a neat, flexible edge that won't pucker.
Cut the yarn, leaving a 6-inch tail, and pull it through the last loop to secure.
Weave in Ends
Using a tapestry needle, weave in all loose ends on the wrong side of the coaster. Thread the needle with the yarn tail and weave it through the purl bumps on the back of the work, going in one direction for about an inch, then reversing direction to secure it. Trim any excess yarn.
Finishing
Blocking: Lightly block each coaster by pinning to a flat surface and misting with water. To block, lay the coaster on a flat, padded surface (like a blocking mat or a towel). Use rust-proof pins to gently stretch the coaster into a perfect square shape, pinning along the edges. Mist the coaster with water until damp but not soaking. Allow to dry completely before removing the pins.
Blocking is essential for this pattern because it evens out the stitches, opens up the slipped-stitch texture, and ensures the coaster lies perfectly flat. The slipped stitches will create a raised, dimensional brick pattern that is both beautiful and functional.
Tips for Success
- Consistent Tension: The key to beautiful slipped stitches is consistent tension. Try to keep your yarn tension even throughout, especially when slipping stitches. If your slipped stitches are too tight, the fabric will pucker; if too loose, the texture will be less defined.
- Count Your Stitches: After each brick row, count your stitches to ensure you haven't accidentally dropped or added any. You should always have 30 stitches on your needle.
- Mark the Right Side: Since the pattern is worked flat, it's easy to lose track of which side is the right side. Place a stitch marker or a piece of scrap yarn on the right side of your work to help you keep your place.
- Use Stitch Markers: If you find it helpful, place stitch markers between pattern repeats. For Row 3, you could place a marker after every 6 stitches (K2, slip 2, K4 = 8 stitches per repeat, so markers every 8 stitches after the first 2). This can help you keep track of where you are in the pattern.
Creative Variations
Once you've mastered the Emberstone Coaster pattern, feel free to experiment! Here are a few ideas to make this project your own:
- Color Combinations: Try using different color palettes to match your home decor. Soft pastels for spring, jewel tones for winter, or even a gradient set from light to dark.
- Larger Size: To make a trivet or a mug rug, simply cast on more stitches and repeat the pattern rows additional times. For a trivet, cast on 42 stitches and work the pattern until the piece is square.
- Add a Border: After binding off, you could pick up stitches around the edge and knit a simple garter stitch border for a more finished look.
- Gift Set: These coasters make wonderful handmade gifts. Pair them with a matching mug or a box of gourmet coffee for a thoughtful, cozy present.
The Emberstone Coaster Set is more than just a practical accessory—it's a small piece of warmth and artistry you can create with your own hands. The rhythmic repetition of slipped stitches is almost meditative, making this project perfect for unwinding after a long day. As you complete each coaster, you'll see the beautiful brick-like texture emerge, transforming simple yarn into a cozy, tactile set of home accents.
Whether you're a beginner looking for your next challenge or an experienced knitter seeking a quick and satisfying project, these coasters are sure to delight. So grab your needles, choose your favorite heat-inspired shades, and let the soothing rhythm of the Emberstone pattern bring a little fireplace warmth to your table.
Happy knitting!