The Ember Dusk Slouch Hat: A Textured Knit Free Pattern
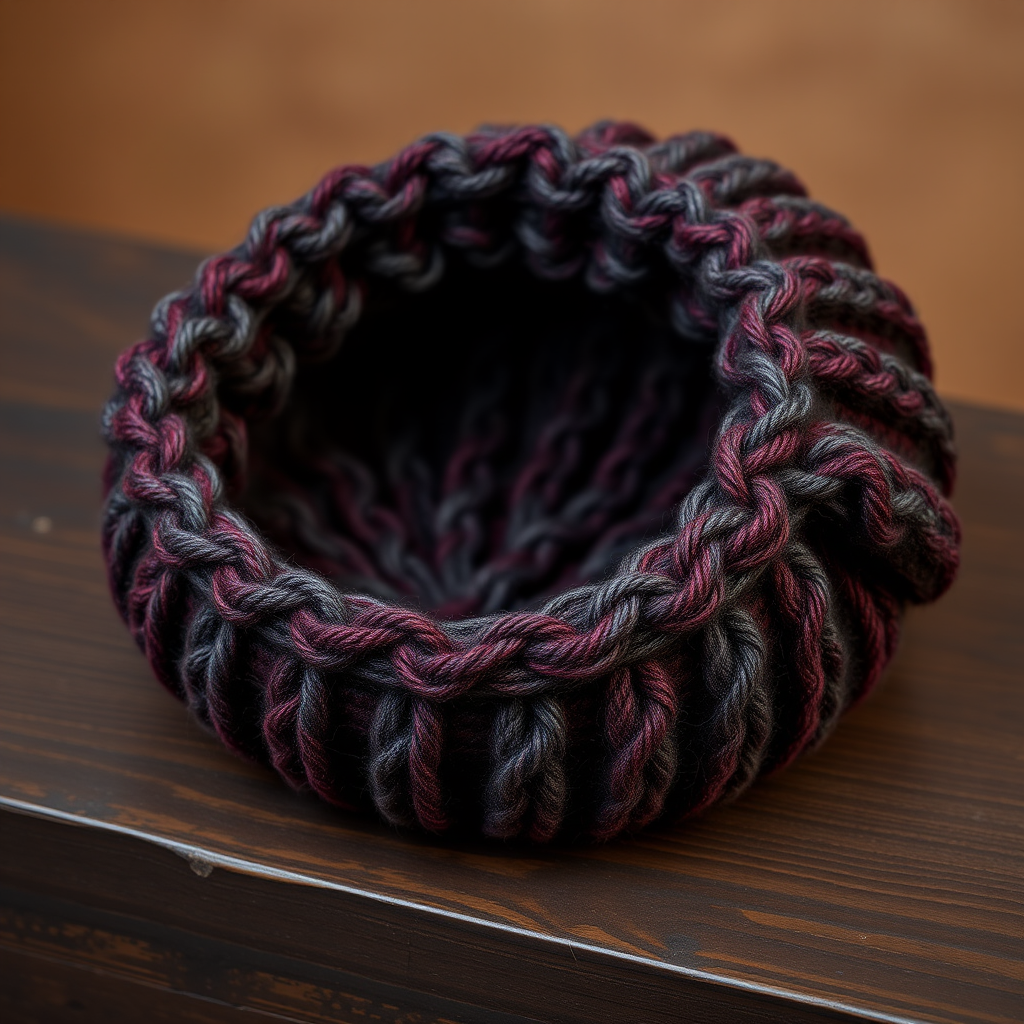
Introducing the Ember Dusk Slouch Hat
There's something magical about a hat that looks like it holds the last light of a winter sunset. The Ember Dusk Slouch Hat is exactly that—a cozy, textured beanie that uses slipped stitches and twisted ribbing to create a fabric reminiscent of glowing embers against a twilight sky. This free knitting pattern is designed for meditative repetition, making it perfect for both experienced knitters looking for a relaxing project and adventurous beginners ready to try something new. The unique construction uses a simple 8-round repeat that produces a stunning, dimensional fabric that looks far more complex than it actually is.
Whether you're knitting for yourself or as a gift, this slouchy hat works up quickly in worsted weight yarn and offers a satisfying blend of texture and style. The marled effect achieved by holding two colors together adds depth and richness, but you can easily customize it with a single solid color for a more subtle look.
Materials Needed
Before you begin, gather the following supplies. The sample uses a beautiful marled effect by holding two colors together, but you can substitute any worsted weight yarn that meets gauge.
Yarn
- Worsted weight yarn (approximately 200-220 yards total)
- Sample used: Malabrigo Rios in 'Piedras' (heathered charcoal) and 'Boticelli Red' (deep burgundy) held together for a marled effect
- Alternative: Any worsted weight yarn that achieves gauge. A single color works beautifully too.
Needles
- US 7 (4.5mm) 16-inch circular needle
- US 7 (4.5mm) double-pointed needles (for crown decreases)
- Or size needed to obtain gauge
Other Supplies
- Stitch marker for marking beginning of round
- Tapestry needle for weaving in ends
- Scissors
Gauge
20 stitches and 28 rows = 4 inches in stockinette stitch, blocked. Always take time to check your gauge—it ensures your hat will fit as intended.
Step-by-Step Instructions
This pattern is written for two sizes: Adult S/M and Adult M/L. Instructions for the larger size are given in parentheses where they differ. The finished circumference is 19 (21) inches unstretched, and the height is 10 (11) inches.
Abbreviations
- CO – cast on
- k – knit
- p – purl
- sl1 wyif – slip 1 stitch purlwise with yarn in front
- k1tbl – knit 1 stitch through the back loop
- p1tbl – purl 1 stitch through the back loop
- k2tog – knit 2 stitches together
- p2tog – purl 2 stitches together
- st(s) – stitch(es)
- rnd(s) – round(s)
Brim
- CO 96 (108) stitches using a long-tail cast on. Place a stitch marker and join for working in the round, being very careful not to twist your stitches.
- Rnd 1: *K1tbl, p1tbl; repeat from * to end of round.
- Repeat Rnd 1 until the brim measures 2 (2.5) inches from the cast-on edge. This twisted ribbing creates a firm, stretchy edge that won't lose its shape.
Body
The body is worked in an 8-round repeat. Pay close attention to the slipped stitch—remember to keep the yarn in front when slipping purlwise.
- Rnd 1: *K1tbl, p1, sl1 wyif, p1; repeat from * to end.
- Rnd 2: *K1tbl, p1, k1, p1; repeat from * to end.
- Rnd 3: *K1tbl, p1, sl1 wyif, p1; repeat from * to end.
- Rnd 4: *K1tbl, p1, k1, p1; repeat from * to end.
- Rnd 5: *K1tbl, p1, sl1 wyif, p1; repeat from * to end.
- Rnd 6: *K1tbl, p1, k1, p1; repeat from * to end.
- Rnd 7: *K1tbl, p1, sl1 wyif, p1; repeat from * to end.
- Rnd 8: *K1tbl, p1, k1, p1; repeat from * to end.
Repeat Rnds 1-8 until the body measures approximately 7 (8) inches from the cast-on edge, ending after completing Rnd 8. This ensures you're ready to begin the crown decreases at the correct point in the pattern.
Crown Decreases
As you work the decreases, switch to double-pointed needles when the stitches become too tight to comfortably work on the circular needle. The decreases are worked in the same pattern as the body, with decreases happening on specific rounds (Rnds 1, 9, 17, 25, 31, and 37).
- Rnd 1 (decrease): *K1tbl, p1, sl1 wyif, p2tog; repeat from * to end. 80 (90) stitches remain.
- Rnd 2: *K1tbl, p1, k1, p1; repeat from * to end.
- Rnd 3: *K1tbl, p1, sl1 wyif, p1; repeat from * to end.
- Rnd 4: *K1tbl, p1, k1, p1; repeat from * to end.
- Rnd 5: *K1tbl, p1, sl1 wyif, p1; repeat from * to end.
- Rnd 6: *K1tbl, p1, k1, p1; repeat from * to end.
- Rnd 7: *K1tbl, p1, sl1 wyif, p1; repeat from * to end.
- Rnd 8: *K1tbl, p1, k1, p1; repeat from * to end.
- Rnd 9 (decrease): *K1tbl, p1, sl1 wyif, p2tog; repeat from * to end. 64 (72) stitches remain.
- Rnd 10: *K1tbl, p1, k1, p1; repeat from * to end.
- Rnd 11: *K1tbl, p1, sl1 wyif, p1; repeat from * to end.
- Rnd 12: *K1tbl, p1, k1, p1; repeat from * to end.
- Rnd 13: *K1tbl, p1, sl1 wyif, p1; repeat from * to end.
- Rnd 14: *K1tbl, p1, k1, p1; repeat from * to end.
- Rnd 15: *K1tbl, p1, sl1 wyif, p1; repeat from * to end.
- Rnd 16: *K1tbl, p1, k1, p1; repeat from * to end.
- Rnd 17 (decrease): *K1tbl, p1, sl1 wyif, p2tog; repeat from * to end. 48 (54) stitches remain.
- Rnd 18: *K1tbl, p1, k1, p1; repeat from * to end.
- Rnd 19: *K1tbl, p1, sl1 wyif, p1; repeat from * to end.
- Rnd 20: *K1tbl, p1, k1, p1; repeat from * to end.
- Rnd 21: *K1tbl, p1, sl1 wyif, p1; repeat from * to end.
- Rnd 22: *K1tbl, p1, k1, p1; repeat from * to end.
- Rnd 23: *K1tbl, p1, sl1 wyif, p1; repeat from * to end.
- Rnd 24: *K1tbl, p1, k1, p1; repeat from * to end.
- Rnd 25 (decrease): *K1tbl, p1, sl1 wyif, p2tog; repeat from * to end. 32 (36) stitches remain.
- Rnd 26: *K1tbl, p1, k1, p1; repeat from * to end.
- Rnd 27: *K1tbl, p1, sl1 wyif, p1; repeat from * to end.
- Rnd 28: *K1tbl, p1, k1, p1; repeat from * to end.
- Rnd 29: *K1tbl, p1, sl1 wyif, p1; repeat from * to end.
- Rnd 30: *K1tbl, p1, k1, p1; repeat from * to end.
- Rnd 31 (decrease): *K1tbl, p1, sl1 wyif, p2tog; repeat from * to end. 16 (18) stitches remain.
- Rnd 32: *K1tbl, p1, k1, p1; repeat from * to end.
- Rnd 33: *K1tbl, p1, sl1 wyif, p1; repeat from * to end.
- Rnd 34: *K1tbl, p1, k1, p1; repeat from * to end.
- Rnd 35: *K1tbl, p1, sl1 wyif, p1; repeat from * to end.
- Rnd 36: *K1tbl, p1, k1, p1; repeat from * to end.
- Rnd 37 (decrease): *K1tbl, p1, sl1 wyif, p2tog; repeat from * to end. 8 (9) stitches remain.
Finishing
- Cut the yarn, leaving a 6-inch tail.
- Thread the tail through a tapestry needle, then pass it through the remaining stitches on your needle, removing them from the needle as you go.
- Pull the tail tight to close the top of the hat, creating a neat gathered crown.
- Weave in the tail securely on the inside of the hat.
- Weave in the cast-on tail as well.
- Block gently: Lightly wet block or steam block to open up the slipped stitch texture and even out the fabric. Avoid heavy pressing, which can flatten the twisted ribbing.
Your Ember Dusk Slouch Hat is complete! The slipped stitches create subtle vertical columns that catch the light beautifully, while the twisted rib brim ensures a snug, comfortable fit. This hat is perfect for crisp autumn walks or cozy winter evenings—wear it with pride knowing you created something truly special.


