The Ember & Ash Ribbed Potholder Free Pattern – A Smoky Gradient Knit with Thermal Texture
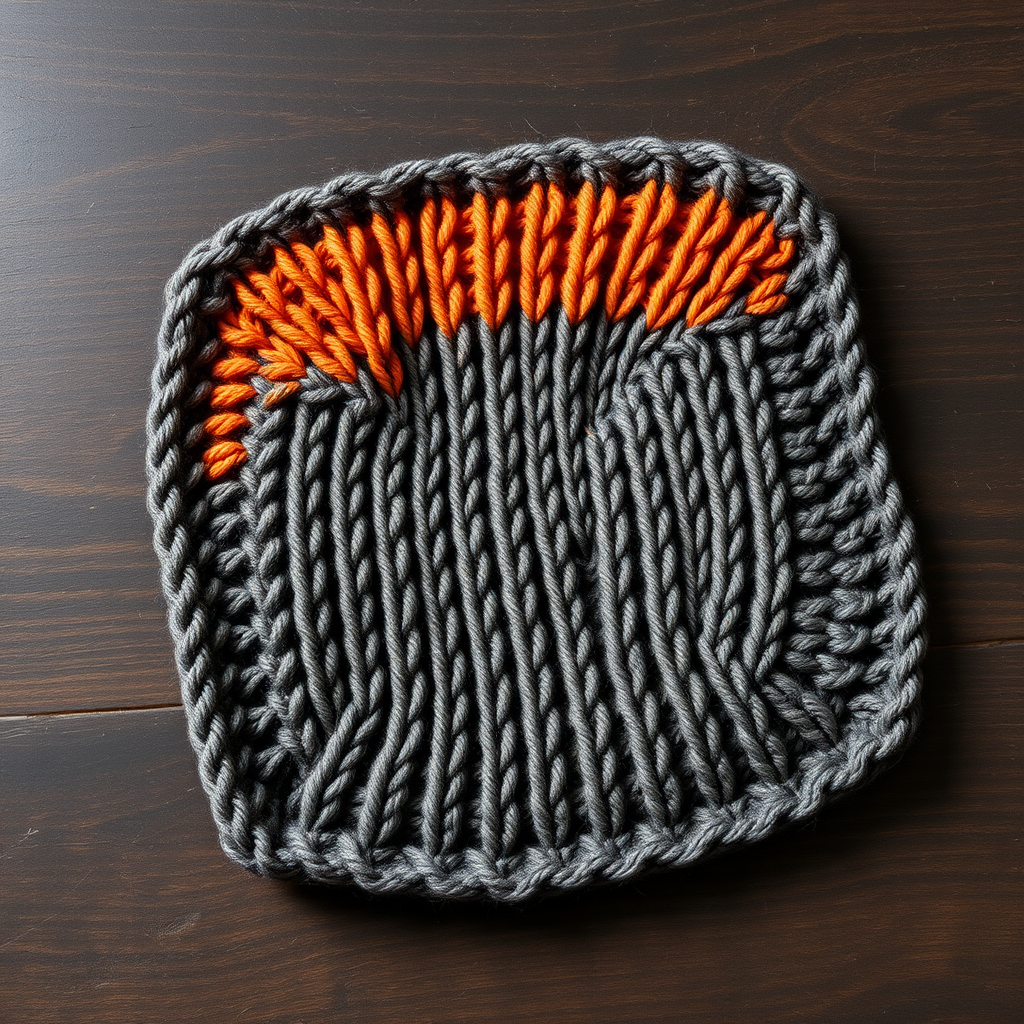
The Ember & Ash Ribbed Potholder: A Free Knitting Pattern for a Smoky Gradient Kitchen Essential
There's something deeply satisfying about creating functional art for your home, and this ribbed potholder pattern delivers exactly that. The Ember & Ash Ribbed Potholder brings a modern, earthy aesthetic to your kitchen with a stunning gradient that flows from deep charcoal through smoky orange to a warm ember glow. Beyond its beauty, the dense 2x2 rib stitch creates a thick, squishy fabric that provides excellent thermal protection—making it as practical as it is beautiful.
Whether you're a seasoned knitter looking for a quick weekend project or a beginner ready to tackle your first colorwork piece, this pattern is designed to be approachable and rewarding. The gradient effect is achieved through simple color-shifting techniques that create a diagonal transition—no complicated stranding or intarsia required. Let's dive into creating this cozy, handcrafted addition to your kitchen.
Materials Needed
Before you begin, gather the following supplies. This project uses minimal materials, making it an affordable and accessible knit.
Yarn
- Worsted weight cotton yarn (e.g., Lion Brand Kitchen Cotton) in 3 colors:
- Color A (Charcoal): Approx. 60g
- Color B (Smoky Orange): Approx. 60g
- Color C (Ember): Approx. 60g
Note: Cotton yarn is essential for heat resistance and durability. Acrylic yarns can melt under high heat, so stick with natural fibers for kitchen items.
Needles & Notions
- US 7 (4.5 mm) knitting needles (straight or circular, whichever you prefer)
- Yarn needle for weaving in ends
- Scissors
- Stitch markers (optional, but helpful for tracking color changes)
- Measuring tape (for gauge check)
Gauge
20 stitches and 28 rows = 4 inches in rib stitch (k2, p2) on US 7 needles, after blocking.
Always check your gauge before starting. If your gauge is off, adjust your needle size accordingly—smaller needles for tighter gauge, larger needles for looser.
Step-by-Step Instructions
This potholder is knitted flat in one piece using a simple 2x2 rib stitch with a gradient color transition. The ribbing creates a thick, insulating fabric perfect for handling hot pots. Follow along carefully, and you'll have a beautiful, functional potholder in no time.
Abbreviations
- CO: Cast on
- K: Knit
- P: Purl
- St(s): Stitch(es)
- RS: Right side
- WS: Wrong side
- BO: Bind off
Foundation
With Color A (Charcoal), CO 40 stitches using your preferred cast-on method (long-tail is recommended for a neat edge).
Rib Pattern Setup
Row 1 (RS): *K2, P2* repeat from * to end of row.
Row 2 (WS): *P2, K2* repeat from * to end of row.
Repeat Rows 1 and 2 for the rib pattern, always keeping the rib alignment—knit the knits and purl the purls as they appear. This means when you see a knit stitch on the needle, knit it; when you see a purl stitch, purl it. This creates the classic 2x2 ribbed texture.
First Gradient Transition (Charcoal to Smoky Orange)
Work 14 rows in Color A (Charcoal) following the rib pattern established above.
Row 15 (RS): With Color A, work the row as established, but on the last 2 stitches, switch to Color B (Smoky Orange) and knit those final 2 stitches with Color B.
Row 16 (WS): With Color B, work the row as established, but on the first 2 stitches, switch to Color A and purl those first 2 stitches with Color A.
Continue alternating colors every 2 stitches at the color change edge to create a smooth, striped gradient. This technique prevents a harsh color line and begins the diagonal shift.
Gradient Body (Diagonal Shift)
Now you'll continue working in rib pattern while gradually shifting the color block across the width. This creates the beautiful diagonal gradient effect.
Work 2 rows with Color B on the right side, then 2 rows with Color B on the left side, gradually shifting the color block across the width over the next 20 rows.
Here's how to execute the shift:
- On each RS row: Move the color change boundary 2 stitches to the right (i.e., knit 2 more stitches with Color B and 2 fewer with Color A).
- On WS rows: Mirror the shift (purl 2 more stitches with Color B and 2 fewer with Color A).
Pro tip: Place a stitch marker at the color change boundary to help you track your shifts. Move the marker 2 stitches each RS row.
After completing 20 rows of shifting, you will have 20 stitches in Color A and 20 stitches in Color B. Work 2 rows even with this split (no shifting).
Second Gradient Transition (Smoky Orange to Ember)
Now introduce Color C (Ember) at the right edge, similar to the first transition.
Over the next 20 rows, gradually shift from Color B to Color C, moving the color change boundary 2 stitches to the left each RS row (i.e., knit 2 more stitches with Color C and 2 fewer with Color B). On WS rows, mirror the shift.
After completing 20 rows of shifting, you will have 20 stitches in Color B and 20 stitches in Color C.
Work 14 rows even with this split (20 stitches Color B, 20 stitches Color C).
Final Edge
Work 2 rows in Color C only. Cut Color B, and continue with Color C across all 40 stitches.
Bind Off
BO all stitches in pattern (knit the knits, purl the purls) with Color C. This maintains the ribbed edge and prevents curling.
Finishing
Weave in all ends using a yarn needle. Take your time to weave securely—this ensures your potholder withstands regular use and washing.
Block the potholder flat to even out the ribbing. To block: soak in lukewarm water with a drop of mild soap, gently squeeze out excess water (don't wring), lay flat on a towel, and shape to 8x8 inches. Allow to dry completely.
Two Finishing Options
Option 1: Pocket Style (Recommended)
Fold the potholder in half to create a double-layer square (approximately 8x8 inches). Sew the bottom and one side closed with matching yarn, leaving the top open as a pocket. This creates a protective hand pocket—perfect for grabbing hot handles safely.
Option 2: Single Layer with Hanging Loop
Leave the potholder as a single-layer square. Create a hanging loop: make a crochet chain of 15 stitches (or knit an i-cord), attach to one corner, and secure. This is great for hanging near your stove for easy access.
Care Instructions
Hand wash cold with mild detergent. Lay flat to dry. Do not machine wash or tumble dry, as this can distort the ribbing and gradient pattern.
Final Thoughts
Your Ember & Ash Ribbed Potholder is now complete! This project is perfect for using up cotton yarn scraps in gradient shades, and it makes a thoughtful handmade gift for housewarmings, holidays, or just because. The dense ribbed texture provides excellent heat protection while adding a cozy, handcrafted touch to any stove.
As you knit, remember that the gradient effect is forgiving—small variations in your color shifts will create a unique, organic look. Don't stress about perfection; embrace the handmade charm. Happy knitting!


