Sunny Citrus Hand Towel Topper Free Pattern – Knit a Cheerful Farmhouse Kitchen Accent
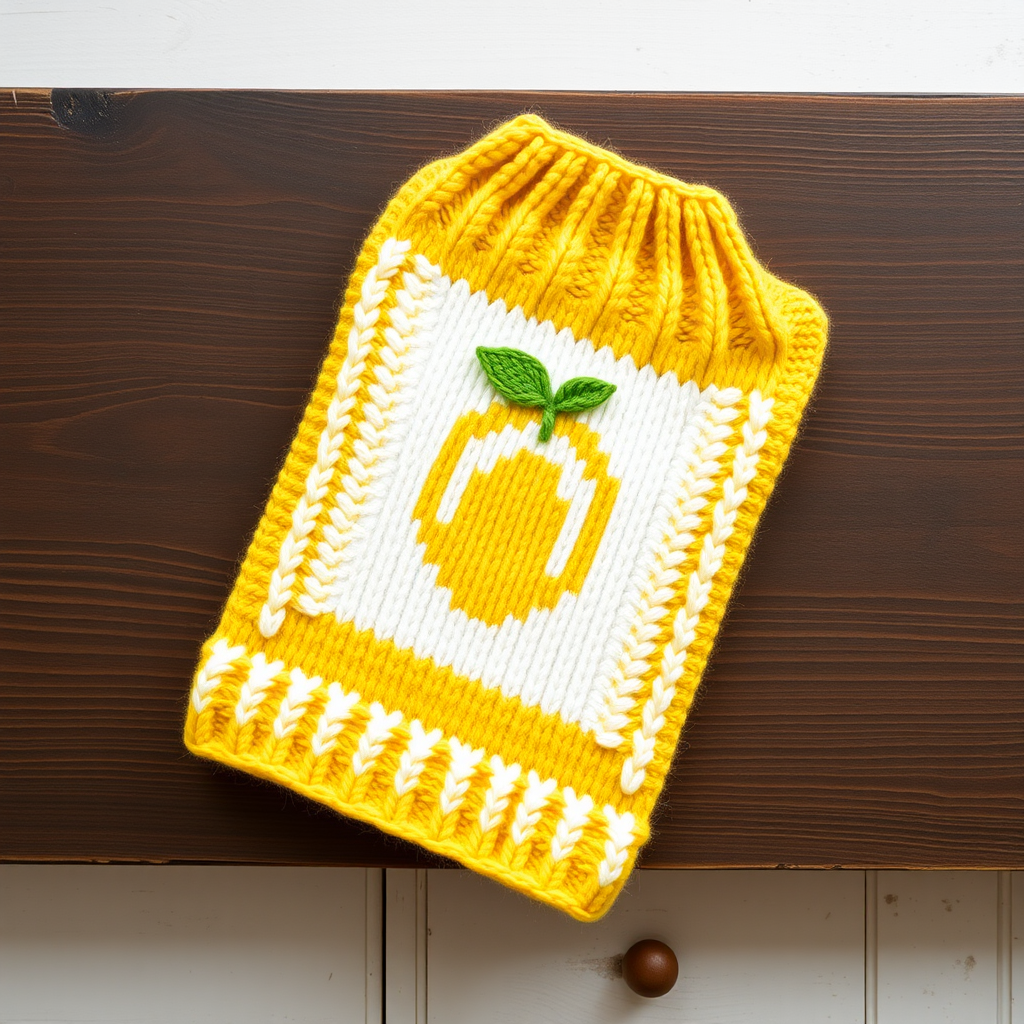
Sunny Citrus Hand Towel Topper Free Pattern – Knit a Cheerful Farmhouse Kitchen Accent
Brighten your kitchen with this charming knitted towel topper featuring a cheerful lemon motif and a practical button loop. This quick project adds a handmade touch to any farmhouse or modern kitchen decor. Whether you're an experienced knitter looking for a satisfying weekend project or a beginner ready to tackle your first intarsia pattern, this Sunny Citrus Towel Topper is the perfect way to bring a splash of sunshine into your daily routine.
The design features a crisp white lemon with a fresh green leaf, set against a warm yellow background. The practical loop at the top slips easily over any standard towel bar, while the optional button closure at the bottom allows you to hang it from a cabinet knob. With its clean lines and cheerful color palette, this towel topper will become a beloved staple in your kitchen for years to come.
Materials Needed
Before you begin, gather the following supplies to ensure a smooth and enjoyable knitting experience:
Yarn
- Yarn A (Yellow): Worsted weight cotton yarn, approximately 100g (220 yards)
- Yarn B (White): Worsted weight cotton yarn, approximately 100g (220 yards)
- Yarn C (Green): Worsted weight cotton yarn, approximately 100g (220 yards)
Pro tip: Choose a machine-washable cotton yarn for easy care. Brands like Lily Sugar'n Cream, Peaches & Creme, or Knit Picks Dishie work beautifully for this project.
Needles and Notions
- Knitting Needles: US 7 (4.5mm) straight needles
- Tapestry needle for weaving in ends and seaming
- Stitch markers (optional, but helpful for tracking rows)
- One button (approximately 1 inch/2.5cm in diameter)
- Scissors
- Measuring tape
Gauge
20 stitches and 26 rows = 4 inches (10cm) in stockinette stitch
Always knit a gauge swatch before starting to ensure your finished piece matches the intended dimensions. If your gauge is off, adjust your needle size accordingly.
Step-by-Step Instructions
This pattern is worked flat in one piece. The main body is knitted in stockinette stitch with a lemon intarsia motif, then folded and seamed to create a loop for the towel bar. Follow along carefully, and you'll have a beautiful towel topper in no time!
Abbreviations
- K = knit
- P = purl
- St(s) = stitch(es)
- RS = right side
- WS = wrong side
- K2tog = knit two together (decrease)
- Yo = yarn over (increase)
Getting Started: Cast On and Base
Cast on: With yarn A (yellow), cast on 40 stitches using your preferred method (long-tail cast on works well).
Row 1 (RS): Knit all stitches.
Row 2 (WS): Purl all stitches.
Repeat rows 1-2 until the piece measures 4 inches (10cm) from the cast-on edge, ending with a wrong-side row. This creates the yellow base of your towel topper.
Begin Lemon Motif (Intarsia)
Now we'll introduce the white yarn to create the lemon shape. Remember to twist the yarns at color changes to prevent holes in your work.
Row 1 (RS): With A (yellow), K20, join B (white), K20.
Row 2 (WS): With B, P20, with A, P20.
Row 3: With A, K18, with B, K4, with A, K18.
Row 4: With A, P18, with B, P4, with A, P18.
Row 5: With A, K16, with B, K8, with A, K16.
Row 6: With A, P16, with B, P8, with A, P16.
Row 7: With A, K14, with B, K12, with A, K14.
Row 8: With A, P14, with B, P12, with A, P14.
Row 9: With A, K12, with B, K16, with A, K12.
Row 10: With A, P12, with B, P16, with A, P12.
Row 11: With A, K10, with B, K20, with A, K10.
Row 12: With A, P10, with B, P20, with A, P10.
Row 13: With A, K8, with B, K24, with A, K8.
Row 14: With A, P8, with B, P24, with A, P8.
Row 15: With A, K6, with B, K28, with A, K6.
Row 16: With A, P6, with B, P28, with A, P6.
Row 17: With A, K4, with B, K32, with A, K4.
Row 18: With A, P4, with B, P32, with A, P4.
Row 19: With A, K2, with B, K36, with A, K2.
Row 20: With A, P2, with B, P36, with A, P2.
At this point, the white section should be 36 stitches wide, centered on your needle. Cut the yellow yarn, leaving a 6-inch tail for weaving in later.
Shape the Lemon
Now we'll work exclusively with yarn B (white) to shape the top of the lemon. The decreases will create a rounded, natural-looking lemon top.
Row 21: With B, K40.
Row 22: With B, P40.
Row 23: With B, K2, K2tog, K32, K2tog, K2 (38 sts).
Row 24: With B, P38.
Row 25: With B, K2, K2tog, K30, K2tog, K2 (36 sts).
Row 26: With B, P36.
Row 27: With B, K2, K2tog, K28, K2tog, K2 (34 sts).
Row 28: With B, P34.
Row 29: With B, K2, K2tog, K26, K2tog, K2 (32 sts).
Row 30: With B, P32.
Row 31: With B, K2, K2tog, K24, K2tog, K2 (30 sts).
Row 32: With B, P30.
Row 33: With B, K2, K2tog, K22, K2tog, K2 (28 sts).
Row 34: With B, P28.
Row 35: With B, K2, K2tog, K20, K2tog, K2 (26 sts).
Row 36: With B, P26.
Row 37: With B, K2, K2tog, K18, K2tog, K2 (24 sts).
Row 38: With B, P24.
Row 39: With B, K2, K2tog, K16, K2tog, K2 (22 sts).
Row 40: With B, P22.
Row 41: With B, K2, K2tog, K14, K2tog, K2 (20 sts).
Row 42: With B, P20.
Row 43: With B, K2, K2tog, K12, K2tog, K2 (18 sts).
Row 44: With B, P18.
Row 45: With B, K2, K2tog, K10, K2tog, K2 (16 sts).
Row 46: With B, P16.
Row 47: With B, K2, K2tog, K8, K2tog, K2 (14 sts).
Row 48: With B, P14.
Row 49: With B, K2, K2tog, K6, K2tog, K2 (12 sts).
Row 50: With B, P12.
Row 51: With B, K2, K2tog, K4, K2tog, K2 (10 sts).
Row 52: With B, P10.
Row 53: With B, K2, K2tog, K2, K2tog, K2 (8 sts).
Row 54: With B, P8.
Row 55: With B, K2, K2tog, K2tog, K2 (6 sts).
Row 56: With B, P6.
Row 57: With B, K2, K2tog, K2 (4 sts).
Row 58: With B, P4.
Row 59: With B, K2tog, K2tog (2 sts).
Row 60: With B, P2.
Row 61: With B, K2tog (1 st). Cut yarn, leaving a 6-inch tail, and pull through the last loop to secure.
Leaf Motif
Now we'll add the charming green leaf at the top of the lemon. With the right side facing you, pick up and knit 10 stitches along the top edge of the lemon (where you decreased). This edge will be slightly curved from the decreases.
Row 1 (WS): Purl all stitches.
Row 2: K1, yo, K8, yo, K1 (12 sts).
Row 3: Purl all stitches.
Row 4: K1, yo, K10, yo, K1 (14 sts).
Row 5: Purl all stitches.
Row 6: K1, yo, K12, yo, K1 (16 sts).
Row 7: Purl all stitches.
Row 8: K1, yo, K14, yo, K1 (18 sts).
Row 9: Purl all stitches.
Row 10: Bind off all stitches knitwise. Cut yarn, leaving a 6-inch tail.
The yarn overs create a subtle leaf shape that widens toward the top, mimicking a natural citrus leaf.
Finishing
Now comes the satisfying part – assembling your towel topper!
Step 1: Fold the piece in half lengthwise with right sides together. The lemon motif should be centered on the front of the folded piece.
Step 2: Sew the side seams using a mattress stitch or whip stitch, leaving the top open. This creates the loop that will slip over your towel bar.
Step 3: Turn the piece right side out. The top opening forms a loop to slip over a towel bar. Gently shape the fabric with your hands.
Step 4: Weave in all loose ends using your tapestry needle. Take care to weave in the tails from your color changes securely, so they don't show on the right side.
Step 5: Block gently. Lay the towel topper flat, mist with water, and shape it to the correct dimensions. Allow it to dry completely before use.
Button Loop (Optional)
For added versatility, you can add a button loop at the bottom edge. This allows you to hang your towel topper from a cabinet knob as well as a towel bar.
Step 1: At the bottom edge of the finished towel topper, pick up and knit 3 stitches.
Step 2: Work in garter stitch (knit every row) for 2 inches (5cm).
Step 3: Bind off all stitches. Weave in ends.
Step 4: Sew a button to the opposite corner of the bottom edge. The loop will stretch over the button to create a closure for hanging over a cabinet knob.
Care Instructions
To keep your Sunny Citrus Towel Topper looking its best, machine wash in cold water on a gentle cycle. Tumble dry on low or lay flat to dry. The cotton yarn will become softer and more absorbent with each wash, making it perfect for kitchen use.
Customization Ideas
Once you've mastered this pattern, feel free to get creative! Try these variations:
- Color swap: Make a lime green lemon with a yellow leaf, or a pink grapefruit with a green leaf
- Size adjustment: Add or subtract stitches in multiples of 4 to change the width
- Monogram: Add an initial below the lemon using duplicate stitch
- Striped background: Alternate yellow and white stripes for a different look
This pattern is perfect for gift-giving, craft fairs, or simply adding a handmade touch to your own kitchen. The cheerful lemon motif brings a touch of summer sunshine to any space, and the practical design means it will be used and appreciated every day.
Happy knitting! We'd love to see your finished Sunny Citrus Towel Toppers – share your creations on social media with the hashtag #SunnyCitrusTowelTopper and inspire fellow knitters!


