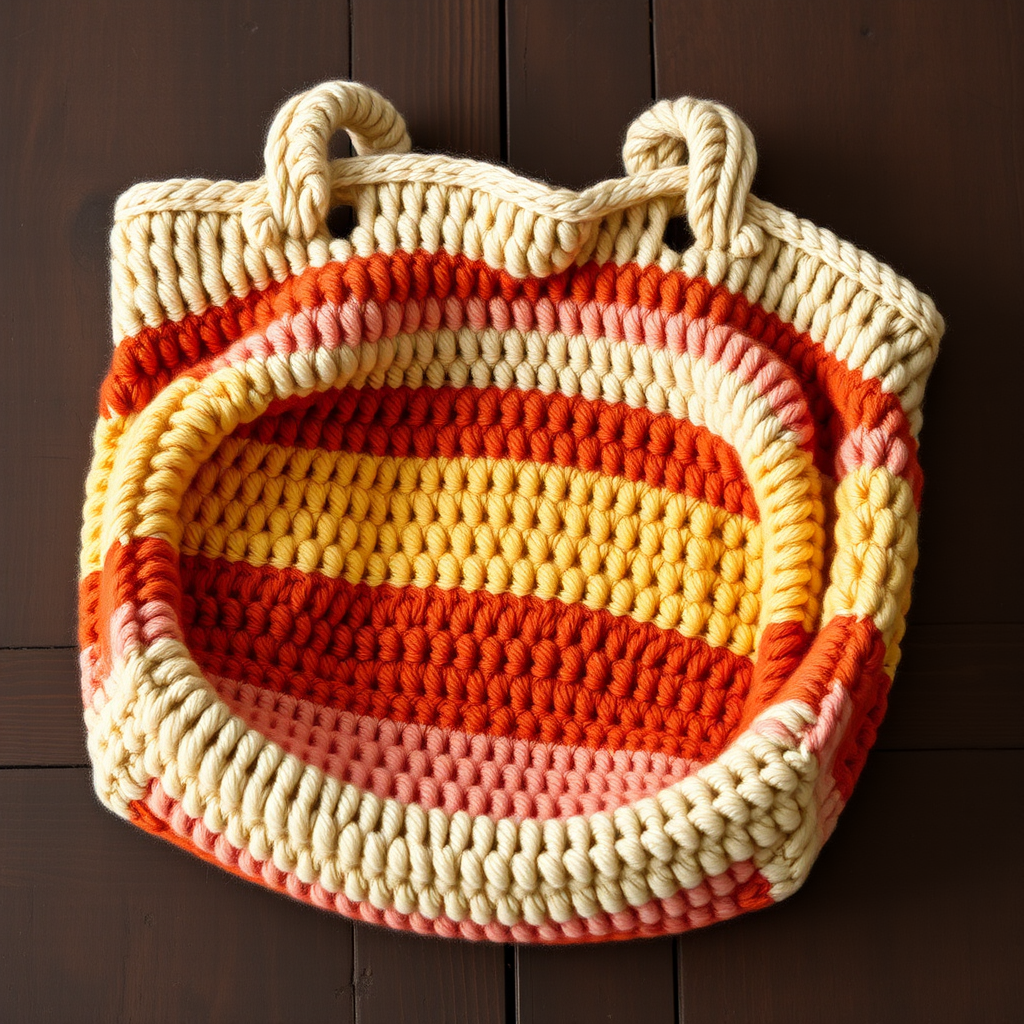
Sun-Kissed Citrus Market Bag Free Pattern – Crochet a Zesty T-Shirt Yarn Tote

Sun-Kissed Citrus Market Bag Free Pattern – Crochet a Zesty T-Shirt Yarn Tote
Imagine strolling through a sun-drenched farmers' market, your arm looped through a bag that's as vibrant as the produce you're about to buy. That's the magic of this Sun-Kissed Citrus Market Bag. Crocheted from upcycled t-shirt yarn in juicy lemon, tangerine, and coral hues, this tote features a stunning textured pineapple stitch that adds a tropical, lacy flair. It's sturdy, stretchy, and the perfect eco-friendly companion for summer errands, beach days, or anywhere you want to carry a little handmade sunshine. Best of all, this free pattern is beginner-friendly and a fantastic way to transform old t-shirts into something beautiful and functional.
Materials Needed
Before you begin, gather these simple supplies. The beauty of t-shirt yarn is its forgiving nature—it's thick, soft, and works up quickly with a large hook.
- Yarn: T-shirt yarn (approx. 300g total). You'll need 100g each in three colors: Lemon Yellow, Tangerine Orange, and Coral Pink.
- Hook: 10mm crochet hook (a larger hook makes it easier to work with bulky yarn).
- Gauge: 7 double crochet (dc) x 4 rows = 10 cm (4 inches) in pineapple stitch pattern. Note: Gauge is important for size, but with t-shirt yarn, slight variations are okay—just aim for a tight, even tension.
- Other: Scissors, yarn needle for weaving in ends, and a stitch marker (optional, but helpful for keeping track of rounds).
Step-by-Step Instructions
This bag is worked in continuous rounds from the bottom up. Don't worry about the stitch count looking complex—once you get into the rhythm of the pineapple stitch, it's a simple, repetitive pattern that's very meditative. Let's get started!
Part 1: The Base (Worked in Lemon Yellow)
We'll start with a flat, circular base using a magic ring. If you're new to magic rings, don't stress—you can also chain 4 and slip stitch to form a ring.
- Round 1: With Lemon Yellow, make a magic ring. Chain 3 (counts as your first double crochet), then work 11 double crochet (dc) into the ring. Join with a slip stitch to the top of the starting chain-3. (You should have 12 dc total.)
- Round 2: Chain 3 (counts as dc), then make 1 dc in the same stitch (this is an increase). Work 2 dc in each stitch around. Join with a slip stitch. (24 dc)
- Round 3: Chain 3, dc in the same stitch, then 1 dc in the next stitch. *Repeat: 2 dc in the next stitch, 1 dc in the next stitch* all the way around. Join. (36 dc)
- Round 4: Chain 3, dc in the same stitch, then 1 dc in the next 2 stitches. *Repeat: 2 dc in the next stitch, 1 dc in the next 2 stitches* around. Join. (48 dc)
- Round 5: Chain 3, dc in the same stitch, then 1 dc in the next 3 stitches. *Repeat: 2 dc in the next stitch, 1 dc in the next 3 stitches* around. Join. (60 dc)
Your base should now be a flat, round circle about 20 cm (8 inches) in diameter. If it's ruffling, your tension is too loose; if it's cupping, it's too tight. Adjust your hook grip slightly for the next rounds.
Part 2: The Sides (Pineapple Stitch Pattern – Still Lemon Yellow)
Now we'll build the lacy, textured sides. This is where the magic happens! The "pineapple" effect comes from the clusters of dc and the increasing chain spaces between them.
- Round 6: Chain 4 (counts as 1 dc + 1 chain). Skip the next stitch, make 1 dc in the next stitch, chain 1, skip the next stitch. *Repeat: 1 dc in the next stitch, chain 1, skip the next stitch* around. Join with a slip stitch to the 3rd chain of the starting chain-4. (You'll have 30 dc and 30 chain-1 spaces.)
- Round 7: Slip stitch into the next chain-1 space. Chain 3, then make 2 dc in the same space. Chain 1, skip the next dc. *Repeat: 3 dc in the next chain-1 space, chain 1, skip the next dc* around. Join. (30 clusters of 3 dc.)
- Round 8: Slip stitch to the first dc of the first cluster. Chain 3, then 1 dc in the next 2 dc. Chain 2, skip the chain-1 space. *Repeat: 1 dc in the next 3 dc, chain 2, skip the chain-1 space* around. Join. (30 groups of 3 dc, 30 chain-2 spaces.)
- Round 9: Chain 3, 1 dc in the next 2 dc. Chain 3, skip the chain-2 space. *Repeat: 1 dc in the next 3 dc, chain 3, skip the chain-2 space* around. Join. (30 groups, 30 chain-3 spaces.)
- Round 10: Chain 3, 1 dc in the next 2 dc. Chain 4, skip the chain-3 space. *Repeat: 1 dc in the next 3 dc, chain 4, skip the chain-3 space* around. Join. (30 groups, 30 chain-4 spaces.)
- Round 11: Chain 3, 1 dc in the next 2 dc. Chain 5, skip the chain-4 space. *Repeat: 1 dc in the next 3 dc, chain 5, skip the chain-4 space* around. Join. (30 groups, 30 chain-5 spaces.)
- Round 12: Chain 3, 1 dc in the next 2 dc. Chain 6, skip the chain-5 space. *Repeat: 1 dc in the next 3 dc, chain 6, skip the chain-5 space* around. Join. (30 groups, 30 chain-6 spaces.)
- Round 13: Chain 3, 1 dc in the next 2 dc. Chain 7, skip the chain-6 space. *Repeat: 1 dc in the next 3 dc, chain 7, skip the chain-6 space* around. Join. (30 groups, 30 chain-7 spaces.)
You'll notice the bag is starting to flare out beautifully, creating that open, airy mesh. The chain spaces are getting longer, which gives the bag its stretchy, roomy feel.
Part 3: Color Transition to Tangerine Orange
Time to switch colors! When you join with a slip stitch at the end of Round 13, fasten off the Lemon Yellow and attach your Tangerine Orange yarn.
- Round 14: With Tangerine Orange, chain 3, 1 dc in the next 2 dc. Chain 8, skip the chain-7 space. *Repeat: 1 dc in the next 3 dc, chain 8, skip the chain-7 space* around. Join. (30 groups, 30 chain-8 spaces.)
- Round 15: Chain 3, 1 dc in the next 2 dc. Chain 8, skip the chain-8 space. *Repeat: 1 dc in the next 3 dc, chain 8, skip the chain-8 space* around. Join. (30 groups, 30 chain-8 spaces.)
- Round 16: Repeat Round 15 exactly. (30 groups, 30 chain-8 spaces.)
- Round 17: Repeat Round 15 exactly. (30 groups, 30 chain-8 spaces.)
The orange section adds a warm, sunny middle band to your bag. The consistent chain-8 spaces create a lovely, uniform mesh.
Part 4: Color Transition to Coral Pink
Fasten off the Tangerine Orange and attach your Coral Pink yarn.
- Round 18: With Coral Pink, chain 3, 1 dc in the next 2 dc. Chain 8, skip the chain-8 space. *Repeat: 1 dc in the next 3 dc, chain 8, skip the chain-8 space* around. Join. (30 groups, 30 chain-8 spaces.)
- Round 19: Repeat Round 18 exactly. (30 groups, 30 chain-8 spaces.)
- Round 20: Repeat Round 18 exactly. (30 groups, 30 chain-8 spaces.)
Part 5: The Top Edge & Finishing Touches
Now we'll tighten up the top edge to give the bag structure and a clean finish.
- Round 21: Chain 3, 1 dc in the next 2 dc. Chain 2, skip the chain-8 space. *Repeat: 1 dc in the next 3 dc, chain 2, skip the chain-8 space* around. Join. (30 groups, 30 chain-2 spaces.)
- Round 22: Chain 3, 1 dc in the next 2 dc. Chain 1, skip the chain-2 space. *Repeat: 1 dc in the next 3 dc, chain 1, skip the chain-2 space* around. Join. (30 groups, 30 chain-1 spaces.)
- Round 23: Chain 1, then make 1 single crochet (sc) in each dc and in each chain-1 space around. Join with a slip stitch to the first sc. (90 sc total.)
- Round 24: Chain 1, make 1 sc in each stitch around. Join. (90 sc.)
Fasten off and weave in all your ends securely with your yarn needle. The top edge should now be firm and stable, ready for the handles.
Part 6: Creating the Handles
These sturdy, braided-looking handles are simple to make and incredibly strong.
- Attach your Coral Pink yarn to the top edge at one side of the bag (pick a spot that feels balanced).
- Chain 60. This will be the length of your handle. Tip: Hold it up to your shoulder to test the length—you can make it longer or shorter by adding or subtracting chains.
- Slip stitch to the opposite side of the bag, about 15 cm (6 inches) away from your starting point. This creates the first loop of the handle.
- Now, slip stitch back along the chain you just made, all the way to the starting point. This doubles up the yarn, creating a thick, sturdy strap.
- Fasten off and weave in the ends.
- Repeat this process on the other side of the bag for the second handle.
And there you have it—your very own Sun-Kissed Citrus Market Bag! Give it a gentle stretch to shape it, and it's ready for action. This bag is not only a stylish accessory but also a wonderful conversation starter. You've taken something old and turned it into something new, beautiful, and useful. Happy crocheting, and enjoy your zesty new tote!