Shell Summit Half-Hood Hoodie Free Crochet Pattern
Shell Summit Half-Hood Hoodie — Free Beginner Crochet Pattern
Introduction
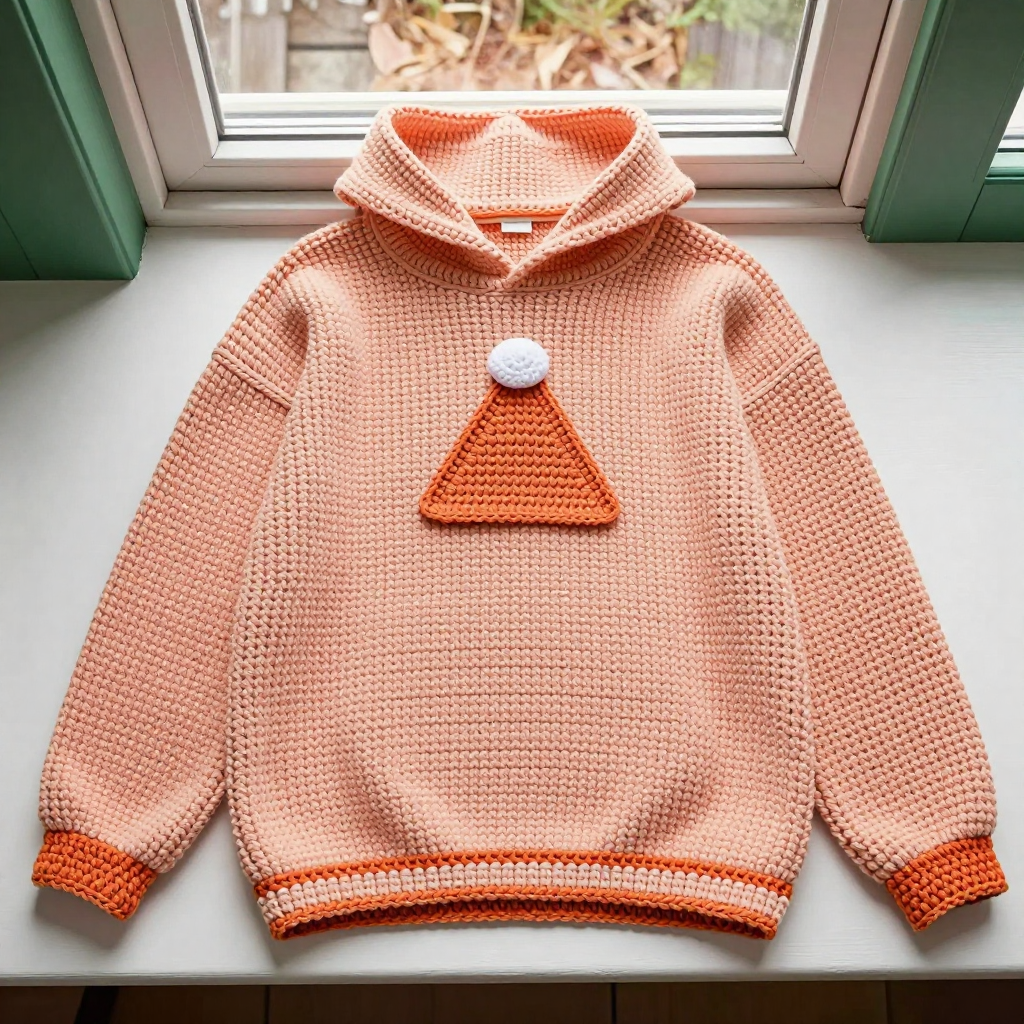
If you have never held a crochet hook before, this is the project that will make you fall in love with making your own clothes. The Shell Summit Half-Hood Hoodie is built from two simple flat rectangles and two tapered sleeve rectangles, all joined with easy slip-stitch seams — no complicated shaping, no confusing short rows, just relaxing shell stitch that grows quickly under your hands. Worked in a soft peach bamboo-cotton blend, the finished fabric is drapey, breathable, and gently weighted, with a shallow stand-up collar that hugs your neck and a quietly integrated apricot mountain summit appliqué on the chest. The result is a boxy, wearable, hygge layer with 4–6 inches of positive ease — the kind of hoodie you reach for every cool evening. If you can chain and make a single crochet, you can absolutely make this.
Materials Needed
- Yarn (main color): Worsted-weight (CYC 4) bamboo-cotton blend, approx. 60% bamboo / 40% cotton, 197 yd (180 m) per 3.5 oz (100 g) skein. Peach: 5 (5, 6, 6, 7) skeins.
- Yarn (contrast): Same yarn in Apricot: 1 skein (for the summit motif and optional snow cap).
- Main hook: US H-8 (5.0 mm) crochet hook, or the size needed to match gauge.
- Edging hook: US G-6 (4.0 mm) crochet hook (for the collar, cuffs, and hem edging).
- Stitch markers: At least 6 (to mark neck stitches, armholes, and shell centers).
- Tapestry needle (yarn needle): For whipstitching the motif and weaving in ends.
- Scissors and a tape measure.
- Blocking supplies: Pins and a spray bottle (or steamer).
Finished measurements: Bust 38 (42, 46, 50, 54) in / 96.5 (106.5, 117, 127, 137) cm. Length 22 (23, 24, 25, 26) in / 56 (58.5, 61, 63.5, 66) cm. Sleeve length from shoulder 18 (18.5, 19, 19.5, 20) in / 45.5 (47, 48, 50.5, 51) cm. Designed with 4–6 in / 10–15 cm of positive ease (meaning the finished garment measures 4–6 in larger than your body).
Abbreviations and Beginner Glossary
- ch — chain: yarn over the hook, pull the loop through the loop on your hook. This makes the starting "rope."
- sc — single crochet: insert hook into stitch, yarn over, pull up a loop (2 loops on hook), yarn over, pull through both loops.
- dc — double crochet: yarn over, insert hook into stitch, yarn over, pull up a loop (3 loops on hook), yarn over, pull through 2 loops, yarn over, pull through last 2 loops.
- sl st — slip stitch: insert hook into stitch, yarn over, pull the loop straight through the loop on your hook (no extra yarn over). Used for joining and seaming.
- reverse sc (crab stitch) — single crochet worked backwards (right to left if you are right-handed): insert hook into the stitch to the right of your hook, yarn over, pull up a loop, yarn over, pull through both loops.
- st(s) — stitch(es).
- sk — skip: leave the next stitch unworked.
- sp — space (the gap between stitches).
- rep — repeat.
- RS — right side: the "public" side of the fabric that faces out.
- WS — wrong side: the inside of the fabric.
- beg — beginning.
- shell — 5 double crochets worked into the same stitch, creating a fan.
- half shell — 3 double crochets worked into the same stitch (used at row edges).
- turn — flip your work over so you can work back across the row.
- fasten off — cut the yarn, pull the tail through the last loop, and tighten.
Gauge
Gauge: In shell stitch with the 5.0 mm hook, 1 shell (5 dc) + 1 sc = approx. 1.5 in (3.8 cm) wide, and 4 pattern rows = 2 in (5 cm). Finished fabric is approx. 16 sts and 8 rows = 4 in (10 cm) over double crochet.
Why gauge matters: Gauge is how many stitches and rows fit into a set measurement. If your stitches are bigger than the pattern's, your hoodie will come out too large; if smaller, too small. It is the single most important step for a garment that fits.
How to swatch: With the 5.0 mm hook and Peach, ch 25. Work the Shell Stitch Pattern (below) for about 12 rows. Lay the swatch flat, measure 4 in (10 cm) across the middle, and count shells. If you get more shells than 1.5 in each, switch to a larger hook; if fewer, switch to a smaller hook. Wash and dry your swatch the way you will wash the hoodie before measuring.
Beginner Tips Before You Start
- Count your shells every row. Shell stitch is easy to lose track of. Before turning, count the fans across — they should match your starting number every time.
- Use stitch markers. Place one in the center dc of each shell on your first row, and mark the neck stitches and armhole openings. It saves endless recounting.
- Do not pull your yarn too tight. Tension is the number-one beginner issue. Keep your loops relaxed and even; tight stitches make stiff, small fabric.
- Make both panels the same length. Measure your Front and Back against each other before seaming — a half-inch difference will show at the hem.
- Seam with a loose hand. Slip-stitch seams should be relaxed, not tight, or the shoulders will pucker.
- Try it on as you go. After the side seams, slip the hoodie on to check the armhole height before setting in the sleeves.
Step-by-Step Instructions
Shell Stitch Pattern (worked flat)
Foundation row (WS): Ch a multiple of 6 + 1. Sc in 2nd ch from hook and in each ch across. Turn.
Row 1 (RS): Ch 3 (counts as first dc), 2 dc in first sc (half shell made), *sk 2 sc, sc in next sc, sk 2 sc, 5 dc in next sc; rep from * across, ending with sk 2 sc, sc in next sc, sk 2 sc, 3 dc in last sc. Turn.
Row 2 (WS): Ch 1, sc in first dc, *5 dc in next sc, sc in center dc of next 5-dc shell; rep from * across, ending with sc in top of beg ch-3. Turn.
Row 3 (RS): Ch 3, 2 dc in first sc, *sc in center dc of next shell, 5 dc in next sc; rep from * across, ending with 3 dc in last sc. Turn.
Repeat Rows 2–3 for the pattern.
Back Panel
With the 5.0 mm hook and Peach, ch 97 (109, 121, 133, 145).
Work the Shell Stitch Pattern until the piece measures 22 (23, 24, 25, 26) in / 56 (58.5, 61, 63.5, 66) cm from the foundation, ending after a WS row. Fasten off.
Mark the center 25 (27, 29, 31, 33) sts along the top edge for the neck — these stay unseamed.
Front Panel
Work exactly as the Back Panel, including the center neck marker.
Shoulder Seams
With RS facing, place Front and Back panels together. Using the 5.0 mm hook and Peach, sl st seam the shoulders from the outer edge inward, leaving the marked center neck sts open. Seam length each shoulder: approx. 6 (6.5, 7, 7.5, 8) in / 15 (16.5, 18, 19, 20.5) cm.
Side Seams
Fold the work in half with RS together. Sl st seam each side from the bottom edge up 14 (14.5, 15, 15.5, 16) in / 35.5 (37, 38, 40.5, 40.5) cm, leaving an armhole opening of approx. 8 (8.5, 9, 9.5, 10) in / 20.5 (21.5, 23, 24, 25.5) cm at the top. Fasten off.
Sleeves (make 2)
With the 5.0 mm hook and Peach, ch 43 (43, 49, 49, 55).
Work the Shell Stitch Pattern, increasing 1 shell (6 sts) at each end every 6th row 4 (5, 5, 6, 6) times as follows: at the beginning of an RS row, work 3 dc in the first sc as established, then add 5 dc in the first sc of the row before continuing the pattern; mirror this at the end of the row. You will have 67 (73, 79, 85, 91) sts.
Continue even (no more increases) until the sleeve measures 18 (18.5, 19, 19.5, 20) in / 45.5 (47, 48, 50.5, 51) cm. Fasten off.
Fold each sleeve in half lengthwise with RS together and sl st seam the underarm. Turn RS out.
Set In Sleeves
With RS facing, insert a sleeve into an armhole, matching the underarm seam to the side seam. Sl st the sleeve cap to the armhole edge all the way around. Repeat for the second sleeve.
Stand-Up Collar
With the 4.0 mm hook and Peach, join yarn at the right shoulder seam at the neck opening with a sl st. Work 1 round sc evenly around the entire neck opening (approx. 60 (64, 68, 72, 76) sc), join with a sl st to the first sc.
Rnd 1: Ch 3, dc in each sc around, join with sl st. (60, 64, 68, 72, 76 dc)
Rnd 2: Ch 3, dc in each dc around, join with sl st. (60, 64, 68, 72, 76 dc)
Rnd 3: Ch 1, sc in each dc around, join with sl st. Fasten off. The collar stands approx. 1.5 in / 4 cm tall.
Cuffs and Hem Edging
With the 4.0 mm hook and Peach, join yarn at the sleeve cuff edge. Work 1 round sc evenly around the cuff, then 1 round reverse sc (crab stitch). Repeat at the bottom hem of the body. Fasten off and weave in ends.
Apricot Summit Motif (appliqué)
With the 5.0 mm hook and Apricot, make a triangle:
Row 1: Ch 2, 3 sc in 2nd ch from hook. Turn. (3 sc)
Row 2: Ch 1, 2 sc in first sc, sc in next sc, 2 sc in last sc. Turn. (5 sc)
Row 3: Ch 1, sc in each sc across. Turn. (5 sc)
Row 4: Ch 1, 2 sc in first sc, sc in each sc to last sc, 2 sc in last sc. Turn. (7 sc)
Row 5: Ch 1, sc in each sc across. Turn. (7 sc)
Row 6: Ch 1, 2 sc in first sc, sc in each sc to last sc, 2 sc in last sc. Turn. (9 sc)
Row 7: Ch 1, sc in each sc across. Fasten off, leaving a long tail for sewing. (9 sc)
The triangle measures approx. 4 in / 10 cm wide at the base and 3 in / 7.5 cm tall.
Optional snow cap: With Apricot, ch 2, 6 sc in 2nd ch from hook, join with sl st. Sew to the top point of the triangle.
Attach Motif
Pin the triangle to the front panel, centered horizontally, with the base approx. 7 in / 18 cm below the neckline and the point facing up. Using the tail and a yarn needle, whipstitch around the edges securely (whipstitch = bring the needle up through both layers, over the edge, and back down, repeating closely). Weave in ends.
Assembly and Finishing
Seaming: All seams in this pattern are slip-stitch seams worked with the RS of the fabric facing each other. Insert your hook through both layers at once, yarn over, and pull through both the fabric and the loop on your hook. Keep the seam relaxed and even — if it pulls, the fabric will pucker.
Weaving in ends: Thread each tail onto the tapestry needle and weave it back and forth through the wrong side of the fabric for about 2 in (5 cm), changing direction once so it locks in place. Trim close to the fabric.
Blocking: Lay the hoodie flat on a towel or blocking mat, pin it gently to the finished measurements (bust, length, sleeve length), and mist lightly with water. Let it dry completely. You can also gently steam the seams flat with an iron held just above the fabric — never press the iron directly onto the stitches. Blocking opens up the shell stitch, softens the bamboo-cotton, and evens out any tension wobbles.
Pro Tips and Variations
- Change colors: Work the summit motif in any contrast color — a deep forest green or dusty rose looks lovely against peach. You can also add a contrast stripe at the cuffs and hem by working the edging rounds in your accent color.
- Adjust the size: The shell stitch works over a multiple of 6 + 1. To add width, add 6 chains to your foundation (one extra shell per side); to remove width, subtract 6. Adjust the length by working more or fewer pattern rows before fastening off.
- Substitute yarn: Any worsted-weight (CYC 4) yarn works — cotton, acrylic, or a wool blend. Always swatch first, because fiber content changes how the fabric drapes and how the gauge behaves after washing.
- Make it a full hood: For a deeper hood, work additional dc rounds around the neck opening before the final sc round, increasing 4–6 sts evenly every other round until the hood measures about 10 in (25 cm) deep, then seam the top closed.