Nordic Pig Chevron Cuffs: Free Pattern for Two-Tone Crochet Baby Booties
Nordic Pig Chevron Cuffs: Free Crochet Baby Booties Pattern
Introduction
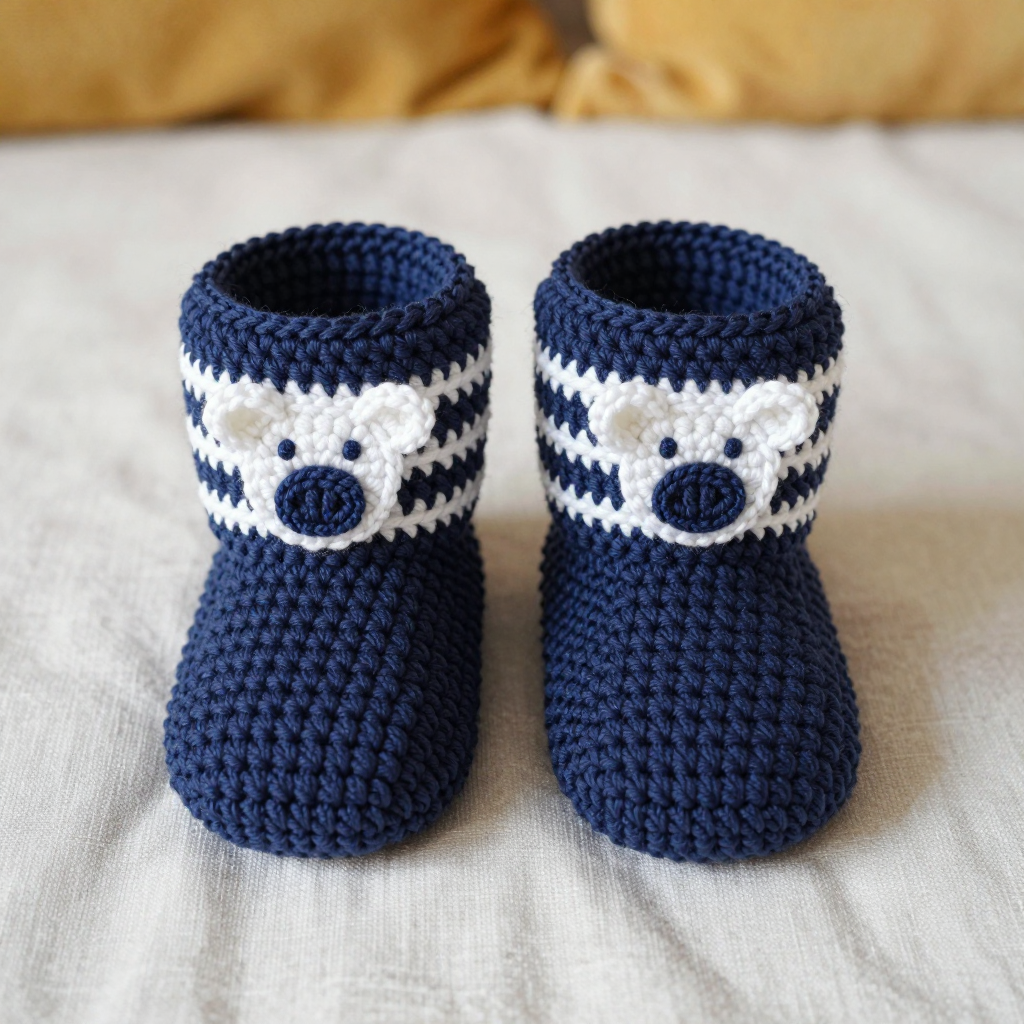
These cozy little booties are the perfect first project for anyone who has just picked up a crochet hook and wants to make something truly adorable. Worked as simple tubes in thick, fuzzy chenille yarn, they grow from a small circle at the toe into a soft, rounded foot that slips easily onto tiny toes. The turned-down cuff uses a rhythmic chevron (ripple) stitch in alternating white and navy stripes, giving a warm Nordic winter look, and each cuff is topped with a tiny circular pig-face appliqué that makes the finished pair impossible to resist. The plush yarn hides small beginner wobbles, the stitches are all basic, and the finished booties feel like a cloud — soft, squishy, and made with love for a baby aged 0–6 months.
Materials Needed
- Yarn: Chenille plush yarn (super bulky / weight category 6), approximately 120 yd (110 m) total: 80 yd (73 m) navy and 40 yd (37 m) white. The sample used a soft polyester chenille.
- Hook: Size 6.0 mm (US J-10) crochet hook, or the size needed to match gauge.
- Stitch marker: One marker (or a scrap of contrasting yarn) to mark the first stitch of each round.
- Tapestry needle: A blunt-tipped needle with a large eye for seaming, sewing on appliqués, and weaving in ends.
- Scissors: Sharp small scissors for cutting yarn.
- Finished size: Fits 0–6 months. Foot length 4 in (10 cm); foot circumference 5 in (12.5 cm); cuff height when turned down 2 in (5 cm); total bootie height with cuff folded 4.5 in (11.5 cm).
Abbreviations and Beginner Glossary
- ch – chain: wrap the yarn over the hook and pull it through the loop on your hook. This makes a small link.
- sc – single crochet: insert the hook into the stitch, yarn over, pull up a loop (2 loops on hook), yarn over again, pull through both loops. One loop remains.
- hdc – half double crochet: yarn over, insert hook into stitch, yarn over, pull up a loop (3 loops on hook), yarn over, pull through all 3 loops at once.
- dc – double crochet: yarn over, insert hook into stitch, yarn over, pull up a loop (3 loops on hook), yarn over, pull through 2 loops, yarn over, pull through the last 2 loops.
- dc2tog – double crochet 2 together (a decrease): yarn over, insert hook into first stitch, yarn over, pull up a loop, yarn over, pull through 2 loops (2 loops remain); yarn over, insert hook into next stitch, yarn over, pull up a loop, yarn over, pull through 2 loops, yarn over, pull through all 3 remaining loops. Two stitches become one.
- sl st – slip stitch: insert hook into stitch, yarn over, pull the loop straight through both the stitch and the loop on your hook. It joins without adding height.
- st(s) – stitch(es): one completed loop or "V" in your fabric.
- rep – repeat: do the same instruction again.
- rnd – round: one complete circle of stitches worked around.
- RS – right side: the outside, public face of the fabric.
- magic ring – an adjustable loop: wrap yarn around your fingers to form a loop, work stitches into it, then pull the tail tight to close the center hole.
- 2 sc in next st – an increase: work two single crochet stitches into the same stitch to add one stitch.
- join with sl st – finish the round by making a slip stitch into the first stitch of that round, closing the circle.
- fasten off – cut the yarn, pull the tail through the last loop, and tighten.
- continuous rounds – working in a spiral without joining, so the rounds flow into one another.
Gauge
Gauge: 10 sc x 11 rounds = 4 in (10 cm) in single crochet worked in the round with chenille yarn on a 6.0 mm hook. Chevron cuff gauge: 1 chevron repeat (14 sts) = 2 in (5 cm) wide; 4 rows = 1 in (2.5 cm).
Why gauge matters: Gauge is how many stitches and rounds fit into a set measurement. If your stitches are bigger than the pattern's, the booties will come out too large; if smaller, they may not fit a baby's foot. How to swatch: With navy yarn, make a magic ring, work 6 sc into it, then increase evenly (2 sc in each stitch, then alternate increases) until you have about 30 stitches, and work several plain rounds. Measure a 4 in (10 cm) section and count your stitches and rounds. If you have more than 10 stitches per 4 in, try a larger hook; if fewer, try a smaller hook.
Beginner Tips Before You Start
- Use a stitch marker. Because the foot is worked in continuous rounds (a spiral), place a marker in the first stitch of each round so you always know where a round begins and ends.
- Do not pull the yarn too tight. Chenille yarn is fuzzy and snaps easily. Keep an even, relaxed tension so the plush texture stays soft and the stitches stay easy to find.
- Count after every increase round. The stitch counts in parentheses tell you exactly how many stitches you should have — check them before moving on.
- Work the chevron cuff in joined rounds. Unlike the foot, the cuff is joined with a slip stitch at the end of each round, which keeps the stripe lines straight.
- Change colors at the end of a round. Finish the last stitch with the new color so the color change is neat, then fasten off the old color.
- Keep the appliqués flat. Do not stuff the pig face or snout — they should lie flat against the cuff.
Step-by-Step Instructions
Bootie (make 2)
Worked in continuous rounds from the toe to the cuff. Do not join unless instructed. Use US crochet terminology.
Set-up: With navy chenille yarn, make a magic ring.
Rnd 1: 6 sc in ring. (6 sc)
Rnd 2: 2 sc in each st around. (12 sc)
Rnd 3: *2 sc in next st, sc in next st; rep from * around. (18 sc)
Rnd 4: *2 sc in next st, sc in next 2 sts; rep from * around. (24 sc)
Rnd 5: *2 sc in next st, sc in next 3 sts; rep from * around. (30 sc)
Rnd 6: *2 sc in next st, sc in next 4 sts; rep from * around. (36 sc)
Rnd 7: *2 sc in next st, sc in next 5 sts; rep from * around. (42 sc)
Rnd 8: *2 sc in next st, sc in next 6 sts; rep from * around. (48 sc)
Rnd 9: Sc in each st around. (48 sc)
Rnds 10–18: Repeat Rnd 9 (sc in each st around). (48 sc)
Rnd 19: Sc in next 18 sts, dc2tog over next 2 sts, dc2tog over next 2 sts, sc in next 18 sts, dc2tog over next 2 sts, dc2tog over next 2 sts. (44 sts)
Rnd 20: Sc in next 18 sts, dc2tog over next 2 sts, dc2tog over next 2 sts, sc in next 18 sts, dc2tog over next 2 sts, dc2tog over next 2 sts. (40 sts)
Rnd 21: Sc in next 18 sts, dc2tog over next 2 sts, dc2tog over next 2 sts, sc in next 18 sts, dc2tog over next 2 sts, dc2tog over next 2 sts. (36 sts)
Rnd 22: Sc in each st around. (36 sc)
Fasten off navy. Join white yarn.
Chevron Cuff
Worked in joined rounds over the 36 sts of the bootie top. The chevron pattern is a multiple of 14 sts and repeats 2 times around (14 x 2 = 28 sts) with the remaining stitches forming the repeat sequence as written. Work the sequence below exactly as given each round.
Rnd 1 (white): Ch 1, sc in first st, *sc in next 5 sts, dc2tog over next 2 sts, dc2tog over next 2 sts, sc in next 5 sts, 2 sc in next st; rep from * around, join with sl st to first sc. (36 sts)
Rnd 2 (white): Ch 1, sc in first st, *sc in next 5 sts, dc2tog over next 2 sts, dc2tog over next 2 sts, sc in next 5 sts, 2 sc in next st; rep from * around, join with sl st to first sc. (36 sts)
Rnd 3 (navy): Ch 1, sc in first st, *sc in next 5 sts, dc2tog over next 2 sts, dc2tog over next 2 sts, sc in next 5 sts, 2 sc in next st; rep from * around, join with sl st to first sc. (36 sts)
Rnd 4 (navy): Ch 1, sc in first st, *sc in next 5 sts, dc2tog over next 2 sts, dc2tog over next 2 sts, sc in next 5 sts, 2 sc in next st; rep from * around, join with sl st to first sc. (36 sts)
Rnd 5 (white): Ch 1, sc in first st, *sc in next 5 sts, dc2tog over next 2 sts, dc2tog over next 2 sts, sc in next 5 sts, 2 sc in next st; rep from * around, join with sl st to first sc. (36 sts)
Rnd 6 (white): Ch 1, sc in first st, *sc in next 5 sts, dc2tog over next 2 sts, dc2tog over next 2 sts, sc in next 5 sts, 2 sc in next st; rep from * around, join with sl st to first sc. (36 sts)
Rnd 7 (navy): Ch 1, sc in first st, *sc in next 5 sts, dc2tog over next 2 sts, dc2tog over next 2 sts, sc in next 5 sts, 2 sc in next st; rep from * around, join with sl st to first sc. (36 sts)
Rnd 8 (navy): Ch 1, sc in first st, *sc in next 5 sts, dc2tog over next 2 sts, dc2tog over next 2 sts, sc in next 5 sts, 2 sc in next st; rep from * around, join with sl st to first sc. (36 sts)
Fasten off navy. Weave in ends. Turn cuff down over the bootie.
Pig-Face Appliqué (make 2)
Worked in a flat circle with white chenille yarn.
Rnd 1: 6 sc in magic ring. (6 sc)
Rnd 2: 2 sc in each st around. (12 sc)
Rnd 3: *2 sc in next st, sc in next st; rep from * around. (18 sc)
Rnd 4: *2 sc in next st, sc in next 2 sts; rep from * around. (24 sc)
Rnd 5: Sc in each st around. (24 sc)
Fasten off, leaving a long tail for sewing. Do not stuff.
Snout (make 2)
Worked with navy chenille yarn.
Rnd 1: 6 sc in magic ring. (6 sc)
Rnd 2: 2 sc in each st around. (12 sc)
Rnd 3: Sc in each st around. (12 sc)
Fasten off, leaving a long tail. Flatten slightly.
Ears (make 4)
Worked with white chenille yarn.
Set-up: Ch 4.
Row 1: Sc in second ch from hook, sc in next ch, 3 sc in last ch; working along opposite side of ch, sc in next ch, sc in last ch. (7 sc)
Row 2: Ch 1, turn, sc in each st across. (7 sc)
Fasten off, leaving a long tail.
Assembly and Finishing
- Sew on the pig faces. Thread a tapestry needle with the white tail of one pig-face appliqué. Position it centered on the front of a turned-down cuff, about 0.5 in (1.25 cm) below the top edge. Using small, even stitches around the outer edge, sew it in place. Repeat for the second bootie.
- Add the snouts. Thread the navy tail of a snout onto the tapestry needle and sew it to the center of each pig face with small stitches around its edge. Repeat for the second bootie.
- Embroider the nostrils. With navy yarn, make two small straight stitches side by side on each snout to form nostrils. Bring the needle up through the fabric, go down where you want the stitch to end, and repeat.
- Sew on the ears. Using white yarn, sew two ears to the top of each pig face, spacing them about 0.5 in (1.25 cm) apart. Secure firmly with a few extra stitches so they stay put through washing.
- Embroider the eyes. With navy yarn, embroider two small eyes above the snout using straight stitches or French knots (wrap the yarn around the needle twice before pulling through for a small knot).
- Weave in all ends. Thread each yarn tail onto the tapestry needle and run it through the back of several stitches, then trim close to the fabric so it will not work loose.
- Block lightly if desired. Mist the booties with cool water, shape them gently with your hands, and let them dry flat away from direct heat. Avoid pressing or flattening the chevron texture.
- Fold the cuffs down over the top of each bootie and give them a gentle tug into shape.
Pro Tips and Variations
- Change the colors. Swap navy and white for any two contrasting super bulky yarns — soft gray and cream, or blush pink and white — to create a different Nordic palette. Keep one color for the foot and alternate the two on the cuff.
- Adjust the size. For a slightly larger bootie (6–12 months), add one more increase round to the toe (Rnd 9: *2 sc in next st, sc in next 7 sts; rep around = 54 sc) and work a few extra plain rounds before the decreases. Check your gauge first so the fit stays accurate.
- Substitute yarn carefully. If chenille is unavailable, use any super bulky (category 6) yarn, but always swatch first — a different fiber may change your gauge and therefore the finished size.
- Make the pig faces removable. Instead of sewing the appliqués on permanently, attach them with small safety pins so the booties can be washed easily or the faces swapped for a different animal.