Whimsical Woodland Fox Booties Free Pattern
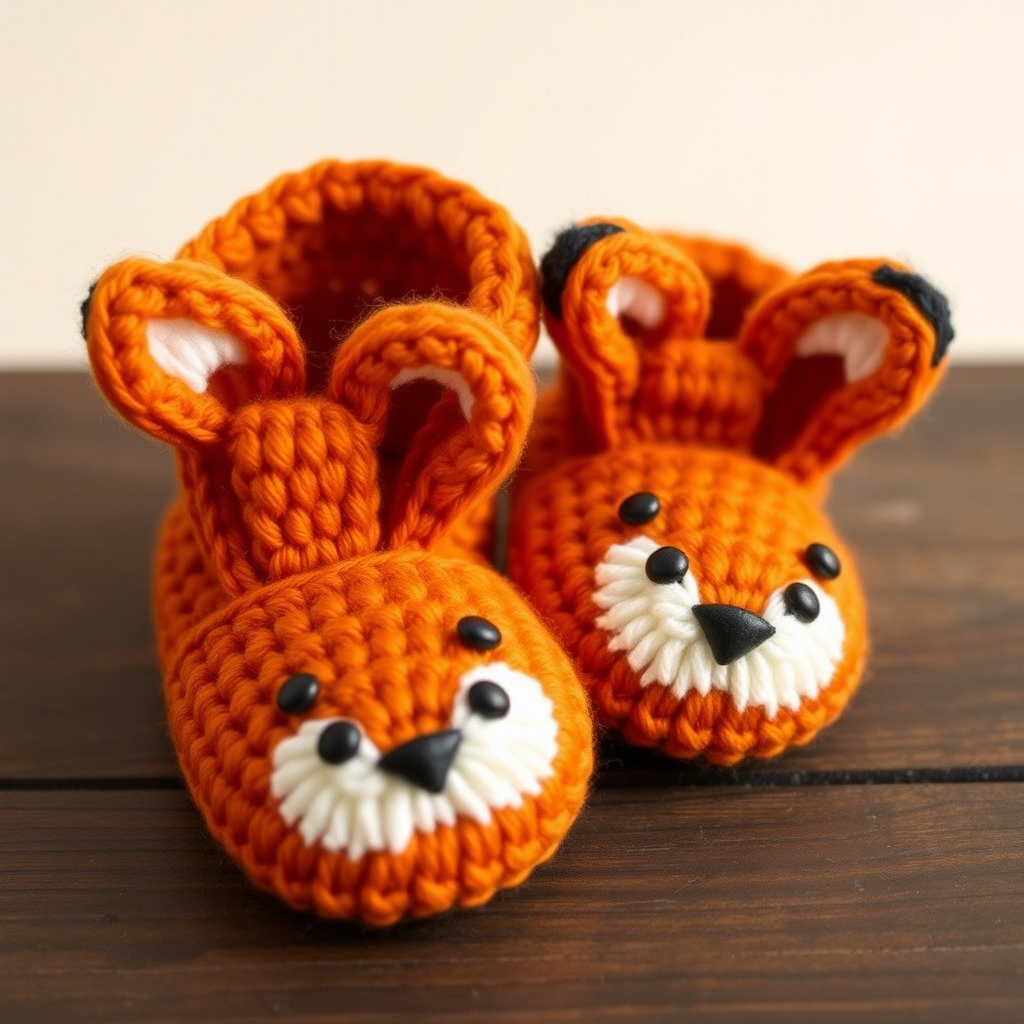
Whimsical Woodland Fox Booties: A Free Crochet Pattern for Tiny Toes
There's something undeniably magical about handmade gifts for little ones, especially when they carry a touch of woodland whimsy. These adorable fox-inspired booties are the perfect project for crafters looking to create something unique, cozy, and utterly charming. With their warm orange hue, sweet white muzzle, and perky little ears, these booties will keep tiny feet toasty while adding a playful, rustic touch to any baby's wardrobe. Whether you're preparing for a baby shower or decorating a woodland-themed nursery, this beginner-friendly pattern is a delightful twist on classic baby footwear that's sure to become a cherished keepsake.
Designed with simplicity in mind, this pattern uses basic single crochet stitches and simple shaping techniques, making it accessible even for those new to crocheting baby items. The result is a soft, textured bootie that looks like a tiny fox face peeking out from your little one's feet. Let's dive into this enchanting project and create something truly special!
Materials Needed
Before you begin your crafting adventure, gather these essential supplies:
Yarn
- Worsted weight yarn in orange (main color) – approximately 100-150 yards, depending on size. Lion Brand Vanna's Choice in "Terracotta" or similar warm orange works beautifully.
- Worsted weight yarn in white – for the muzzle and inner ears. A soft cream or pure white will create a lovely contrast.
- Worsted weight yarn in black – for embroidering the nose and eyes. A small amount is all you need.
Tools and Notions
- 4.5 mm crochet hook (or size needed to obtain gauge)
- Yarn needle for sewing pieces together and weaving in ends
- Sharp scissors for cutting yarn
- Stitch markers (optional but helpful for keeping track of rounds)
Gauge
16 stitches and 18 rows per 4 inches in single crochet. Always make a gauge swatch first to ensure your booties come out the right size. If your gauge is off, adjust your hook size accordingly.
Sizes
This pattern includes instructions for three sizes: 0-3 months (3-6 months, 6-12 months). The numbers in parentheses correspond to the larger sizes throughout the pattern.
Step-by-Step Instructions
Let's create these adorable fox booties! Follow along carefully, and you'll have a beautiful pair in no time.
Abbreviations
- ch = chain
- sc = single crochet
- inc = increase (2 sc in same stitch)
- dec = decrease (sc 2 together)
- sl st = slip stitch
- st(s) = stitch(es)
Part 1: The Sole (Make 2)
The sole forms the foundation of your bootie and provides a comfortable, sturdy base for tiny feet.
Row 1: With orange yarn, chain 7 (9, 11).
Single crochet in the 2nd chain from the hook and in each chain across. Turn your work. (6, 8, 10 stitches)
Row 2: Chain 1. Increase in the first stitch (work 2 sc in that stitch), then single crochet in each stitch across until you reach the last stitch. Increase in the last stitch. Turn. (8, 10, 12 stitches)
Row 3: Chain 1. Increase in the first stitch, single crochet across until the last stitch, increase in the last stitch. Turn. (10, 12, 14 stitches)
Rows 4-6 (7, 8): Chain 1. Single crochet in each stitch across. Turn. (10, 12, 14 stitches)
Row 7 (8, 9): Chain 1. Decrease over the first two stitches (single crochet 2 together), single crochet across until the last two stitches, decrease over those last two stitches. Turn. (8, 10, 12 stitches)
Row 8 (9, 10): Chain 1. Decrease over the first two stitches, single crochet across until the last two stitches, decrease over those last two stitches. Turn. (6, 8, 10 stitches)
Fasten off and weave in the ends. Set the sole aside. Repeat to make the second sole.
Part 2: The Upper Bootie (Make 2)
This is the main body of the bootie that will wrap around your little one's foot and form the adorable fox face.
Round 1: With orange yarn, chain 18 (20, 22).
Single crochet in the 2nd chain from the hook and in each chain across. When you reach the last chain, work 3 single crochet into that final chain to turn the corner. Now working along the other side of the foundation chain, single crochet in each chain across. Work 2 single crochet in the last chain. Join with a slip stitch to the first single crochet. (36, 40, 44 stitches)
Round 2: Chain 1. Single crochet in each stitch around. Join with a slip stitch to the first stitch. (36, 40, 44 stitches)
Round 3: Chain 1. Single crochet in the next 8 (9, 10) stitches. Decrease over the next two stitches. Single crochet in the next 16 (18, 20) stitches. Decrease over the next two stitches. Single crochet in the next 8 (9, 10) stitches. Join. (34, 38, 42 stitches)
Round 4: Chain 1. Single crochet in the next 7 (8, 9) stitches. Decrease. Single crochet in the next 16 (18, 20) stitches. Decrease. Single crochet in the next 7 (8, 9) stitches. Join. (32, 36, 40 stitches)
Round 5: Chain 1. Single crochet in the next 6 (7, 8) stitches. Decrease. Single crochet in the next 16 (18, 20) stitches. Decrease. Single crochet in the next 6 (7, 8) stitches. Join. (30, 34, 38 stitches)
Round 6: Chain 1. Single crochet in the next 5 (6, 7) stitches. Decrease. Single crochet in the next 16 (18, 20) stitches. Decrease. Single crochet in the next 5 (6, 7) stitches. Join. (28, 32, 36 stitches)
Round 7: Chain 1. Single crochet in each stitch around. Join. (28, 32, 36 stitches)
Round 8: Chain 1. Single crochet in the next 4 (5, 6) stitches. Decrease. Single crochet in the next 16 (18, 20) stitches. Decrease. Single crochet in the next 4 (5, 6) stitches. Join. (26, 30, 34 stitches)
Round 9: Chain 1. Single crochet in each stitch around. Join. (26, 30, 34 stitches)
Round 10: Chain 1. Single crochet in the next 3 (4, 5) stitches. Decrease. Single crochet in the next 16 (18, 20) stitches. Decrease. Single crochet in the next 3 (4, 5) stitches. Join. (24, 28, 32 stitches)
Round 11: Chain 1. Single crochet in each stitch around. Join. (24, 28, 32 stitches)
Round 12: Chain 1. Single crochet in the next 2 (3, 4) stitches. Decrease. Single crochet in the next 16 (18, 20) stitches. Decrease. Single crochet in the next 2 (3, 4) stitches. Join. (22, 26, 30 stitches)
Round 13: Chain 1. Single crochet in each stitch around. Join. (22, 26, 30 stitches)
Round 14: Chain 1. Single crochet in the next 1 (2, 3) stitches. Decrease. Single crochet in the next 16 (18, 20) stitches. Decrease. Single crochet in the next 1 (2, 3) stitches. Join. (20, 24, 28 stitches)
Round 15: Chain 1. Single crochet in each stitch around. Join. (20, 24, 28 stitches)
Fasten off, leaving a long tail (approximately 18-20 inches) for sewing the upper to the sole. Repeat for the second bootie.
Part 3: The Muzzle (Make 2)
The white muzzle is what gives these booties their adorable fox face appearance.
Round 1: With white yarn, chain 4.
Single crochet in the 2nd chain from the hook, single crochet in the next chain, work 3 single crochet in the last chain. Now working along the other side of the chain, single crochet in the next chain, work 2 single crochet in the last chain. Join with a slip stitch to the first single crochet. (8 stitches)
Round 2: Chain 1. Increase in each stitch around (work 2 single crochet in every stitch). Join. (16 stitches)
Round 3: Chain 1. Single crochet in each stitch around. Join. (16 stitches)
Fasten off, leaving a long tail for sewing. Repeat for the second muzzle.
Part 4: The Ears (Make 4 Orange Outer + 4 White Inner)
Each ear consists of an orange outer piece and a white inner piece that are sewn together for a lovely two-tone effect.
Outer Ear (Orange) – Make 2:
Row 1: With orange yarn, chain 4.
Single crochet in the 2nd chain from the hook and in each chain across. Turn. (3 stitches)
Row 2: Chain 1. Increase in the first stitch, single crochet in the next stitch, increase in the last stitch. Turn. (5 stitches)
Row 3: Chain 1. Single crochet in each stitch across. Turn. (5 stitches)
Row 4: Chain 1. Decrease over the first two stitches, single crochet in the next stitch, decrease over the last two stitches. Turn. (3 stitches)
Row 5: Chain 1. Decrease over the first two stitches, single crochet in the last stitch. Turn. (2 stitches)
Fasten off, leaving a long tail for sewing. Repeat for the second outer ear.
Inner Ear (White) – Make 2:
Repeat the exact same instructions as the outer ear, but using white yarn. Fasten off, leaving a long tail.
Part 5: Assembly
Now comes the exciting part – bringing all the pieces together to create your adorable fox booties!
Step 1: Attach the Upper to the Sole
Take one upper bootie piece and one sole. Align them with right sides together, matching the center of the heel and the center of the toe. Using the long tail from the upper bootie and a yarn needle, whip stitch the upper to the sole all the way around. Make sure your stitches are even and secure. When you reach the starting point, knot the yarn and weave in the end.
Step 2: Attach the Muzzle
Position the white muzzle on the front (toe area) of the bootie, centered horizontally. Using the long tail from the muzzle, sew it in place along the bottom and sides, leaving the top edge open to create a subtle pocket effect. This gives the fox face dimension. Secure and weave in the ends.
Step 3: Create and Attach the Ears
For each ear, place one white inner ear piece on top of one orange outer ear piece, aligning the edges. Using the tail from the white piece, whip stitch the two pieces together along the sides and bottom, leaving the top edge open. Alternatively, you can simply sew them together with a few stitches in the center. Attach each completed ear to the top sides of the bootie, positioning them symmetrically. Sew securely and weave in all ends.
Step 4: Embroider the Face
With black yarn and your yarn needle, embroider a small nose on the tip of the white muzzle. Make a small triangle or oval shape using satin stitch or a few tight stitches. Then, embroider two small eyes above the muzzle, positioned symmetrically. You can make simple dots or slightly oval shapes. Be sure to secure the yarn well on the inside of the bootie.
Step 5: Final Touches
Weave in all remaining ends carefully, making sure no loose threads are visible. Gently shape the booties and ensure the ears stand up nicely. Repeat the entire assembly process for the second bootie.
Your Fox Booties Are Complete!
Congratulations! You've just created a pair of utterly adorable Whimsical Woodland Fox Booties. These charming little shoes are perfect for keeping tiny toes warm during chilly months, making memorable baby shower gifts, or adding a touch of woodland magic to your own little one's wardrobe. The soft, textured single crochet stitch and the sweet fox face design make these booties as comfortable as they are cute.
Remember, practice makes perfect – don't be afraid to make a second pair once you've mastered the technique. You could even experiment with different color combinations to create other woodland creatures, like bears or bunnies! Happy crocheting, and enjoy watching those tiny fox feet scamper about!


