Night Orchard Tassel Cape: Free Corner-to-Corner Crochet Pattern
Night Orchard Tassel Cape: Free Corner-to-Corner Crochet Pattern
Introduction
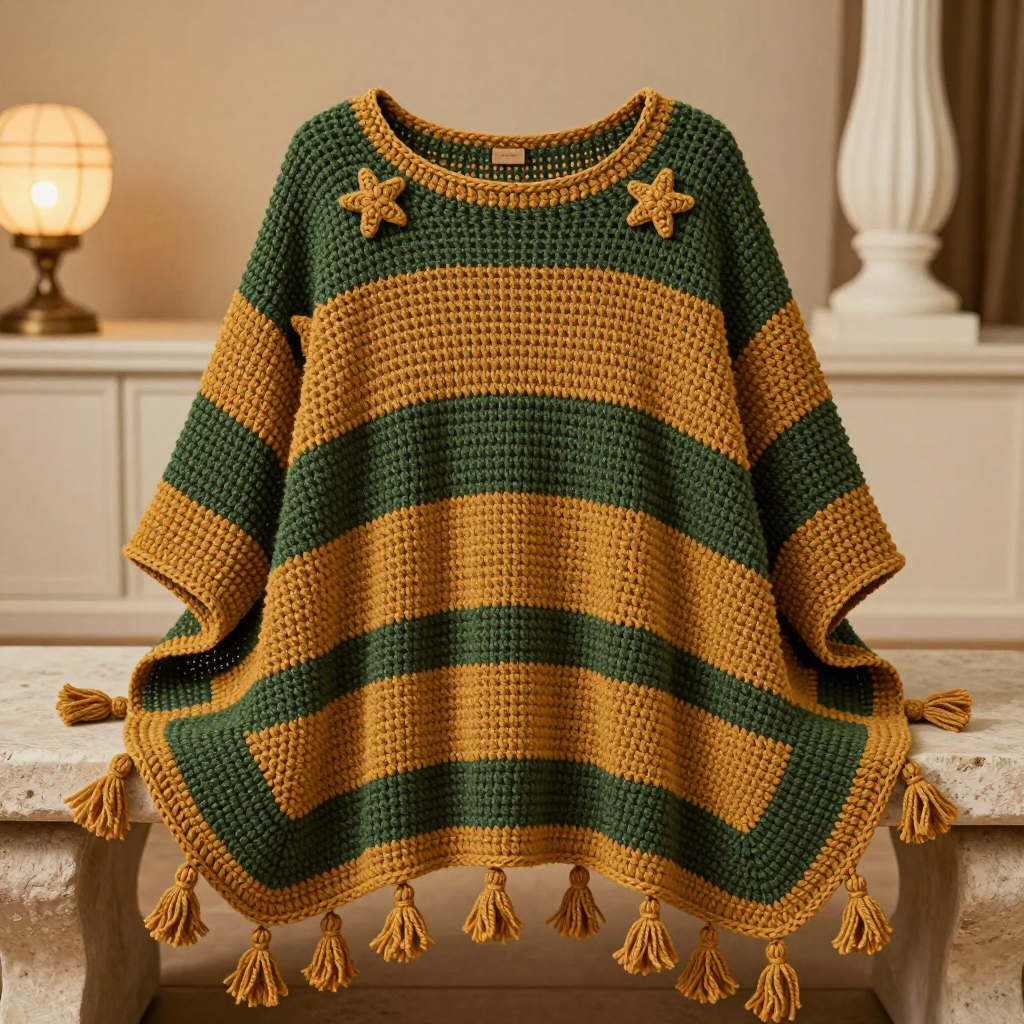
The Night Orchard Tassel Cape is the perfect first big project for someone who has just learned the basic crochet stitches and wants to make something they will actually wear. It is worked in corner-to-corner crochet — a wonderfully forgiving technique that builds the whole cape out of tiny, repeatable squares, so you only ever need to master one small block at a time. The finished piece is a soft, square shoulder cape in alternating bands of deep olive green and warm ochre gold, with four little crocheted stars near the shoulders and twelve short yarn tassels swinging along the hem. It drapes over the shoulders like a cozy square shawl, roughly 40 inches wide and 20 inches deep, and it feels like a warm, slightly fuzzy wool blanket you can wear on a crisp autumn walk. If you can chain and double crochet, you can make this cape — and you will be amazed at what those two stitches can build.
Materials Needed
- Yarn: DK weight (light worsted) merino wool, approx. 246 yd (225 m) per 100 g skein.
- Color A (olive): 2 skeins, approx. 400 yd (366 m) total.
- Color B (ochre): 2 skeins, approx. 330 yd (302 m) total, plus a small amount held aside for the stars and tassels.
- Crochet hook: Size 4.5 mm (US 7), or whatever size you need to match the gauge below.
- Tapestry needle: A large, blunt needle with an eye big enough for your yarn, used for seaming and weaving in ends.
- Stitch marker (optional): A small clip or safety pin used to mark a spot in your work so you do not lose your place.
- Scissors: Any sharp pair for cutting yarn.
- Blocking mat and pins (optional but recommended): A foam play mat or towel plus rust-proof pins for shaping the finished cape.
- Finished size: Approx. 40 in (102 cm) wide across the top (shoulder) edge, 20 in (51 cm) deep from the shoulder line to the hem point, with arm openings approx. 8 in (20 cm) deep at each side.
Abbreviations and Beginner Glossary
Every abbreviation used in this pattern is listed here in plain English. Read this list once before you begin — no prior knowledge is assumed.
- ch – chain. Make a loop of yarn on your hook, wrap the yarn over the hook, and pull it through the loop already on the hook. That is one chain.
- dc – double crochet. Wrap the yarn over your hook, insert the hook into the stitch or space, pull up a loop (you now have 3 loops on the hook), wrap the yarn over again and pull it through the first 2 loops (2 loops left), wrap the yarn over once more and pull it through the last 2 loops (1 loop left). That is one double crochet.
- sl st – slip stitch. Insert the hook into the stitch or space, wrap the yarn over, and pull it straight through both the stitch and the loop on your hook in one motion. It makes a nearly invisible joining stitch.
- sc – single crochet. Insert the hook into the stitch, pull up a loop (2 loops on hook), wrap the yarn over, and pull it through both loops. That is one single crochet.
- st / sts – stitch / stitches. One completed stitch, or several of them.
- C2C – corner-to-corner crochet. A technique where you work diagonal rows of small square "blocks" from one corner of the fabric to the opposite corner.
- Block – one C2C square, made of ch 3 plus 3 dc. In this pattern one block measures about 1 x 1 in (2.5 x 2.5 cm).
- Increase row – a row where you add one new block at the beginning, making the fabric one block wider.
- Decrease row – a row where you skip the first block (by slip stitching across it) and omit the last block, making the fabric one block narrower.
- Ch-3 space – the little gap formed by the chain 3 at the top of a block. Blocks are joined by working into these spaces.
- Magic ring – an adjustable loop of yarn that you crochet into and then pull tight, leaving no hole in the center. Used for the stars.
- Join with sl st – finish a round by making a slip stitch into the top of the first stitch so the round closes into a circle.
- Fasten off – cut the yarn a few inches from your work, pull the tail all the way through the last loop, and tighten so it does not unravel.
- Turn – flip your work over so you can work back along the row you just made.
- Right side – the side of the fabric meant to face outward when worn. The "wrong side" is the inside.
Gauge
Gauge: One C2C block (ch 3 + 3 dc) measures approx. 1 x 1 in (2.5 x 2.5 cm). 4 blocks = approx. 4 in (10 cm).
Why gauge matters: Gauge is simply how big your stitches come out. If your blocks are bigger than 1 inch, your cape will be bigger than 40 inches wide; if they are smaller, it will be too small to drape over your shoulders. Checking gauge first saves you from crocheting an entire cape that does not fit.
How to make a gauge swatch: With Color A, ch 6. Work Row 1 as written below (1 block). Continue increasing as in the pattern until you have 5 blocks, then work one even row. Lay the swatch flat without stretching it and measure across 4 blocks. If 4 blocks measure 4 inches, you are spot on. If they measure more than 4 inches, switch to a smaller hook (try 4.0 mm / US G-6). If they measure less, switch to a larger hook (try 5.0 mm / US H-8).
Beginner Tips Before You Start
- Count your blocks at the end of every row. C2C is easy to lose track of. Say the number out loud as you go, and place a stitch marker in the first block of each row so you always know where the row began.
- Do not pull your yarn too tight. C2C blocks should look like small open squares. If you tug every stitch snug, the fabric becomes stiff and the cape will not drape. Let the yarn relax.
- Keep your turning chain loose. The ch 3 at the end of each row becomes the space you work into on the next row. If it is tight, your next block will be cramped.
- Change colors at the very start of a row. Finish the last stitch of the previous row with the new color by pulling the new yarn through the final loop, then carry on. This keeps the band edges clean.
- Work in good light and take breaks. This is a long, repetitive project — roughly 60 rows. Ten minutes at a time is plenty for a beginner's hands.
- Trust the process. The first few rows look like a tiny triangle. By Row 20 it becomes a wide band, and by Row 60 it is a full cape. It really does work.
Step-by-Step Instructions
Construction Overview
This cape is one flat C2C rectangle worked diagonally, corner to corner, in alternating horizontal bands of olive (A) and ochre (B). It is then folded in half along the long edge to form a square shoulder cape, with a short seam at each side to create arm openings. Four small ochre star appliqués are sewn near the shoulders, and short yarn tassels are added along the hem.
Band sequence: Each band is 4 blocks tall (approx. 4 in / 10 cm). The sequence across the depth of the cape is A, B, A, B, A — five bands in total. Carry colors up the side edge, or fasten off and rejoin as you prefer.
Set-Up
With Color A, ch 6.
Row 1 (increase): Dc in 4th ch from hook and in each of next 2 ch (first block made), ch 3, turn. (1 block)
Increase Section (Rows 2–20)
Row 2: Ch 6, dc in 4th ch from hook and in next 2 ch (new block), sl st into the ch-3 space of the previous row, ch 3, 3 dc in same ch-3 space, ch 3, turn. (2 blocks)
Row 3: Ch 6, dc in 4th ch from hook and in next 2 ch, *sl st into next ch-3 space, ch 3, 3 dc in same space; repeat from * across, ch 3, turn. (3 blocks)
Rows 4–20: Repeat Row 3, adding one block at the beginning of every row, until Row 20. (20 blocks)
Color changes during this section: Change to Color B at the start of Row 5, Color A at Row 9, Color B at Row 13, and Color A at Row 17.
Straight Section (Rows 21–40)
Row 21: Sl st across first block, ch 3, 3 dc in next ch-3 space, *sl st into next ch-3 space, ch 3, 3 dc in same space; repeat from * across, ch 3, turn. (20 blocks)
Rows 22–40: Repeat Row 21. (20 blocks)
Band sequence for this section: Color B at Rows 21–24, Color A at Rows 25–28, Color B at Rows 29–32, Color A at Rows 33–36, Color B at Rows 37–40.
Decrease Section (Rows 41–60)
Row 41: Sl st across first block, ch 3, 3 dc in next ch-3 space, *sl st into next ch-3 space, ch 3, 3 dc in same space; repeat from * across, omitting the final block, ch 3, turn. (19 blocks)
Rows 42–60: Repeat Row 41, decreasing one block at the beginning of every row, until 1 block remains on Row 60. (1 block) Fasten off and weave in ends.
Color note: Continue the A, B, A, B, A band sequence through the decrease section, changing colors every 4 rows as before.
Blocking the Rectangle
Pin the rectangle to measurements (approx. 40 x 20 in / 102 x 51 cm) on a blocking mat, mist with water, and allow it to dry fully. This opens the C2C blocks and evens the fabric before you seam it.
Forming the Cape
Fold the rectangle in half with right sides together, matching the two short ends to form the shoulder line. Seam each side edge from the outer corner inward for approx. 8 in (20 cm) to create the arm openings, leaving the center open for the neck. Turn right side out.
Star Appliqués (Make 4, Color B)
Round 1: Make a magic ring, ch 3 (counts as first dc), work 9 dc into ring, join with sl st to top of ch-3. (10 dc)
Round 2: *Ch 4, sl st in 2nd ch from hook, sc in next ch, dc in next ch, skip 1 dc on Round 1, sl st in next dc; repeat from * 4 more times. (5 points)
Fasten off, leaving a long tail. Sew one star to each front shoulder area and one to each back shoulder area, approx. 3 in (7.5 cm) below the neck edge and 4 in (10 cm) in from the side seam.
Tassels (Make 12, Color B)
Cut 12 lengths of yarn approx. 6 in (15 cm) long. Fold each length in half, insert the hook through a stitch along the hem edge, pull the fold through, then pull the ends through the loop and tighten. Space tassels evenly along the hem, approx. 3 in (7.5 cm) apart. Trim ends to approx. 2.5 in (6 cm).
Assembly and Finishing
Seaming the sides: Thread your tapestry needle with a long tail of Color A. With the cape still folded right sides together, bring the needle up through both layers at the outer corner and sew a simple running stitch (in and out, in and out) along the side edge for 8 inches (20 cm), keeping your stitches small and even. Repeat on the other side. Turn the cape right side out so the seams are hidden inside.
Weaving in ends: Thread each loose yarn tail onto the tapestry needle and run it back and forth through the back of several stitches (about 2 inches / 5 cm), then trim close to the fabric. Never tie a knot — knots work loose and show through.
Blocking the finished cape: Lay the cape flat on a blocking mat, pin the shoulder edge to 40 inches (102 cm) wide, mist lightly with water, and let it dry completely. This relaxes the seams, opens the blocks, and makes the wool feel soft.
Finishing touch: Lightly steam the seams and tassels with an iron held an inch above the fabric (never press the iron directly onto the wool). Wear with the point at center back or center front as you prefer.
Pro Tips and Variations
- Change the color story: Swap the olive and ochre for charcoal and rust, or cream and dusty rose, for a completely different mood. Keep the same A, B, A, B, A band sequence so the finished proportions stay the same.
- Make it wider or narrower: To make a larger cape, simply work more increase rows before the straight section (each extra block adds about 1 inch / 2.5 cm to the width) and add the same number of decrease rows at the end. To make a smaller capelet, stop increasing at 16 blocks instead of 20.
- Substitute the yarn: Any DK or light worsted weight yarn works — acrylic is a budget-friendly, machine-washable choice, and a cotton-linen blend gives a crisper, more summery drape. Always re-check your gauge swatch after switching yarn.
- Skip or swap the embellishments: Leave the stars off for a minimalist look, or replace the tassels with a simple single-crochet border around the hem for a cleaner finish. The cape is beautiful either way.