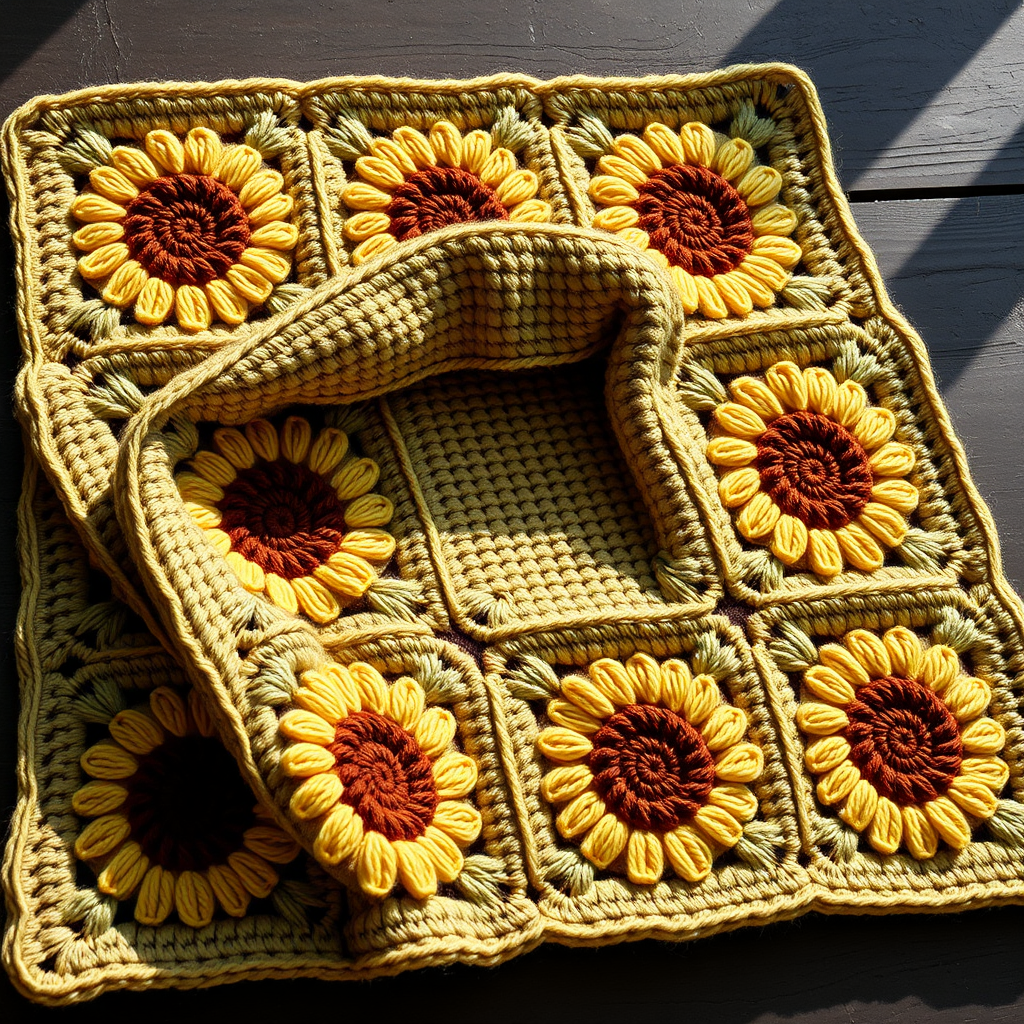
Namaqualand Daisy Meadow Blanket Free Pattern – Crochet a Wildflower Dream

Namaqualand Daisy Meadow Blanket Free Pattern – Crochet a Wildflower Dream
Transform your living space into a sun-drenched South African spring with this heirloom-quality granny square blanket. Each square blooms with dimensional daisies in fiery orange, golden yellow, and soft cream, creating a stunning, textured masterpiece. This pattern is a love letter to the Namaqualand flower fields, offering a meditative, repetitive crochet journey that yields a breathtaking heirloom piece you'll treasure for generations.
Whether you're a seasoned crocheter looking for a new challenge or a confident beginner ready to expand your skills, this blanket pattern delivers both beauty and satisfaction. The 42 individual squares feature raised 3D daisy centers that pop off the surface, surrounded by classic granny clusters in warm, earthy tones. The finished piece measures approximately 42 inches by 49 inches—perfect for draping over a couch, snuggling under on cool evenings, or displaying as a stunning wall tapestry.
Materials Needed
Before you begin your crochet journey, gather these essential supplies:
Yarn Requirements
Worsted weight (#4) cotton or cotton-blend yarn in the following colors:
- Cream (MC) – Main color for square backgrounds and border (approximately 800g)
- Golden Yellow (A) – For daisy centers (approximately 250g)
- Burnt Orange (B) – For daisy centers (approximately 250g)
- Terracotta (C) – Optional accent color (approximately 100g)
- Sage Green (D) – For the ring around daisies (approximately 200g)
- Soft White (E) – For daisy petals (approximately 200g)
Total yarn needed: Approximately 1800g (about 3600 yards)
Tools and Notions
- 5.0 mm (H-8) crochet hook – The perfect size for worsted weight yarn
- Yarn needle – For weaving in ends and joining squares
- Sharp scissors – For cutting yarn cleanly
- Stitch markers – Helpful for keeping track of rounds
Gauge Information
One completed square (before border) measures 6 inches (15 cm) across. While exact gauge isn't critical for this project, maintaining consistent tension throughout ensures your squares are uniform and your blanket lies flat. If your squares come out slightly larger or smaller, adjust your hook size accordingly.
Step-by-Step Instructions
This blanket is constructed from 42 individual granny squares, each featuring a raised 3D daisy center. Squares are joined using a flat slip-stitch seam, then finished with a beautiful scalloped border. Let's break down every step in detail.
Special Stitches You'll Need
Before diving in, familiarize yourself with these special techniques:
- Magic Ring (MR): An adjustable loop that creates a tight, seamless center. Wrap yarn around your fingers, insert hook, and work your first round into the loop, then pull tight.
- Chain (ch): The foundation stitch – yarn over, pull through loop.
- Slip Stitch (sl st): Insert hook, yarn over, pull through both loops on hook.
- Single Crochet (sc): Insert hook, yarn over, pull up loop, yarn over, pull through both loops.
- Double Crochet (dc): Yarn over, insert hook, yarn over, pull up loop, yarn over, pull through two loops, yarn over, pull through remaining two loops.
- Treble Crochet (tr): Yarn over twice, insert hook, yarn over, pull up loop, yarn over, pull through two loops, yarn over, pull through two loops, yarn over, pull through remaining two loops.
- Popcorn Stitch (PC): Work 4 dc in indicated stitch, drop loop from hook, insert hook into top of first dc of the group, grab dropped loop, and pull through. Ch 1 to close. This creates a raised, puffy texture.
- Front Post Double Crochet (FPdc): Yarn over, insert hook from front to back around the post of the stitch below, work as a regular dc. This creates raised ridges.
Making the Daisy Squares (Make 42 Total)
You'll create 21 squares with Golden Yellow centers and 21 squares with Burnt Orange centers. The process is identical for both—only the center color changes.
Round 1: The Center
With Color A (Golden Yellow) or Color B (Burnt Orange), make a Magic Ring. Ch 3 (this counts as your first double crochet), then work 11 dc into the ring. Slip stitch to the top of the ch-3 to join. You should now have 12 dc total. Fasten off and pull the magic ring tight to close the center completely.
Round 2: Creating Petal Spaces
Join Color E (Soft White) in any dc stitch. *Ch 4, skip the next dc, slip stitch in the next dc.* Repeat from * around the circle. You'll create 6 ch-4 loops. Slip stitch to the first slip stitch to join. Fasten off. These loops will form the foundation for your daisy petals.
Round 3: The Daisy Petals
Join Color E again in any ch-4 loop. In each ch-4 loop, work the following sequence: (1 sc, 1 hdc, 3 dc, 1 hdc, 1 sc). After completing each petal, slip stitch in the next slip stitch between petals. Repeat this pattern around all 6 loops. You'll have 6 beautiful, dimensional petals. Fasten off.
Pro tip: The combination of single, half-double, and double crochets creates the natural curve and fullness of a real daisy petal.
Round 4: The Sage Green Ring
Join Color D (Sage Green) in the slip stitch between any two petals. *Ch 5, skip to the next slip stitch between petals, slip stitch in that slip stitch.* Repeat from * around. You'll create 6 ch-5 loops. Slip stitch to the first slip stitch to join. Fasten off. This green ring frames your daisy beautifully.
Round 5: Starting the Square Base
Join MC (Cream) in any ch-5 loop. Ch 3 (counts as first dc), then work (2 dc, ch 2, 3 dc) in the same loop – this creates your first corner. *Ch 1, work (3 dc, ch 2, 3 dc) in the next ch-5 loop – this is another corner.* Repeat from * around the square, ending with ch 1. Slip stitch to the top of the ch-3 to join. You should now have 4 corners and 4 side ch-1 spaces.
Round 6: Building the Granny Rows
Slip stitch into the next 2 dc and into the ch-2 corner space. Ch 3 (counts as first dc), work (2 dc, ch 2, 3 dc) in the same corner space. *Ch 1, work 3 dc in the next ch-1 space, ch 1, work (3 dc, ch 2, 3 dc) in the next corner space.* Repeat from * around, ending with ch 1. Slip stitch to the top of the ch-3 to join. Fasten off. Each side now has two 3-dc groups.
Round 7: Completing the Square
Join MC again in any corner ch-2 space. Ch 3, work (2 dc, ch 2, 3 dc) in the same corner. *Ch 1, work 3 dc in the next ch-1 space, ch 1, work 3 dc in the next ch-1 space, ch 1, work (3 dc, ch 2, 3 dc) in the next corner.* Repeat from * around, ending with ch 1. Slip stitch to join. Fasten off and weave in all ends carefully. Each side now has three 3-dc groups, and your square measures 6 inches across.
Repeat this entire process to create all 42 squares – 21 with yellow centers and 21 with orange centers. This is the meditative part of the project; settle in with your favorite music or podcast and enjoy the rhythm.
Assembling Your Blanket
Now comes the exciting part – bringing your squares together into a beautiful meadow!
Arranging Your Squares
Lay out your 42 squares in a 6×7 grid, alternating orange and yellow centers. This creates a beautiful, balanced checkerboard effect reminiscent of wildflowers scattered across a field. Step back and admire your arrangement before joining.
Joining Method: Flat Slip-Stitch Seam
This joining technique creates a nearly invisible, flat seam that doesn't add bulk. Here's how:
- Place two squares wrong sides together (right sides facing out).
- Insert your hook through both loops of the corresponding stitches on both squares.
- Yarn over and pull through, then pull through the loop on your hook (slip stitch).
- Continue slip stitching across the entire edge, keeping your tension consistent.
Join all vertical seams first – this creates 6 long strips of 7 squares each. Then join the horizontal seams to connect the strips into one large rectangle. Weave in all ends as you go to keep your work tidy.
Adding the Beautiful Scalloped Border
The border is the finishing touch that echoes the daisy petals and frames your masterpiece.
Round 1: Foundation Round
Join MC (Cream) in any corner. Ch 3, work 2 dc in the same corner. *Work 1 dc in each dc and 1 dc in each ch-1 space across the side, work 3 dc in the corner.* Repeat from * around the entire blanket. Slip stitch to join.
Round 2: Single Crochet Round
Ch 1, *work 1 sc in each dc across, work 3 sc in the corner.* Repeat from * around the entire blanket. Slip stitch to join. This round creates a smooth, even base for the scallops.
Round 3: The Scallop Edge
Ch 1, *skip 1 sc, work 5 dc in the next sc, skip 1 sc, slip stitch in the next sc.* Repeat from * around the blanket. For the corners, work 7 dc in each corner sc to accommodate the extra width. Slip stitch to join. Fasten off and weave in all ends thoroughly.
Your Namaqualand Daisy Meadow Blanket is complete! Give it a gentle blocking to open up the stitches and showcase the dimensional daisies. Lay it flat to dry, then drape it over your favorite chair or sofa to enjoy the sun-drenched beauty of South African wildflowers in your own home.
Care Instructions: Hand wash in cool water with mild detergent, lay flat to dry. This cotton blanket will soften beautifully with each wash, becoming more cozy and loved over time.
Happy crocheting, and may your home bloom with the vibrant colors of Namaqualand!