Meadowmist Blooming Poncho Capshawl with Fringe Free Pattern
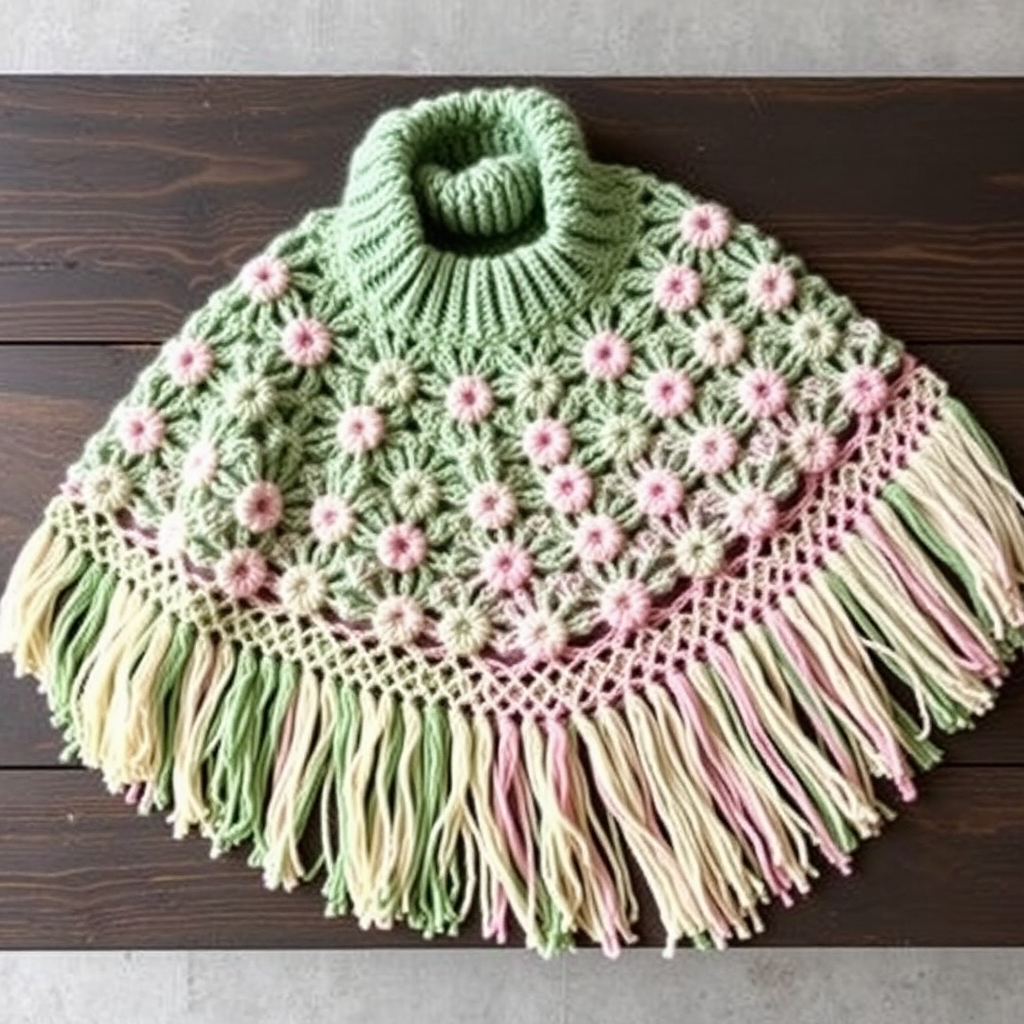
Meadowmist Blooming Poncho Capshawl with Fringe: A Free Knitting Pattern
Wrap yourself in the ethereal beauty of a blooming garden with this exquisite knitted poncho capshawl. Featuring a delicate floral lace pattern that evokes scattered blossoms across a meadow, this versatile piece drapes elegantly over the shoulders, offering cozy warmth with a touch of romantic whimsy. The harmonious palette of meadow green, blush pink, and cream creates a botanical masterpiece that transitions beautifully through seasons. Whether you're curling up with a book or stepping out for an evening stroll, this capshawl adds handcrafted charm to any outfit. Best of all, this pattern is designed for knitters of all levels—even beginners can achieve stunning results with our detailed, step-by-step guidance.
Materials Needed
Before you begin your knitting journey, gather these essential supplies:
- Yarn: Worsted weight yarn in three shades:
- Meadow Green (MC) – approximately 800g
- Blush Pink (CC1) – approximately 300g
- Cream (CC2) – approximately 200g
- Needles: US 8 (5mm) circular knitting needles with a 32-inch cable; US 8 (5mm) double-pointed needles for small sections
- Notions: Stitch markers, tapestry needle for weaving in ends, crochet hook (for fringe), scissors
- Gauge: 18 stitches and 24 rows = 4 inches in stockinette stitch (blocked). Always check your gauge to ensure proper sizing.
Abbreviations
Familiarize yourself with these standard knitting abbreviations before starting:
- K = knit
- P = purl
- K2tog = knit two together (decrease)
- SSK = slip, slip, knit (decrease)
- YO = yarn over (increase)
- PM = place marker
- SM = slip marker
- RS = right side
- WS = wrong side
- M1 = make one (increase by picking up the bar between stitches and knitting through the back loop)
Special Stitch: Bloom Lace Pattern
This gorgeous lace pattern creates the signature floral effect. The pattern is written for flat knitting (multiple of 6 + 1 stitches):
- Row 1 (RS): K1, *YO, SSK, K1, K2tog, YO, K1; repeat from * to end.
- Row 2 (WS): Purl all stitches.
- Row 3 (RS): K2, *YO, SSK, K1, K2tog, YO, K1; repeat from * to last 3 stitches, K3.
- Row 4 (WS): Purl all stitches.
- Row 5 (RS): K3, *YO, SSK, K1, K2tog, YO, K1; repeat from * to last 2 stitches, K2.
- Row 6 (WS): Purl all stitches.
- Row 7 (RS): K4, *YO, SSK, K1, K2tog, YO, K1; repeat from * to last 1 stitch, K1.
- Row 8 (WS): Purl all stitches.
- Row 9 (RS): K5, *YO, SSK, K1, K2tog, YO, K1; repeat from * to last 0 stitches.
- Row 10 (WS): Purl all stitches.
Step-by-Step Instructions
Neckband
With Meadow Green (MC), cast on 90 stitches. Join in the round, being extremely careful not to twist your stitches. Place a marker at the beginning of the round to track your progress.
Work in K1, P1 ribbing for 2 inches. This creates a neat, stretchy collar that will sit comfortably around your neck.
Yoke Increases
Now we'll gradually increase stitches to create the flowing A-line silhouette:
- Increase Round 1: *K9, M1 (make one by picking up the bar between stitches and knitting through the back loop); repeat from * to end. You should now have 100 stitches.
- Knit 1 round even (no increases).
- Increase Round 2: *K10, M1; repeat from * to end. You should now have 110 stitches.
- Knit 1 round even.
- Continue increasing in this manner (adding 10 stitches each increase round) every 4th round until you have 220 stitches total. You will have worked 12 increase rounds in total.
Pro tip: Place a marker every 10 stitches during increase rounds to make counting easier and catch mistakes early.
Body – Bloom Lace Pattern
Now we'll work the beautiful Bloom Lace pattern in the round. Since the original pattern is written for flat knitting, we'll adapt it for circular knitting by knitting all even rounds instead of purling. This creates a seamless, elegant poncho without any side seams.
For a seamless circular poncho, work the lace as follows:
- Round 1: *K1, YO, SSK, K1, K2tog, YO; repeat from * to end.
- Round 2: Knit all stitches.
- Round 3: *K2, YO, SSK, K1, K2tog, YO; repeat from * to end.
- Round 4: Knit all stitches.
- Round 5: *K3, YO, SSK, K1, K2tog, YO; repeat from * to end.
- Round 6: Knit all stitches.
- Round 7: *K4, YO, SSK, K1, K2tog, YO; repeat from * to end.
- Round 8: Knit all stitches.
- Round 9: *K5, YO, SSK, K1, K2tog, YO; repeat from * to end.
- Round 10: Knit all stitches.
Repeat these 10 rounds until the body measures 12 inches from the neckband, or your desired length. Remember to try it on periodically to ensure the fit is perfect for you.
Color Transition for Blooming Effect
To achieve that gorgeous blooming garden effect, we'll introduce the pink and cream yarns in a rhythmic stripe pattern:
- Work 4 rounds of MC (Meadow Green).
- Work 2 rounds of CC1 (Blush Pink).
- Work 2 rounds of CC2 (Cream).
- Work 2 rounds of CC1 (Blush Pink).
- Work 4 rounds of MC (Meadow Green).
Repeat this sequence twice more (three times total). Then continue with MC for the final 4 inches of the body. This creates a beautiful gradient effect that mimics flowers blooming through a meadow.
Fringe Edge
Bind off loosely to maintain the drape of the lace pattern. Cut yarn, leaving a long tail for weaving in later.
Now for the finishing touch—the lush fringe:
- Cut strands of MC, CC1, and CC2 yarn, each 12 inches long. You'll need enough for one fringe every 2 stitches along the entire bottom edge.
- Take 3 strands together (one of each color), fold them in half to create a loop.
- Using a crochet hook, pull the loop through an edge stitch.
- Pull the ends through the loop and tighten gently to secure.
- Repeat this fringe every 2 stitches along the entire bottom edge.
Pro tip: Trim the fringe ends evenly after attaching them all for a polished, professional look.
Finishing
Weave in all loose ends carefully using a tapestry needle. This step is crucial for a clean finish that will withstand wear and washing.
Block the poncho to open up the lace pattern and even out the stitches. To block:
- Soak the finished piece in lukewarm water with a gentle wool wash for 15-20 minutes.
- Gently squeeze out excess water (never wring or twist).
- Lay flat on a clean towel, shaping to the desired dimensions.
- Pin the edges to open up the lace pattern if desired.
- Allow to dry completely before wearing.
Optional Hood
If you prefer a capshawl with a hood, follow these additional instructions:
- Pick up stitches along the neckband using your double-pointed needles.
- Knit in stockinette stitch, increasing slightly at the top for a rounded shape.
- Work for 10 inches, then bind off and seam the top closed.
- Add a fringe to the hood edge if desired for extra charm.
Tips for Success
- Check your gauge: Always knit a swatch first to ensure your tension matches the pattern. This prevents sizing issues.
- Use stitch markers: They're your best friend for tracking rounds and increases.
- Count regularly: Especially during lace rounds, counting stitches helps catch mistakes early.
- Take breaks: Knitting for long periods can cause hand fatigue. Rest and stretch regularly.
- Enjoy the process: This is a meditative project—embrace the rhythm of the stitches.
This Meadowmist Blooming Poncho Capshawl is more than just a garment—it's a wearable piece of art that captures the romance of a spring garden. The combination of delicate lace, soft color transitions, and playful fringe creates a truly unique accessory that will be treasured for years. Whether you're knitting it for yourself or as a heartfelt gift, the finished piece is sure to bring warmth and beauty to any wardrobe.
Happy knitting, and may your stitches always bloom beautifully!


