Meadow Dew Drop Coasters Free Pattern – Knit with Bobbles and Leaf Stitch
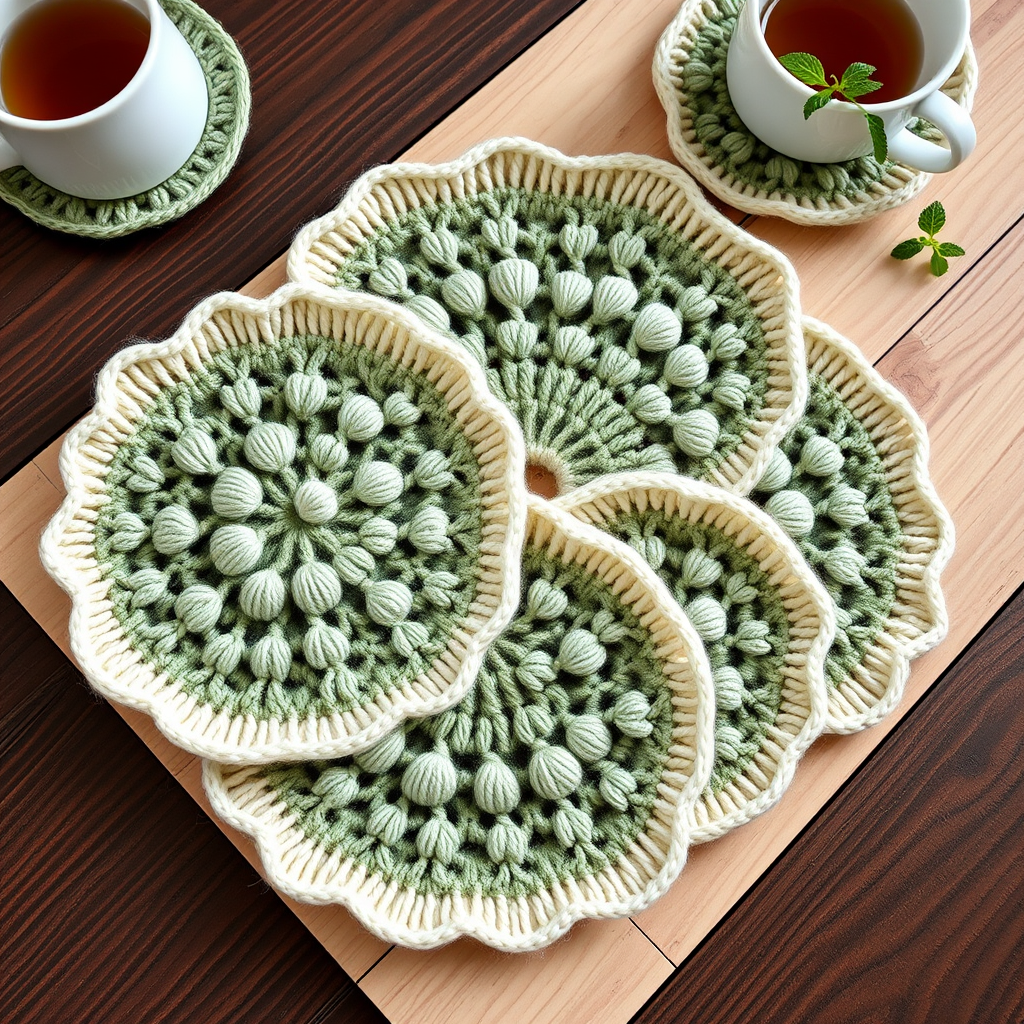
Meadow Dew Drop Coasters Free Knitting Pattern – Bring Spring to Your Table
Imagine setting your morning coffee on a tiny, handcrafted garden. That's exactly what you'll create with our Meadow Dew Drop Coasters! These charming knitted coasters feature a delicate leaf stitch pattern and plump, textured bobbles that mimic fresh dewdrops resting on spring foliage. Each coaster is a miniature work of art, perfect for adding a touch of handmade warmth to your table setting or for gifting to a fellow knitting enthusiast. Made with soft, absorbent cotton yarn, these coasters are as practical as they are beautiful.
This pattern is designed with beginners in mind, using simple knit and purl stitches, yarn overs, and a fun bobble technique that adds wonderful dimension. Whether you're looking for a quick weekend project or a thoughtful handmade gift, these coasters are sure to delight. Let's dive into this delightful knitting adventure!
Materials Needed
Before you begin, gather the following supplies to ensure a smooth and enjoyable knitting experience:
- Yarn: Worsted weight cotton yarn (e.g., Lion Brand Kitchen Cotton) in two colors:
- Main Color (MC): Soft sage green (approximately 50 yards per coaster)
- Contrast Color (CC): Cream or pale yellow (approximately 20 yards per coaster)
- Knitting Needles: US Size 6 (4.0 mm) knitting needles (straight or circular, as preferred)
- Stitch Markers: At least 1 marker to denote the beginning of rounds
- Yarn Needle: For weaving in ends and sewing
- Scissors: For cutting yarn
- Blocking Mats and Pins (optional): For shaping the finished coasters
Gauge: 20 stitches and 28 rows = 4 inches in stockinette stitch (blocked). Gauge is important for achieving the correct finished size, so be sure to check your tension before starting.
Finished Size: Approximately 4.5 inches in diameter (after blocking).
Step-by-Step Instructions
Follow these detailed instructions to create your own set of Meadow Dew Drop Coasters. The pattern is worked flat in rows, then finished with a beautiful picot edging worked in the round. Make four coasters to complete your set.
Abbreviations
- CO: Cast on
- K: Knit
- P: Purl
- K2tog: Knit two stitches together (decrease)
- SSK: Slip, slip, knit (decrease)
- YO: Yarn over (increase)
- MB: Make bobble (K1, P1, K1, P1, K1 into same stitch, then pass the 4th, 3rd, 2nd, and 1st stitches over the 5th stitch – one bobble made)
- St(s): Stitch(es)
- Rep: Repeat
- Rnd: Round
- RS: Right side
- WS: Wrong side
Coaster Pattern (Make 4)
Foundation: With MC, CO 8 sts. Leave a long tail (approximately 8 inches) for sewing later.
Row 1 (RS): K1, YO, K1, YO, K1, YO, K1, YO, K1, YO, K1, YO, K1, YO, K1 (15 sts)
Explanation: This row creates the initial increases that will form the center of your coaster. You are doubling your stitch count by adding a yarn over before each knit stitch except the first and last.
Row 2 (WS): Purl all sts.
Explanation: Purl across the entire row to create a smooth stockinette background.
Row 3: K1, YO, K2, YO, K2, YO, K2, YO, K2, YO, K2, YO, K2, YO, K1 (22 sts)
Explanation: Continue the increase pattern. You are adding a yarn over before each group of knit stitches, creating a radiating spoke effect.
Row 4: Purl all sts.
Row 5: K1, YO, K3, YO, K3, YO, K3, YO, K3, YO, K3, YO, K3, YO, K1 (29 sts)
Explanation: Notice the pattern: K1, YO, then K3 repeated, ending with YO, K1. Each row adds one more knit stitch between the yarn overs.
Row 6: Purl all sts.
Row 7: K1, YO, K4, YO, K4, YO, K4, YO, K4, YO, K4, YO, K4, YO, K1 (36 sts)
Explanation: Continue the established increase rhythm. The coaster is growing into a flat circle.
Row 8: Purl all sts.
Row 9: K1, YO, K5, YO, K5, YO, K5, YO, K5, YO, K5, YO, K5, YO, K1 (43 sts)
Explanation: Keep going! The pattern is consistent and easy to follow.
Row 10: Purl all sts.
Row 11: K1, YO, K6, YO, K6, YO, K6, YO, K6, YO, K6, YO, K6, YO, K1 (50 sts)
Explanation: You're halfway through the base of the coaster. The increases are creating a lovely geometric pattern.
Row 12: Purl all sts.
Leaf and Bobble Pattern
Now we'll introduce the beautiful bobbles that give these coasters their name. The bobbles are worked into the knit stitches, creating raised "dewdrops" on the surface.
Row 13 (RS): K1, YO, K2, MB, K2, YO, K2, MB, K2, YO, K2, MB, K2, YO, K2, MB, K2, YO, K2, MB, K2, YO, K2, MB, K2, YO, K1 (58 sts)
Explanation: This is where the magic happens! Work K1, YO, then K2, MB, K2. Repeat the K2, MB, K2 sequence across the row, ending with YO, K1. The bobbles are placed between the yarn over increases, creating a scalloped leaf effect.
Row 14 (WS): Purl all sts.
Explanation: Purl across, letting the bobbles pop to the front.
Row 15: K1, YO, K3, MB, K3, YO, K3, MB, K3, YO, K3, MB, K3, YO, K3, MB, K3, YO, K3, MB, K3, YO, K3, MB, K3, YO, K1 (66 sts)
Explanation: Notice how the pattern expands: K1, YO, then K3, MB, K3 repeated, ending with YO, K1. The bobbles are now spaced further apart as the coaster grows.
Row 16: Purl all sts.
Row 17: K1, YO, K4, MB, K4, YO, K4, MB, K4, YO, K4, MB, K4, YO, K4, MB, K4, YO, K4, MB, K4, YO, K4, MB, K4, YO, K1 (74 sts)
Explanation: Continue the established pattern. The bobbles are creating a beautiful, textured ring around the center.
Row 18: Purl all sts.
Border in Contrast Color
Now it's time to switch to your Contrast Color (CC) for the beautiful border. This adds a lovely finishing touch and frames the textured center perfectly.
Row 19: With CC, K1, YO, K5, MB, K5, YO, K5, MB, K5, YO, K5, MB, K5, YO, K5, MB, K5, YO, K5, MB, K5, YO, K5, MB, K5, YO, K1 (82 sts)
Explanation: Join the CC yarn and continue the pattern. The contrast color will make the bobbles stand out even more dramatically.
Row 20: Purl all sts.
Row 21: K1, YO, K6, MB, K6, YO, K6, MB, K6, YO, K6, MB, K6, YO, K6, MB, K6, YO, K6, MB, K6, YO, K6, MB, K6, YO, K1 (90 sts)
Explanation: Keep the rhythm going. The coaster is almost complete!
Row 22: Purl all sts.
Row 23: K1, YO, K7, MB, K7, YO, K7, MB, K7, YO, K7, MB, K7, YO, K7, MB, K7, YO, K7, MB, K7, YO, K7, MB, K7, YO, K1 (98 sts)
Explanation: This is the final increase row. Your coaster should now be a beautiful, textured circle.
Row 24: Purl all sts.
Picot Edging (Worked in the Round)
Now we'll add a delicate picot edging that gives the coasters their scalloped, professional finish. This is worked by picking up stitches around the entire edge of the coaster.
Step 1: With RS facing, using CC yarn, pick up and knit 1 st in each row end along the straight sides, and 1 st in each cast-on stitch at the bottom. You will have approximately 98 sts along the top edge, plus 24 sts on each side, plus 8 sts at the bottom = 154 sts total. Place a marker at the beginning.
Explanation: This creates a continuous loop of stitches around the entire perimeter of your coaster. Don't worry about being exact – the goal is to have a roughly even number of stitches.
Rnd 1: *K2tog, YO* rep to end.
Explanation: This creates the eyelet holes that will form the picot edge. The yarn overs create small openings, and the decreases keep the stitch count even.
Rnd 2: Knit all sts.
Explanation: A simple knit round to stabilize the eyelets.
Rnd 3: *K2tog, YO* rep to end.
Explanation: Repeat the eyelet pattern to create a second row of holes, which will make the picot edge more pronounced.
Rnd 4: Knit all sts.
Rnd 5: Bind off loosely (knitwise).
Explanation: Bind off all stitches loosely to maintain the stretchy, decorative edge. When you bind off, the yarn overs will naturally create little scalloped points.
Finishing Touches
Weave in all ends: Using your yarn needle, carefully weave in all loose ends on the wrong side of the coaster. Be sure to weave in the long tail from your cast-on as well.
Blocking: To achieve the perfect circular shape and crisp edges, wet block your coasters. Soak them in lukewarm water with a drop of mild soap, then gently squeeze out excess water (do not wring). Lay them flat on a blocking mat, shape them into perfect circles, and pin out the picot points if desired. Allow them to dry completely.
Repeat: Make 3 more coasters to complete your set of four.
Tips for Success
- Bobble Technique: If you're new to making bobbles, practice on a swatch first. The key is to work all five stitches into the same stitch before decreasing them back down to one.
- Yarn Choice: Cotton yarn is ideal for coasters because it's absorbent, durable, and washes well. The worsted weight ensures your coasters are thick enough to protect your table.
- Color Variations: Feel free to experiment with different color combinations! Pastel pinks, sky blues, or even vibrant summer colors would look beautiful.
- Gauge Matters: While this is a forgiving pattern, checking your gauge will ensure your coasters come out the intended size.
These Meadow Dew Drop Coasters are a joy to knit and even more delightful to use. The combination of textured bobbles, delicate leaf increases, and the crisp picot edging creates a truly special handmade item. Whether you're making them for yourself or as a thoughtful gift, they're sure to bring a touch of spring to any table. Happy knitting!


