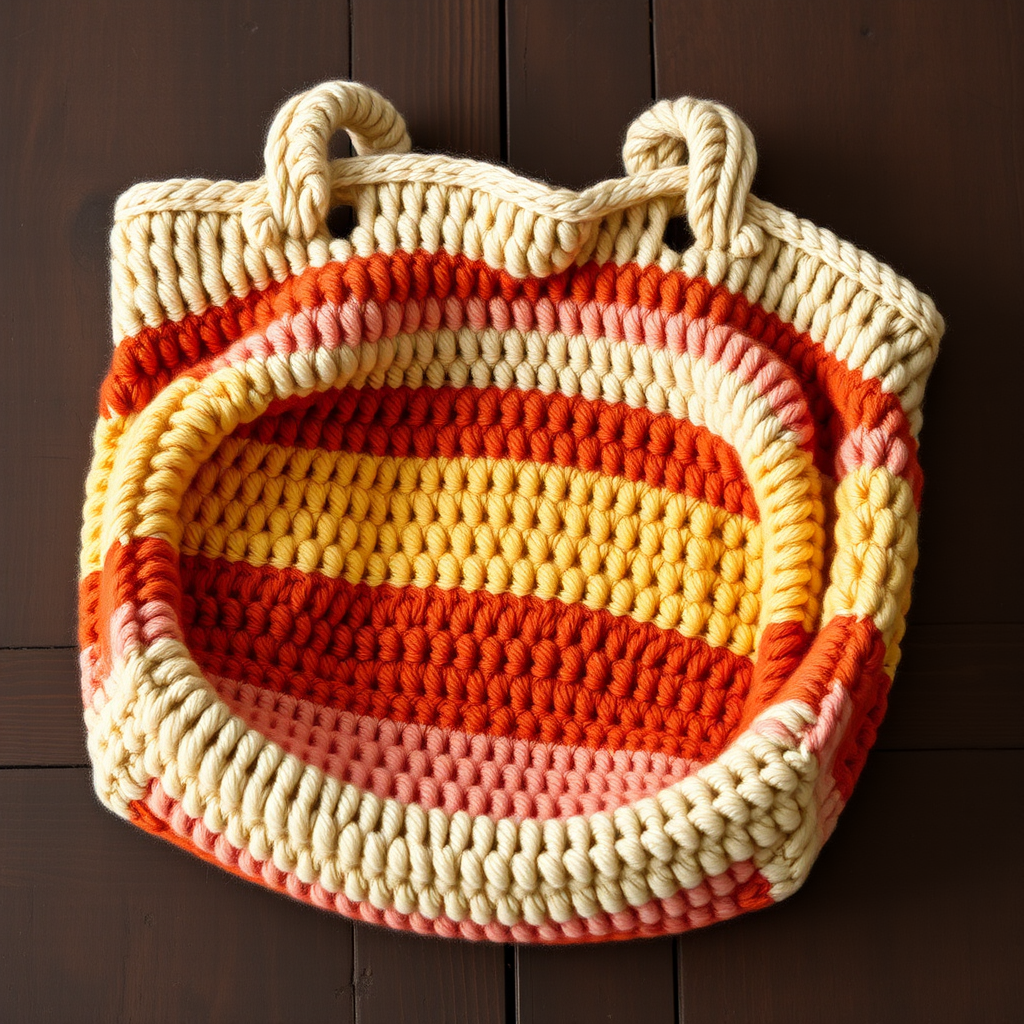
Meadow Breeze Market Tote Free Pattern – A Boho Striped Crochet Carryall

Meadow Breeze Market Tote Free Pattern – A Boho Striped Crochet Carryall
There's something deeply satisfying about crocheting your own market bag. Not only is it eco-friendly and endlessly reusable, but it also becomes a stylish accessory that reflects your personal taste. Today, I'm thrilled to share the Meadow Breeze Market Tote—an airy, textured carryall that's perfect for farmers market hauls, beach days, or simply strolling through the city with your essentials in tow.
This pattern features a playful striped design in a warm, earthy palette of sand, sage, and terracotta. The dense double crochet stitch creates a sturdy fabric that holds its shape beautifully, while the wide, braided-looking straps ensure comfort even when your bag is packed full. Whether you're a seasoned crocheter or just starting your journey, this pattern is accessible, forgiving, and incredibly rewarding to make. Let's dive in!
Materials Needed
Before we begin, gather the following supplies. The beauty of this pattern lies in its simplicity—you only need a few basic materials to create something truly special.
Yarn
- Lion Brand 24/7 Cotton (or any worsted-weight cotton yarn) in 3 colors:
- Color A (Sand) – for the base, main body, and straps
- Color B (Sage) – for the striped accent
- Color C (Terracotta) – for the striped accent
- Approximately 250g total (roughly 2 balls of Color A and 1 ball each of Colors B and C)
Hook & Notions
- 5.0 mm crochet hook (US H-8)
- Stitch markers (to mark the first stitch of each round)
- Yarn needle (for weaving in ends and sewing straps)
- Scissors
Gauge
16 double crochet x 9 rows = 4 x 4 inches (10 x 10 cm) in double crochet. Gauge is important for achieving the correct finished size, so be sure to check your tension before starting.
Step-by-Step Instructions
This pattern is worked in joined rounds, which creates a seamless, professional-looking finish. Let's break it down into manageable sections. Note: Ch 2 at the beginning of each round counts as your first double crochet. Always use a stitch marker to mark the first stitch of each round.
Part 1: The Base (Worked in Color A)
The base of your tote is a flat oval that will form the bottom of the bag. We'll increase evenly in each round to create a smooth, flat circle.
Round 1: Ch 4, join with a slip stitch to form a ring. Ch 2 (counts as first dc), work 11 dc into the ring, join with a slip stitch to the top of the ch-2. (12 dc total)
Round 2: Ch 2, 2 dc in each stitch around, join. (24 dc)
Round 3: Ch 2, *2 dc in next st, 1 dc in next st* repeat from * to * around, join. (36 dc)
Round 4: Ch 2, *2 dc in next st, 1 dc in next 2 sts* repeat from * to * around, join. (48 dc)
Round 5: Ch 2, *2 dc in next st, 1 dc in next 3 sts* repeat from * to * around, join. (60 dc)
Round 6: Ch 2, *2 dc in next st, 1 dc in next 4 sts* repeat from * to * around, join. (72 dc)
Your base should now measure approximately 6-7 inches in diameter. If it's rippling, your tension may be too tight; if it's cupping, your tension may be too loose. Adjust accordingly for the next section.
Part 2: The Body (Striped Pattern)
Now we'll build the body of the bag upward in a beautiful striped pattern. Each color is worked for two rounds, creating bold, clean stripes. The stitch count remains constant at 72 dc throughout this section.
Rounds 7-8: With Color A, ch 2, dc in each stitch around, join. (72 dc)
Rounds 9-10: With Color B, ch 2, dc in each stitch around, join. (72 dc)
Rounds 11-12: With Color C, ch 2, dc in each stitch around, join. (72 dc)
Rounds 13-14: With Color A, ch 2, dc in each stitch around, join. (72 dc)
Rounds 15-16: With Color B, ch 2, dc in each stitch around, join. (72 dc)
Rounds 17-18: With Color C, ch 2, dc in each stitch around, join. (72 dc)
Rounds 19-20: With Color A, ch 2, dc in each stitch around, join. (72 dc)
Rounds 21-22: With Color B, ch 2, dc in each stitch around, join. (72 dc)
Rounds 23-24: With Color C, ch 2, dc in each stitch around, join. (72 dc)
Rounds 25-26: With Color A, ch 2, dc in each stitch around, join. (72 dc)
When changing colors, simply fasten off the old color and join the new color with a slip stitch. Weave in ends as you go to keep your work tidy.
Part 3: Creating the Strap Openings
This is where the magic happens! We'll create openings in the body of the bag where your straps will be attached. This technique gives the bag a clean, professional look.
Round 27: With Color A, ch 2, dc in next 20 sts, ch 30 (skip 30 sts), dc in next 22 sts, ch 30 (skip 30 sts), dc in next 21 sts, join. (72 dc + 2 ch-30 spaces)
Let's break this down: You're working around the bag, creating two large chain spaces that will become the openings for your straps. The first segment covers 21 stitches (ch 2 + 20 dc), then you skip 30 stitches and chain 30 instead. This creates the first opening. Then you work 22 dc across the bottom, chain 30 for the second opening, and finish with 21 dc to complete the round.
Round 28: With Color A, ch 2, dc in each stitch and in each chain around, join. (132 dc)
This round is crucial—you're working double crochets into both the existing stitches AND each chain of the openings. This creates a reinforced edge that will support your straps beautifully.
Rounds 29-30: With Color A, ch 2, dc in each stitch around, join. (132 dc)
These final two rounds add height and stability to the top edge of your bag. Fasten off and weave in all ends securely.
Part 4: The Straps (Make 2)
Now for the finishing touch—sturdy, comfortable straps that will carry all your treasures. These are worked flat and then folded to create a thick, braided-looking strap.
Row 1: With Color A, ch 8. Dc in the 4th ch from the hook and in each chain across. (6 dc)
Rows 2-30: Ch 2, turn, dc in each stitch across. (6 dc)
Fasten off, leaving a long tail (about 18 inches) for sewing. Repeat to make the second strap.
Assembling the Straps: Fold each strap in half lengthwise (so the right sides are together) and sew the long edges together using a whip stitch or mattress stitch. This creates a double-thick, sturdy strap that will hold its shape beautifully.
Attaching the Straps: Position each strap on the inside of the bag, centered over the ch-30 spaces from Round 27. The folded edge should be at the bottom, and the open ends should align with the top edge of the bag. Sew securely using the long tail, making sure to catch both layers of the strap and the bag fabric. Reinforce with a few extra stitches for durability.
Finishing Touches & Care Tips
Once your straps are attached, give your bag a gentle steam block to even out the stitches and help it hold its shape. Weave in any remaining ends and trim excess yarn.
To care for your Meadow Breeze Market Tote, hand wash in cool water with mild detergent and lay flat to dry. The cotton yarn will soften with use and washing, making your bag even more comfortable over time.
This pattern is wonderfully versatile—feel free to experiment with different color combinations to match your personal style. You could try a monochromatic look, bold contrasting stripes, or even a gradient effect. The possibilities are endless!
I hope you enjoy crocheting your Meadow Breeze Market Tote as much as I enjoyed designing it. There's nothing quite like the satisfaction of carrying a handmade bag that's both beautiful and functional. Happy crocheting!