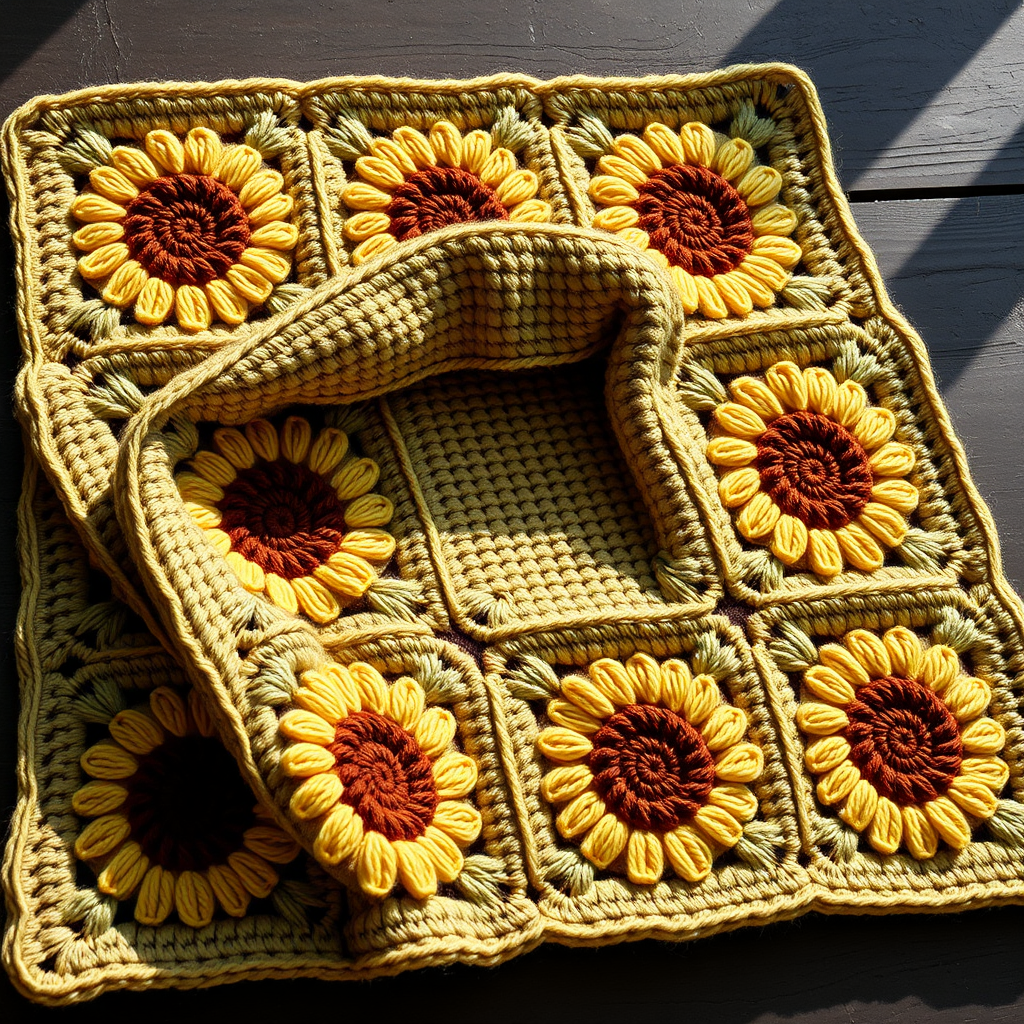
Marigold Meadow Granny Square Blanket Free Pattern – Crochet a Sunlit Garden Throw

Marigold Meadow Granny Square Blanket Free Pattern – Crochet a Sunlit Garden Throw
Wrap yourself in a handcrafted meadow of golden marigolds with this modern take on the classic granny square blanket. Each square blooms with textured petals and warm sunset hues, creating a cozy heirloom piece that brings a touch of boho charm to any room. This pattern is perfect for intermediate crocheters looking to expand their skills, but with clear instructions, even confident beginners can tackle this rewarding project. The result is a stunning 36-inch by 36-inch throw that captures the essence of a sunlit garden.
Why You'll Love This Pattern
This isn't your grandmother's granny square blanket—though she'd certainly approve! The raised marigold flower centers add delightful three-dimensional texture, while the visible sage green seams create a modern patchwork aesthetic. The warm palette of marigold orange, sunny yellow, cream, sage green, and terracotta evokes golden afternoons and blooming meadows. Whether draped over a rustic chair or folded at the foot of your bed, this blanket brings handmade warmth to your space.
Materials Needed
Before you begin, gather these supplies:
- Yarn: Worsted weight cotton or acrylic blend (e.g., Lion Brand Cotton-Ease) in 5 colors:
- Color A – Marigold (approx. 300g)
- Color B – Sunbeam Yellow (approx. 250g)
- Color C – Cream (approx. 300g)
- Color D – Sage Green (approx. 200g)
- Color E – Terracotta (approx. 150g)
- Hook: 5.0 mm (H-8) crochet hook
- Other: Yarn needle for weaving ends, scissors, stitch markers (optional)
Gauge: One granny square = 6 inches (15 cm) across. Gauge is not critical, but consistent tension ensures uniform squares that join together neatly.
Step-by-Step Instructions
Marigold Square Pattern (Make 36)
Each square features a raised marigold flower center with layered petals. Follow these rounds carefully, and you'll have beautiful blooming squares in no time.
Round 1: The Center
With color A (Marigold), make a magic ring. Chain 3 (this counts as your first double crochet), then work 11 double crochets into the ring. Slip stitch to the top of the starting chain-3 to join. You should have 12 double crochets total.
Round 2: Creating the Petal Loops
Chain 1, single crochet in the same stitch. *Chain 3, skip the next double crochet, single crochet in the next double crochet.* Repeat from * around, ending with chain 3, then slip stitch to the first single crochet. You'll have 6 chain-3 loops that will form the base for your petals.
Round 3: Forming the Marigold Petals
Slip stitch into the first chain-3 loop. In that same loop, work (chain 3, 2 double crochets, chain 2, 3 double crochets) – this creates your first petal. *Chain 1, then in the next chain-3 loop work (3 double crochets, chain 2, 3 double crochets).* Repeat from * around, ending with chain 1, then slip stitch to the top of the starting chain-3. You'll have 6 beautiful petals.
Round 4: Transitioning to a Square
Slip stitch to the chain-2 space of the first petal. In that same space, work (chain 3, 2 double crochets, chain 2, 3 double crochets) – this is your first corner. *Chain 1, work 3 double crochets in the next chain-1 space, chain 1, then work (3 double crochets, chain 2, 3 double crochets) in the next chain-2 space.* Repeat from * around, ending with chain 1, 3 double crochets in the last chain-1 space, chain 1, then slip stitch to the top of the starting chain-3. You should now have 4 corners and 4 side clusters.
Round 5: Building the Square
Slip stitch to the chain-2 space of the first corner. Work (chain 3, 2 double crochets, chain 2, 3 double crochets) in that same space. *Chain 1, 3 double crochets in the next chain-1 space, chain 1, 3 double crochets in the next chain-1 space, chain 1, then work (3 double crochets, chain 2, 3 double crochets) in the next corner.* Repeat from * around, working 3 double crochets in each chain-1 space along the sides. End with a slip stitch to the top of the starting chain-3. You'll have 4 corners and 8 side clusters.
Round 6: Final Round of the Square
Repeat Round 5, working 3 double crochets in each chain-1 space along the sides. You'll now have 12 side clusters total. Fasten off and weave in all ends. Your square should measure approximately 6 inches across.
Pro tip: Make all 36 squares before joining. This allows you to arrange them in the most pleasing layout and ensures consistent tension throughout.
Joining the Squares
Arrange your 36 squares in a 6x6 grid. For a dynamic look, alternate the orientation of the squares slightly—some with the flower center facing up, others rotated 90 degrees. This creates visual interest while maintaining the overall pattern.
Join the squares using color D (Sage Green) with the flat slip stitch join method:
- Place two squares right sides together, aligning the corresponding stitches.
- Insert your hook through both loops of the corresponding stitches on both squares.
- Yarn over and pull through all loops on the hook (this is a slip stitch).
- Continue slip stitching across the entire edge, working through both layers.
First, join all squares into rows of 6. Then join the rows together using the same method. The visible sage green seams will create a beautiful patchwork effect that complements the marigold flowers.
Adding the Border
Once all squares are joined, it's time to add a soft, scalloped border that frames your blanket beautifully.
Border Round 1
With the right side facing, attach color C (Cream) in any corner. Chain 1, then single crochet evenly around the entire blanket, working 3 single crochets in each corner. Slip stitch to the first single crochet to join.
Border Round 2: Scalloped Edge
Chain 1, single crochet in the same stitch. *Skip 2 single crochets, work 5 double crochets in the next single crochet, skip 2 single crochets, single crochet in the next single crochet.* Repeat from * around the entire blanket, working 5 double crochets in each corner single crochet to maintain the scallop shape. Slip stitch to the first single crochet. Fasten off and weave in all ends.
Finishing Touches
Lightly steam block your finished blanket to even out the stitches and enhance the three-dimensional flower motifs. Lay it flat on a clean surface, gently mist with water or use a steam iron held a few inches above the fabric, and allow it to dry completely. This step helps the blanket lie flat and showcases the beautiful texture of the marigold flowers.
Tips for Success
- Consistent tension: Try to maintain the same tension throughout all 36 squares. If your tension varies, your squares may not join together evenly.
- Weave as you go: Weave in ends as you complete each square to avoid a mountain of yarn tails at the end.
- Customize your palette: Feel free to swap colors to match your decor. The pattern works beautifully in any color combination.
- Size adjustments: To make a larger blanket, simply make more squares. A 7x7 grid (49 squares) creates a generous throw, while an 8x8 grid (64 squares) makes a cozy bedspread.
This Marigold Meadow Granny Square Blanket is more than just a crochet project—it's a labor of love that results in a treasured heirloom piece. The combination of textured flowers, warm colors, and modern joining technique creates a blanket that's both timeless and contemporary. As you work through each square, imagine the sunlit meadow you're creating, and enjoy the meditative rhythm of crochet. Happy hooking!