Launch Pad Duster Coat Free Crochet Pattern: Oversized Popcorn Squiggle Coat
Launch Pad Duster Coat: A Free Crochet Pattern for Total Beginners
Introduction
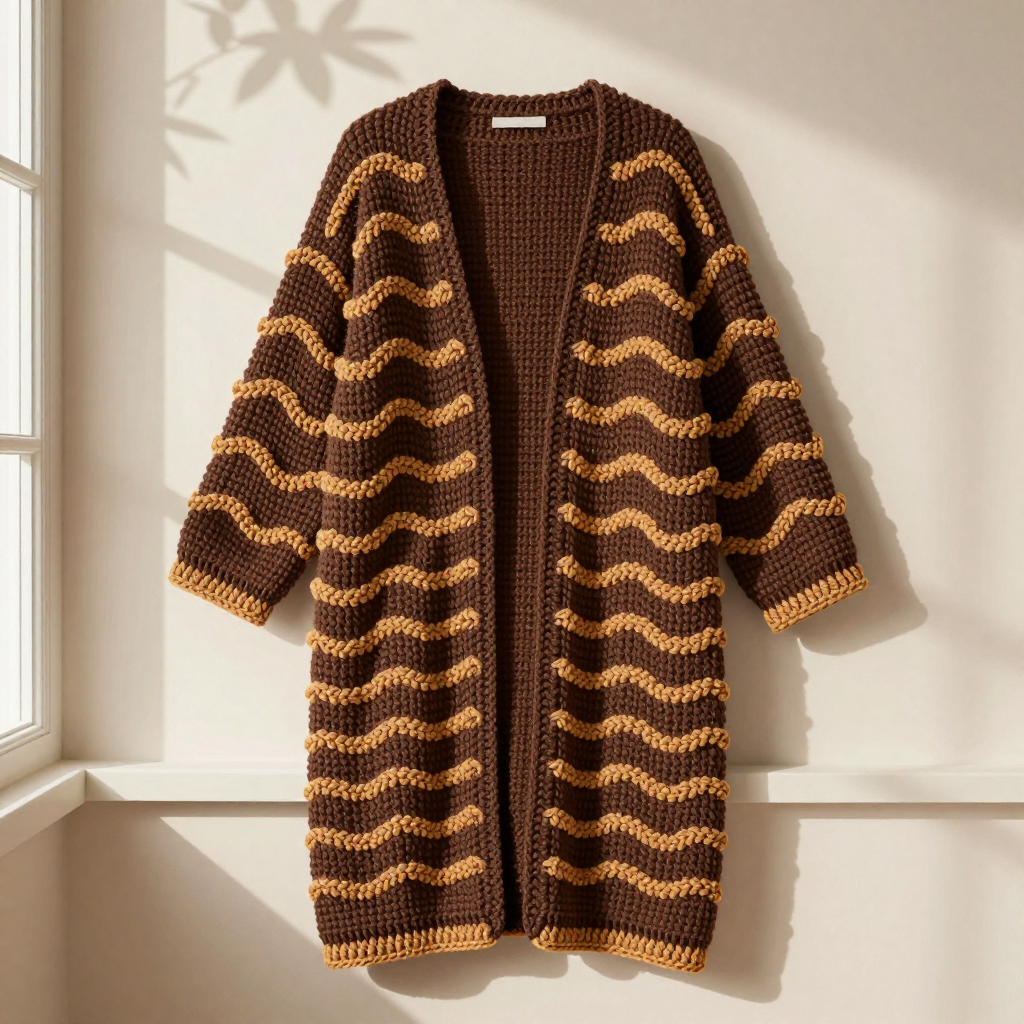
Welcome to the Launch Pad Duster Coat — a long, straight, gloriously oversized coat worked in soft chocolate mohair-silk and scattered with raised caramel popcorn "squiggles" that look like a rocket's launch trajectory across the fabric. This pattern is written for the complete beginner: every stitch, every abbreviation, and every seam is explained as if you have never held a crochet hook before. What makes this coat special is its simplicity — it is built from four flat rectangles (two body panels and two sleeves), so you never have to shape a curve or work in a circle. The finished coat feels feather-light and fuzzy, drapes like a dream, and has a tactile, three-dimensional surface you will not be able to stop touching. It is unisex, ankle-length, worn open, and looks far more complicated than it is.
Materials Needed
- Yarn (held DOUBLE throughout): Lace-weight mohair-silk blend, approx. 420 m / 50 g (70% mohair / 30% silk). Main Color (MC) Chocolate: approx. 1,250 g (10,500 m). Contrast Color (CC) Caramel: approx. 250 g (2,100 m). You will hold two strands together at all times.
- Main hook: 5.5 mm (US I-9) crochet hook.
- Smaller hook: 5.0 mm (US H-8) for popcorn motifs and all edging.
- Stitch markers (at least 8) to mark armholes, shoulders, and popcorn positions.
- Tapestry needle (blunt, large eye) for seaming and weaving in ends.
- Scissors.
- Measuring tape and a steamer or iron with steam setting for blocking.
Finished measurements (unisex, oversized straight tube): Sizes S/M (L/XL, 2XL/3XL). Body circumference flat, before seaming: 112 (128, 144) cm / 44 (50.5, 56.75) in. Length shoulder to hem: 118 cm / 46.5 in (all sizes). Sleeve rectangle: 46 (50, 54) cm wide x 58 cm long / 18 (19.75, 21.25) x 22.75 in. Armhole opening after seaming: 22 (24, 26) cm / 8.75 (9.5, 10.25) in. Neck opening: 22 cm / 8.75 in wide.
Abbreviations and Beginner Glossary
- ch – chain: yarn over the hook, pull the loop through the loop on your hook. Creates a foundation or a turning chain.
- sl st – slip stitch: insert hook into stitch, yarn over, pull through both the stitch and the loop on your hook at once. A flat, invisible joining stitch.
- sc – single crochet: insert hook into stitch, yarn over, pull up a loop (2 loops on hook), yarn over, pull through both loops. The shortest basic stitch.
- hdc – half double crochet: yarn over first, insert hook into stitch, yarn over, pull up a loop (3 loops on hook), yarn over, pull through all 3 loops at once. Medium height — this is our main fabric stitch.
- dc – double crochet: yarn over, insert hook, yarn over, pull up a loop (3 loops), yarn over, pull through 2 loops, yarn over, pull through last 2 loops. A tall stitch used inside the popcorn.
- hdc2tog – half double crochet 2 together (a decrease): yarn over, insert hook into first stitch, pull up a loop, yarn over, insert hook into next stitch, pull up a loop (4 loops on hook), yarn over, pull through all 4 loops. Turns 2 stitches into 1.
- pc – popcorn: work 5 dc into the same stitch, remove your hook from the working loop, insert the hook into the top of the first of those 5 dc, pick the dropped loop back up, and pull it through to close the cluster into a raised bobble. Ch 1 to secure it.
- squiggle – a continuous wavy line of popcorn stitches placed in staggered positions across the fabric.
- RS / WS – right side (the outside, public face of the fabric) / wrong side (the inside).
- st(s) – stitch(es). tog – together. MC / CC – main color / contrast color.
- mattress stitch – a seaming method that joins two edges invisibly by passing the needle under the horizontal bars between stitches, alternating sides.
Gauge
12 sts x 7 rows = 10 x 10 cm / 4 x 4 in in half double crochet (hdc) with yarn held double on the 5.5 mm hook, after light steaming. Each popcorn measures approx. 2.5 cm / 1 in in diameter.
Gauge matters because it controls the finished size: if your stitches are bigger than this, your coat will be too large; if smaller, too tight. To make a swatch, chain 20, work hdc in each chain and in each stitch for about 10 rows, steam it lightly, then measure a 10 cm square in the middle. If you have more than 12 stitches, switch to a larger hook; if fewer, switch to a smaller hook. Always check gauge before starting — the mohair halo makes it easy to crochet tighter than you think.
Beginner Tips Before You Start
- Hold two strands as one. Pull one strand from the outside of the ball and one from the center, or use two separate balls. Treat the doubled strand as a single yarn.
- Do not pull your yarn too tight. Mohair-silk needs to breathe. Loose, relaxed tension gives the drape and halo this coat is famous for.
- Use stitch markers. Place one at each armhole start, each shoulder point, and every popcorn position on the first squiggle row so you never lose your place.
- Carry the caramel loosely. When you switch to CC for popcorns, twist MC and CC every 3–4 stitches along the wrong side so you avoid long, snagging floats.
- Count after every row. The stitch count in parentheses at the end of each row is your safety net — check it before turning.
- Steam, never press. Blocking with steam preserves the popcorn texture and the fuzzy halo. An iron pressed flat will crush both.
Step-by-Step Instructions
Body Panel (make 2 identical — Front and Back)
Each panel is worked flat in rows from hem to shoulder. The two panels are identical; the front opening is created later by seaming only the sides, leaving the center front open.
With MC held double and the 5.5 mm hook, ch 68 (78, 88).
Row 1 (RS): Hdc in 3rd ch from hook and in each ch across. Turn. (66 (76, 86) hdc)
Row 2: Ch 2 (does not count as a st), hdc in each st across. Turn. (66 (76, 86) hdc)
Rows 3–6: Repeat Row 2. (66 (76, 86) hdc) — 6 rows total, approx. 8.5 cm / 3.25 in.
Row 7 (RS): Ch 2, hdc in next 8 (10, 12) sts, *pc in next st, hdc in next 9 sts; repeat from * to last 9 (11, 13) sts, hdc to end. Turn. (66 (76, 86) sts)
Row 8: Ch 2, hdc in each st across, carrying CC loosely along the WS and twisting MC and CC every 3–4 sts. Turn. (66 (76, 86) hdc)
Row 9: Ch 2, hdc in next 4 (6, 8) sts, *pc in next st, hdc in next 9 sts; repeat from * to last 5 (7, 9) sts, hdc to end. Turn. (66 (76, 86) sts)
Row 10: As Row 8. (66 (76, 86) hdc)
Row 11: Ch 2, hdc in next 12 (14, 16) sts, *pc in next st, hdc in next 9 sts; repeat from * to last 13 (15, 17) sts, hdc to end. Turn. (66 (76, 86) sts)
Row 12: As Row 8. (66 (76, 86) hdc)
Row 13: Ch 2, hdc in next 8 (10, 12) sts, *pc in next st, hdc in next 9 sts; repeat from * to last 9 (11, 13) sts, hdc to end. Turn. (66 (76, 86) sts)
Row 14: As Row 8. (66 (76, 86) hdc)
Rows 7–14 form one squiggle band (8 rows). The staggered popcorn positions create a wavy, looping line across the panel.
Rows 15–20: Ch 2, hdc in each st across. Turn. (66 (76, 86) hdc) — 6 plain MC rows.
Repeat Rows 7–20 (one squiggle band + 6 plain rows = 14 rows) until the panel measures approx. 110 cm / 43.25 in from the foundation, ending after a WS row. You will have approximately 7 squiggle bands.
Next row (RS) — shoulder taper: Ch 2, hdc2tog, hdc to last 2 sts, hdc2tog. Turn. (64 (74, 84) hdc)
Next row: Ch 2, hdc in each st across. Turn. (64 (74, 84) hdc)
Fasten off MC and CC. Weave in ends. Make a second identical panel.
Sleeve Rectangle (make 2)
With MC held double and the 5.5 mm hook, ch 56 (60, 64).
Row 1 (RS): Hdc in 3rd ch from hook and in each ch across. Turn. (54 (58, 62) hdc)
Rows 2–4: Ch 2, hdc in each st across. Turn. (54 (58, 62) hdc)
Row 5 (RS): Ch 2, hdc in next 6 (8, 10) sts, *pc in next st, hdc in next 9 sts; repeat from * to last 7 (9, 11) sts, hdc to end. Turn. (54 (58, 62) sts)
Row 6: Ch 2, hdc in each st across. Turn. (54 (58, 62) hdc)
Row 7: Ch 2, hdc in next 2 (4, 6) sts, *pc in next st, hdc in next 9 sts; repeat from * to last 3 (5, 7) sts, hdc to end. Turn. (54 (58, 62) sts)
Row 8: Ch 2, hdc in each st across. Turn. (54 (58, 62) hdc)
Rows 9–12: Ch 2, hdc in each st across. Turn. (54 (58, 62) hdc)
Repeat Rows 5–12 (8-row sequence) until the sleeve measures 58 cm / 22.75 in, ending after a WS row. Fasten off. Make a second sleeve rectangle.
Assembly and Finishing
- Block: Steam all four pieces lightly, holding the iron just above the fabric. Do not press flat — preserve the halo and popcorn texture.
- Align: Place Front and Back panels together with RS facing, aligning side edges and shoulders. The center front stays open.
- Side seams: With MC and tapestry needle, seam each side edge from hem upward using mattress stitch, leaving the top 22 (24, 26) cm / 8.75 (9.5, 10.25) in unseamed for the armhole. Mark the armhole start with a stitch marker first.
- Shoulder seams: Join the top 11 cm / 4.25 in of each shoulder edge, leaving a 22 cm / 8.75 in center neck opening.
- Sleeve tubes: Fold each sleeve rectangle in half lengthwise with RS together. Seam the long edges to form a tube. Turn RS out.
- Set in sleeves: Insert each sleeve into its armhole, aligning the sleeve seam with the side seam. Sew in place with MC.
- Neck edging: With the 5.0 mm hook and MC held double, join yarn at center back neck. Work 1 round sc evenly around the entire neck opening (approx. 60 sc). Fasten off.
- Front opening edging: With the 5.0 mm hook and MC held double, join yarn at the bottom right front corner. Work 1 row sc evenly up the right front edge, around the neck (working into the neck edging), and down the left front edge. Fasten off. Do not add buttonholes — the coat is worn open.
- Hem edging: With the 5.0 mm hook and CC held double, work 1 row sc along the bottom hem of the joined body. Fasten off.
- Cuff edging: With the 5.0 mm hook and CC held double, work 1 round sc around each sleeve cuff. Fasten off.
- Finish: Weave in all ends with the tapestry needle, then steam lightly once more to settle the fabric.
Pro Tips and Variations
- Change the color story: Swap chocolate and caramel for charcoal and cream, or navy and rust. Keep MC as the background and CC for popcorns and hem/cuff edging so the squiggles stay readable.
- Adjust the length: The coat is adjustable in 7-row increments (one squiggle band + 6 plain rows ≈ 10 cm / 4 in). Add or remove repeats before the shoulder taper to make it shorter or longer.
- Resize the width: To go up or down a size, add or remove 10 stitches from the body chain (one popcorn repeat) and 4 stitches from the sleeve chain, keeping the popcorn spacing of 9 hdc between motifs.
- Yarn substitution: If mohair-silk is unavailable, use any lace-weight yarn held double, or a single strand of light fingering weight — but always swatch, because the halo and drape depend on the double-stranded lace.