Harvest Moon Textured Cushion Free Knitting Pattern
Harvest Moon Textured Cushion: A Cozy Cable Knit Pattern for Beginners
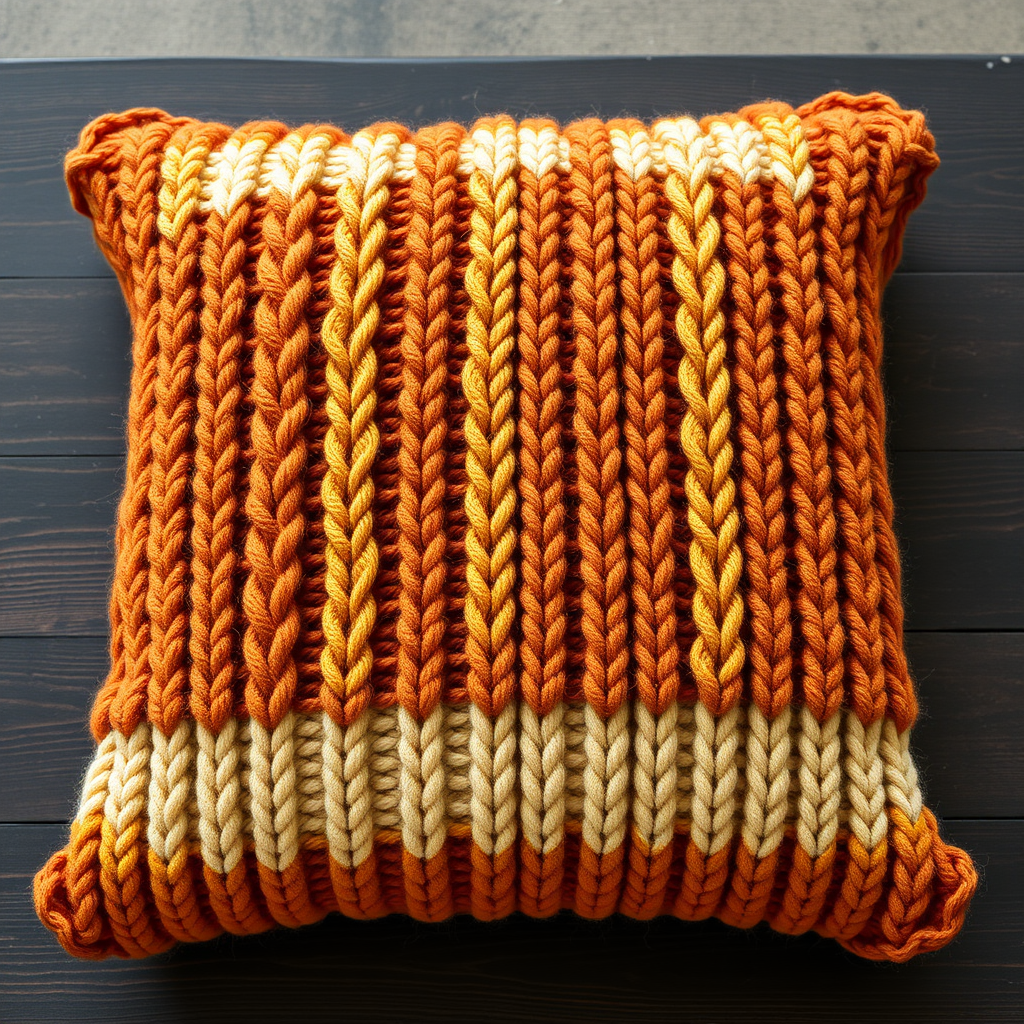
Bring the warm, golden glow of autumn into your living space with the Harvest Moon Textured Cushion. This stunning home decor project combines the timeless elegance of braided cables with the subtle, bumpy charm of seed stitch, all worked in a rich palette of terracotta, mustard, and cream. Knit in the round with super bulky yarn, this cushion cover works up quickly and delivers a high-impact, luxurious result that will become the focal point of any sofa, armchair, or bed.
Whether you are looking to refresh your seasonal decor or searching for a satisfying weekend project, this free knitting pattern is designed to be accessible. The repetitive nature of the cable pattern makes it meditative, while the chunky yarn ensures your hard work is visible in every plump, squishy stitch. Let’s dive into creating a handmade treasure that radiates warmth and craftsmanship.
Materials Needed
Before you begin, gather the following supplies to ensure a smooth and enjoyable knitting experience. This project is perfect for using up those beautiful, chunky single skeins you have been saving.
Yarn
- Super Bulky Weight Yarn (Weight category 6). You will need approximately 250g / 350 meters total per cushion.
- Color A (Base): Warm Terracotta (approx. 100g / 140m) – used for the ribbed edges and back panel.
- Color B (Accent 1): Deep Mustard Yellow (approx. 75g / 105m) – used for the main cable bands.
- Color C (Accent 2): Creamy Off-White (approx. 75g / 105m) – used for the contrasting cable bands.
Needles & Notions
- 10mm (US 15) Circular Knitting Needles with a 60cm (24-inch) cable for the main body.
- 10mm (US 15) Double-Pointed Needles (DPNs) for working small circumferences if needed (though the circular needle should suffice).
- Cable Needle (or a spare DPN).
- Stitch Markers (at least one to mark the beginning of the round).
- Tapestry Needle for weaving in ends and seaming.
- 45cm x 45cm (18" x 18") Cushion Insert.
Gauge
Getting the right gauge is crucial for the perfect fit. In stockinette stitch using 10mm needles, your gauge should be:
9 stitches and 12 rows = 10cm (4 inches) square.
Tip: Always knit a swatch first. If your gauge is too loose, try smaller needles; if it's too tight, go up a size.
Step-by-Step Instructions
This pattern is worked in two parts: a textured front panel knitted in the round, and a simple ribbed back panel knitted flat. Don't worry if you've never worked cables before—the instructions below break down every step.
Abbreviations
- CO: Cast On
- K: Knit
- P: Purl
- K2tog: Knit two stitches together (decrease)
- P2tog: Purl two stitches together (decrease)
- C4F: Cable 4 Front (slip 2 stitches to cable needle, hold in front, knit 2, knit 2 from cable needle)
- C4B: Cable 4 Back (slip 2 stitches to cable needle, hold in back, knit 2, knit 2 from cable needle)
- St(s): Stitch(es)
- Rnd: Round
- RS: Right Side
- WS: Wrong Side
Finished Size
The final cushion cover measures 45cm x 45cm (18" x 18"), perfectly fitting a standard square cushion insert.
Front Panel (Worked in the Round)
Setup: With Color A (Terracotta), CO 80 stitches. Place a stitch marker and join in the round, being extremely careful not to twist your stitches.
Ribbed Edge:
- Rnd 1-4: *K2, P2*; repeat from * to end of round. (This creates a neat, stretchy border).
Main Pattern Body: Now we begin the colorwork and cabling. The pattern repeat is based on 8 stitches for the cable, followed by a 4-stitch seed stitch panel (P2, K2).
- Rnd 5: Switch to Color B (Mustard). *Knit 8, P2, K2, P2*; repeat from * to end. (You will have 10 repeats of the 12-stitch pattern).
- Rnd 6: *Knit 8, P2, K2, P2*; repeat to end.
- Rnd 7 (Cable Row): *C4F, C4B, P2, K2, P2*; repeat to end. (This twists the 8 knit stitches into a braid).
- Rnd 8: *Knit 8, P2, K2, P2*; repeat to end.
- Rnd 9: *Knit 8, P2, K2, P2*; repeat to end.
- Rnd 10 (Cable Row): *C4B, C4F, P2, K2, P2*; repeat to end. (This twists the cable in the opposite direction for a classic rope effect).
- Rnd 11-12: *Knit 8, P2, K2, P2*; repeat to end.
Color Change to Cream:
- Rnd 13: Switch to Color C (Cream). *Knit 8, P2, K2, P2*; repeat to end.
- Rnd 14: *Knit 8, P2, K2, P2*; repeat to end.
- Rnd 15 (Cable Row): *C4F, C4B, P2, K2, P2*; repeat to end.
- Rnd 16: *Knit 8, P2, K2, P2*; repeat to end.
- Rnd 17: *Knit 8, P2, K2, P2*; repeat to end.
- Rnd 18 (Cable Row): *C4B, C4F, P2, K2, P2*; repeat to end.
- Rnd 19-20: *Knit 8, P2, K2, P2*; repeat to end.
Repeating the Sequence: To achieve the full height, repeat Rnds 5-20 two more times. Then, repeat Rnds 5-12 once more. You should now have a total of 3 full cable twists in Mustard and 2 in Cream, ending with a Mustard section.
Finishing Edge:
- Rnd 21: Switch back to Color A (Terracotta). *K2, P2*; repeat to end.
- Rnd 22-24: *K2, P2*; repeat to end.
- Bind Off: Bind off loosely in pattern (knit the knits and purl the purls). Ensure it is stretchy so the edge lies flat.
Back Panel (Worked Flat)
This panel is a simple 2x2 rib, which gives the back of the cushion a classic, textured look while remaining sturdy.
- Setup: With Color A (Terracotta), CO 80 stitches.
- Row 1 (RS): *K2, P2*; repeat from * to end.
- Row 2 (WS): *K2, P2*; repeat from * to end.
- Repeat: Continue repeating these two rows until the piece measures 45cm (18 inches) from the cast-on edge. Bind off in pattern.
Finishing & Assembly
Now for the satisfying part—bringing it all together.
- Weave in Ends: Using your tapestry needle, carefully weave in all loose yarn ends on both panels. Be sure to secure them well, especially at color changes.
- Position Panels: Place the Front and Back panels together with Right Sides facing out (if you want the seam on the inside) or Wrong Sides facing out (if you prefer a visible, decorative seam). For a clean look, right sides out is recommended.
- Seam Three Sides: Thread your tapestry needle with a long piece of Terracotta yarn. Using a whip stitch, carefully sew three sides of the cushion cover together. Keep your stitches even and close together for a secure seam.
- Insert Cushion: Turn the cover right-side out if you sewed with wrong sides together. Gently insert the 45cm cushion form into the opening, pushing it into the corners.
- Close the Fourth Side: Whip stitch the remaining side closed, making sure the cushion form is snug inside.
- Final Weave: Weave in the final ends from the seaming. Give your cushion a gentle pat to fluff it up.
Care Instructions
To keep your Harvest Moon cushion looking its best, hand wash it in cold water with a mild detergent. Gently squeeze out excess water (do not wring), and lay flat to dry away from direct sunlight. This will preserve the integrity of the chunky yarn and the crispness of the cables.
Enjoy your beautiful, handcrafted cushion! It's the perfect accent for cozy autumn evenings and a wonderful gift for a fellow knitting enthusiast.