Free Pattern: Frosted Petal Sparkle Blossom
Frosted Petal Sparkle Blossom: A Free Beginner Crochet Flower Pattern
Introduction
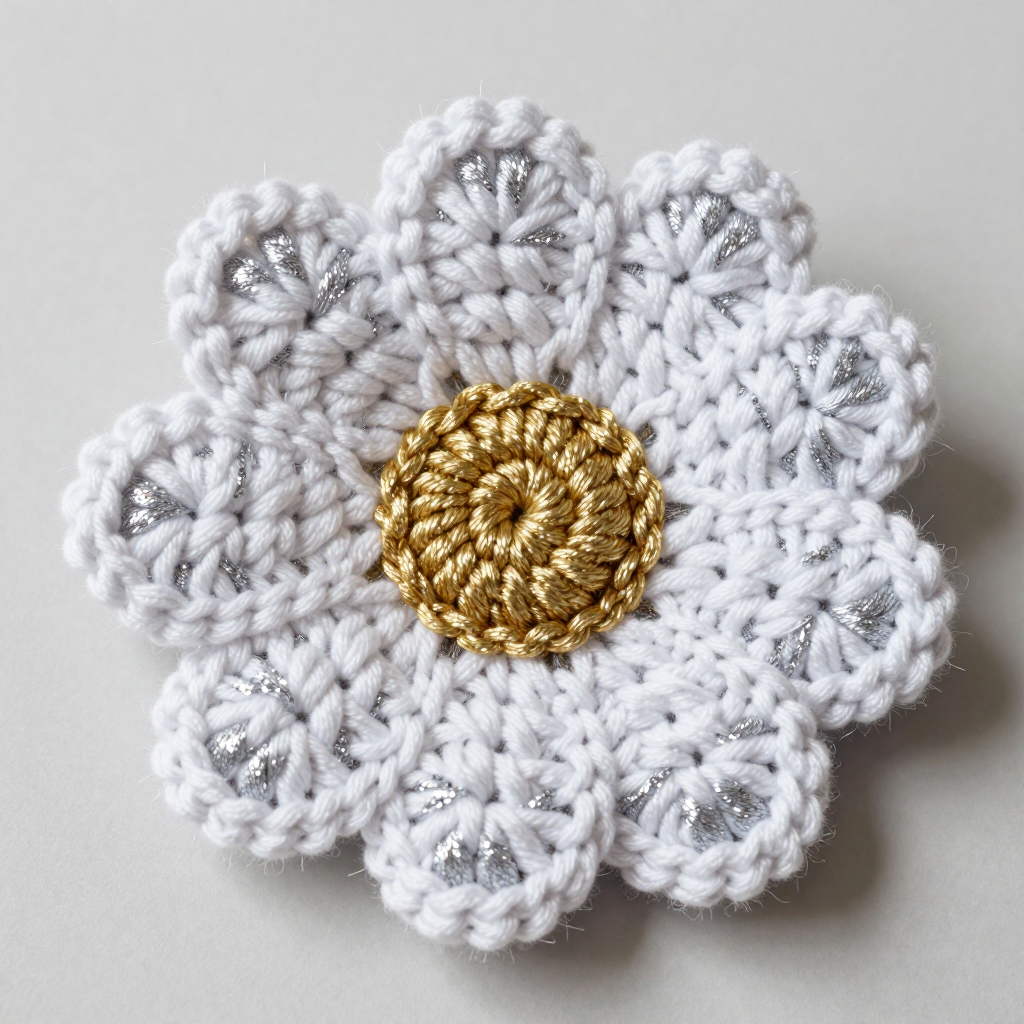
If you have ever wanted to make something pretty with your own two hands but felt intimidated by big, complicated patterns, this flower is for you. The Frosted Petal Sparkle Blossom is a small, chunky, glitter-flecked crochet flower that comes together in just a handful of rounds, making it one of the friendliest first projects you can possibly try. It is perfect for total beginners, for crafters who want a quick win, and for anyone who loves a little sparkle. When finished, it looks like a plump, layered blossom about 3 inches (7.5 cm) across, with an inner ring of six small rounded petals, an outer ring of six larger pointed petals, and a little domed gold center. The bulky glitter yarn gives it a soft, squishy feel and a subtle shimmer that catches the light. You can sew it onto a hat, a bag, a headband, or a gift, or pin it to your favorite jacket.
Materials Needed
- Yarn (petals): Bulky weight yarn (also called weight 5 or chunky) with a metallic glitter ply, in white/silver. You will need approximately 10–12 yards.
- Yarn (center): Bulky weight yarn (weight 5) with a metallic glitter ply, in gold. You will need approximately 5–8 yards.
- Total yarn: Approximately 15–20 yards of bulky glitter yarn altogether.
- Crochet hook: Size G/6, which is 4.0 mm. (The "G/6" is the US size and "4.0 mm" is the metric size; they are the same hook.)
- Stitch marker: 1 removable stitch marker (or a small safety pin, or a scrap of contrasting yarn) to mark the first stitch of a round.
- Tapestry needle: A blunt-tipped needle with a large eye, for weaving in yarn tails and for sewing the flower onto a project.
- Scissors: Any sharp pair of craft scissors for cutting yarn.
- Optional: A brooch pin or a small piece of felt, if you want to make the flower removable or give it a neat backing.
Finished size: Approximately 3 inches (7.5 cm) across.
Abbreviations and Beginner Glossary
Every abbreviation used in this pattern is listed below and explained in plain English. Read through this list once before you begin, and come back to it any time a term feels unfamiliar. You do not need to memorize anything.
- ch – chain. Make a loop of yarn on your hook, then pull the working yarn through that loop. Each one you make is a "chain stitch." Chains are used to start a round or to create open spaces.
- sc – single crochet. Insert your hook into the stitch, wrap the yarn over the hook (yarn over), pull up a loop (you now have 2 loops on the hook), yarn over again, and pull through both loops. One single crochet made.
- hdc – half double crochet. Yarn over first, insert your hook into the stitch, yarn over and pull up a loop (3 loops on the hook), yarn over again, and pull through all 3 loops at once. One half double crochet made. It is slightly taller than a single crochet.
- dc – double crochet. Yarn over first, insert your hook into the stitch, yarn over and pull up a loop (3 loops on the hook), yarn over and pull through the first 2 loops (2 loops remain), yarn over and pull through the last 2 loops. One double crochet made. It is taller than a half double crochet.
- tr – treble crochet (also called triple crochet). Yarn over twice, insert your hook into the stitch, yarn over and pull up a loop (4 loops on the hook), yarn over and pull through the first 2 loops, yarn over and pull through the next 2 loops, yarn over and pull through the last 2 loops. One treble crochet made. It is the tallest stitch in this pattern.
- sl st – slip stitch. Insert your hook into the stitch, yarn over, and pull the yarn through both the stitch and the loop already on your hook in one motion. It makes a nearly invisible joining stitch and does not add height.
- st / sts – stitch / stitches. A "stitch" is one completed loop of crochet work.
- magic ring – an adjustable loop of yarn that you crochet into and then pull tight, so the center of your work closes up with no hole. If you have never made one, see the tip in the next section.
- back loop only – every single crochet stitch has two loops at its top edge: a front loop (closer to you) and a back loop (farther from you). Working "in the back loop only" means you insert your hook under just the back loop, leaving the front loop untouched. This creates a ridge and lets the new petals sit behind the old ones.
- ch-3 space / ch-4 space – the hole created underneath a chain of 3 or 4 stitches. When the pattern says "work into the ch-3 space," you put your stitches into that hole rather than into a stitch.
- skip – do not work into that stitch; leave it empty and move on to the next one.
- join with a sl st – after finishing a round, make a slip stitch into the very first stitch of that round to close the circle.
- fasten off – cut the yarn a few inches from your work, then pull the cut tail all the way through the last loop on your hook to secure it.
- yarn over – wrap the working yarn (the strand coming from the ball) over your hook from back to front.
- weave in ends – thread a yarn tail onto a tapestry needle and run it back and forth through the back of your work so it disappears and cannot unravel.
Gauge
Gauge is not critical for this project. Because this flower is a decorative embellishment rather than a fitted garment, small differences in your tension will not cause a problem. Your finished flower will measure approximately 3 inches (7.5 cm) across when worked with bulky yarn and a 4.0 mm hook.
Why gauge matters: Gauge is simply how many stitches and rows you get in a set area of fabric. In projects like sweaters or hats, gauge must match the pattern exactly or the finished item will not fit. For this flower, gauge only affects the final size, so you can relax.
How to check your gauge anyway (optional): Work Rounds 1 and 2 of the center. If your center circle measures roughly 1 inch (2.5 cm) across, you are right on track. If it is much larger, try a smaller hook; if it is much smaller, try a larger hook. That is all the swatching you need.
Beginner Tips Before You Start
- Use a stitch marker. Place a removable stitch marker in the very first stitch of each round. When you come back around, you will know exactly where to join and will never lose your place.
- Do not pull your yarn too tight. Beginners often grip the yarn hard, which makes the stitches stiff and hard to insert the hook into. Aim for even, relaxed tension. If your stitches feel tight, loosen your grip on the yarn.
- Learn the magic ring before Round 1. To make one: lay the yarn tail over your palm, wrap the working yarn around two fingers to form a loop, insert your hook into the loop, pull the working yarn through, chain 1 to secure, then work your stitches into the loop. When finished, pull the short tail firmly and the hole closes. If the magic ring frustrates you, an easy substitute is to chain 4 and join with a slip stitch into a ring, then work your 6 single crochets into that ring.
- Count out loud. Counting your stitches at the end of every round is the single best habit a beginner can build. The stitch count in parentheses at the end of each round tells you exactly what you should have.
- Keep your petals facing the same way. When you work Round 5 into the back loops, the first petal layer will naturally flip forward. Gently push it toward you so it sits in front of the new work.
- Glitter yarn can be slippery. The metallic ply makes knots looser than usual, so leave tails of at least 4 inches (10 cm) when you fasten off, and weave them in thoroughly.
Step-by-Step Instructions
This flower is worked in the round, meaning you crochet in a circle rather than back and forth in rows. Each round is joined with a slip stitch at the end. Read each round completely before you begin it.
Center
Round 1: With the gold glitter bulky yarn, make a magic ring. Ch 1. Work 6 sc into the ring. Pull the short tail tight to close the center hole. Join with a sl st to the first sc. (6 sc)
Round 2: Ch 1. Work 2 sc in each sc around — that means two single crochets into every one of the 6 stitches, for a total of 12. Join with a sl st to the first sc. Fasten off the gold yarn, leaving a tail of about 4 inches (10 cm) to weave in later. (12 sc)
First Petal Layer
Round 3: Join the white/silver glitter bulky yarn with a sl st into any sc of Round 2. Then work the following sequence all the way around: *Ch 3, skip the next sc, sl st in the next sc. Repeat from * five more times, ending with a sl st in the stitch where you started this round. You will have created 6 chain-3 spaces (little loops) around the center. Do not fasten off. (6 ch-3 spaces)
Round 4: Sl st into the first ch-3 space to begin. In that same space, work (sc, hdc, dc, hdc, sc) — that is 5 stitches, one after another, all inside the one chain space. Then *sl st into the next ch-3 space, and work (sc, hdc, dc, hdc, sc) in that space. Repeat from * around until all 6 spaces are filled. Join with a sl st to the first sc of the round. (6 petals)
Second Petal Layer
Round 5: Ch 1. Working behind the first petal layer, sc in the back loop only of each sc from Round 2 — that is one single crochet into each of the 12 stitches, inserting your hook under just the back loop. Join with a sl st to the first sc. (12 sc)
Round 6: Work the following sequence all the way around: *Ch 4, skip the next sc, sl st in the next sc. Repeat from * five more times, ending with a sl st in the stitch where you started this round. You will have created 6 chain-4 spaces. (6 ch-4 spaces)
Round 7: Sl st into the first ch-4 space to begin. In that same space, work (sc, hdc, dc, tr, dc, hdc, sc) — that is 7 stitches, one after another, all inside the one chain space. Then *sl st into the next ch-4 space, and work (sc, hdc, dc, tr, dc, hdc, sc) in that space. Repeat from * around until all 6 spaces are filled. Join with a sl st to the first sc of the round. Fasten off, leaving a tail of about 4 inches (10 cm). (6 petals)
Assembly and Finishing
Shaping: Use your fingers to gently press each petal flat and fan the two layers so the larger outer petals sit behind the smaller inner petals. The treble crochet at the tip of each outer petal gives it a slightly pointed shape; smooth it into place.
Weaving in ends: Thread each yarn tail onto your tapestry needle. Turn the flower over and run the needle back and forth through the back of several stitches, changing direction once or twice so the tail cannot work loose. Trim the yarn close to the fabric. Do this for the gold center tail, the white joining tail, and the final fastening-off tail.
Blocking (optional): Hold a steam iron about 2 inches (5 cm) above the flower and let the steam settle on it for a few seconds. Do not press the iron directly onto the glitter yarn, as the metallic ply can melt or flatten. Let the flower air-dry flat. If you do not have a steam iron, simply shape the flower with your fingers and lay it flat under a light book for an hour.
Attaching the flower: To sew the flower onto a hat, bag, or headband, thread a tapestry needle with matching yarn and take several small stitches through the back of the center circle and into the fabric beneath. To make the flower removable, sew a brooch pin or a small circle of felt to the back instead.
Pro Tips and Variations
- Change the colors: Use any two contrasting bulky glitter yarns you love — pink and silver, teal and gold, or a single color throughout for a tonal, elegant look. The center color is the one that will peek through the middle, so choose it deliberately.
- Adjust the size: For a smaller flower, use worsted weight (weight 4) yarn with a 3.5 mm (E/4) hook. For a larger statement flower, use super bulky (weight 6) yarn with a 6.0 mm (J/10) hook. The stitch counts stay exactly the same; only the yarn and hook change.
- Substitute the yarn: Any bulky weight yarn works, glitter or not. If you use a smooth yarn, the petals will look cleaner and more modern; if you use a fuzzy yarn, the flower will look soft and cloud-like. Just check that your yarn is roughly the same thickness as the sample so the flower stays about 3 inches across.
- Make a bouquet: Work five or six flowers in different colors, then sew them onto a length of ribbon or a wooden hoop for a quick, cheerful wall decoration or gift topper.