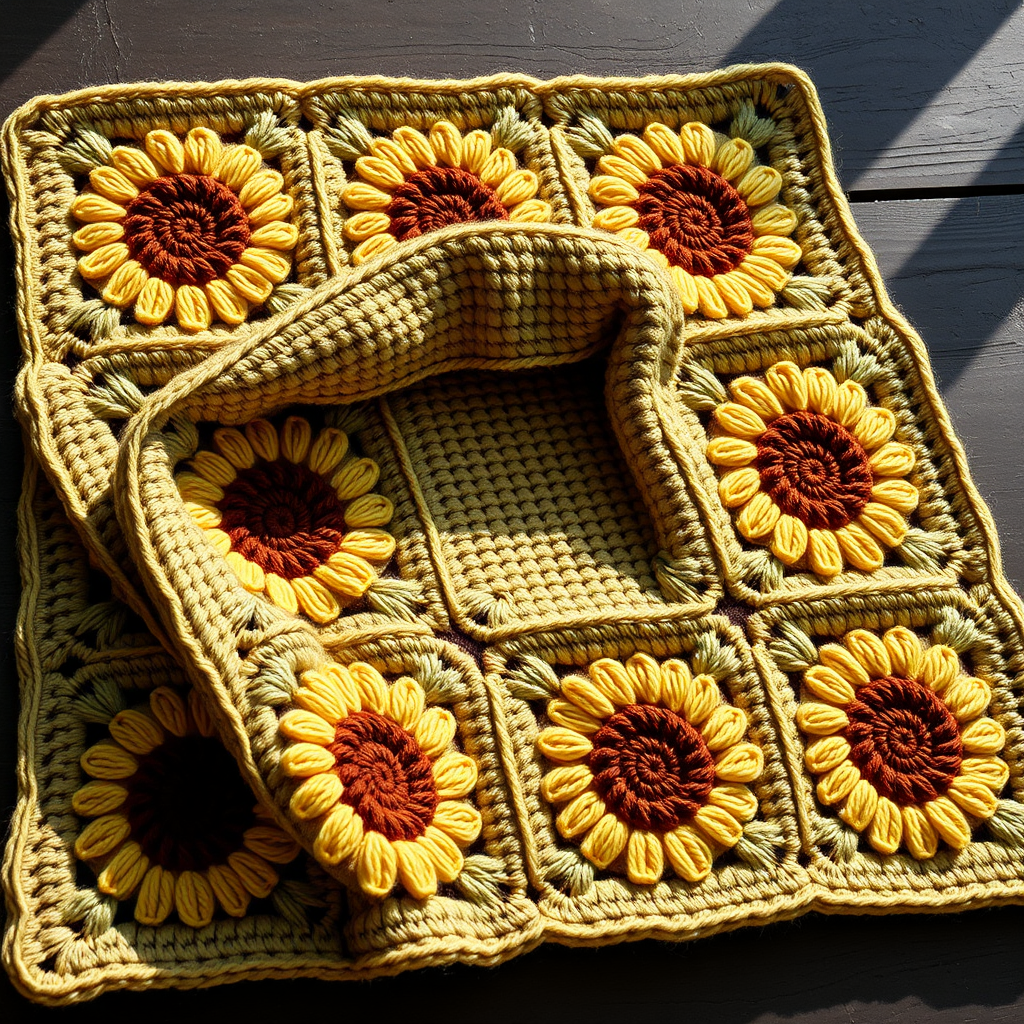
Enchanted Meadow 3D Flower Granny Square Blanket Free Pattern – Crochet a Whimsical Garden Heirloom

Enchanted Meadow 3D Flower Granny Square Blanket Free Pattern – Crochet a Whimsical Garden Heirloom
Transform your living space into a blooming meadow with this enchanting 3D flower granny square blanket, where each square bursts with dimensional petals and rich, earthy tones. This free pattern guides you through creating a tactile, heirloom-quality throw that celebrates the beauty of handcrafted texture. Whether you're a seasoned crocheter or a confident beginner looking for a rewarding project, this blanket is designed to become a cherished piece in your home for years to come.
The magic of this pattern lies in its construction: each 6-inch square features a central flower with layered, three-dimensional petals that literally pop off the surface. The dusty rose center gives way to larger petals in the same hue, surrounded by a ring of forest green pointed petals, all set against a warm cream background. The outer border alternates between sage green and terracotta, creating a warm, earthy patchwork that feels both modern and timeless. The result is a tactile, textured throw that invites you to run your fingers over its raised petals and admire the intricate stitch work.
Materials Needed
Before you begin, gather the following materials. This project uses worsted weight yarn, which is perfect for creating a durable, cozy blanket with excellent stitch definition.
Yarn
Worsted weight cotton or acrylic blend (e.g., Lion Brand Cotton-Ease) in 5 colors:
- Color A – Forest Green: For the pointed petals and assembly
- Color B – Cream: For the corner base
- Color C – Dusty Rose: For the center flower
- Color D – Sage: For the outer border
- Color E – Terracotta: For the outer border and edging
Yardage note: For a 4x4 square blanket (24 inches square), you'll need approximately 400-500 yards of Color A, 300-400 yards of Color B, 200-300 yards of Color C, and 200-300 yards each of Colors D and E. Adjust accordingly for larger sizes.
Hook and Notions
- 5.0 mm (H-8) crochet hook
- Yarn needle for weaving in ends and assembly
- Scissors
- Stitch markers (optional, but helpful for keeping track of rounds)
Gauge
One completed square measures 6 inches (15 cm) across. Gauge is not critical for this project, but consistency ensures uniform squares that will join together neatly. If your squares come out slightly larger or smaller, adjust your hook size accordingly.
Step-by-Step Instructions
This pattern creates a 6-inch (15 cm) granny square with a central 3D flower motif. Each square uses 5 colors; adjust as desired. The pattern is written in US terms.
Abbreviations (US terms)
- ch = chain
- sl st = slip stitch
- sc = single crochet
- hdc = half double crochet
- dc = double crochet
- tr = treble crochet
- magic ring = adjustable loop
Square 1: Center Flower (Color C – Dusty Rose)
Round 1: Make a magic ring. Ch 3 (counts as first dc), 11 dc into ring. Join with sl st to top of ch-3. (12 dc)
Tip: If you're new to magic rings, you can alternatively ch 4 and sl st to form a ring, then work the 12 dc into the center. The magic ring allows you to pull the center tight for a neat, closed flower.
Round 2: Ch 1, sc in same st, *ch 3, skip next dc, sc in next dc*; repeat from * to * around, ending with ch 3, sl st to first sc. (6 ch-3 spaces)
Detail: This round creates the foundation for the first layer of petals. The ch-3 spaces will become the "pockets" where you'll work the petals in the next round.
Round 3: In each ch-3 space, work (sc, hdc, 3 dc, hdc, sc) to form a petal. Join with sl st to first sc. (6 petals)
Detail: Each petal is worked entirely within a single ch-3 space. The combination of sc, hdc, and dc stitches creates a rounded, dimensional petal shape. The sc at the beginning and end of each petal anchors it to the space, while the taller stitches in the middle give it height and volume.
Round 4: Ch 1, sc in back loop of the sc between petals, *ch 4, sc in back loop of next sc between petals*; repeat from * to * around, ending with ch 4, sl st to first sc. (6 ch-4 spaces)
Detail: This is where the 3D effect begins. By working into the back loop only of the sc stitches between petals, you create a ridge that pushes the first layer of petals forward. The ch-4 spaces are larger than before, allowing for bigger petals in the next round.
Round 5: In each ch-4 space, work (sc, hdc, 5 dc, hdc, sc) to form larger petals. Join with sl st to first sc. (6 large petals)
Detail: These larger petals sit behind the first layer, creating a beautiful layered effect. The extra 2 dc in each petal (compared to Round 3) make them noticeably larger and more dramatic. The petals will naturally curve forward, giving the flower its dimensional, 3D appearance.
Fasten off Color C.
Square 2: Background (Color A – Forest Green)
Round 6: Join Color A with sl st to any back loop of a sc between large petals. Ch 1, sc in same st, *ch 5, sc in back loop of next sc between petals*; repeat from * to * around, ending with ch 5, sl st to first sc. (6 ch-5 spaces)
Detail: Working into the back loops again creates another ridge that pushes the flower forward even more. The ch-5 spaces are the largest yet, setting up for the pointed petals that will frame the flower.
Round 7: In each ch-5 space, work (sc, hdc, 3 dc, tr, 3 dc, hdc, sc) to form pointed petals. Join with sl st to first sc. (6 pointed petals)
Detail: The treble crochet (tr) stitch at the center of each petal creates a dramatic point, giving these petals a star-like appearance. This layer frames the dusty rose flower beautifully, adding contrast and depth. The combination of stitches creates a petal that is wider at the base and comes to a distinct point at the top.
Fasten off Color A.
Square 3: Corner Base (Color B – Cream)
Round 8: Join Color B with sl st to any tr (center of a pointed petal). Ch 3 (counts as dc), 2 dc in same st, *ch 2, 3 dc in next tr*; repeat from * to * around, ending with ch 2, sl st to top of ch-3. (18 dc groups, 6 ch-2 spaces)
Detail: This round transitions the flower into a square shape. By working 3 dc into each treble crochet (the point of each petal), you create a cluster of stitches that will form the base of the square. The ch-2 spaces between clusters create openings that will be used to form the corners in the next round.
Round 9: Sl st into next 2 dc and into ch-2 space. Ch 3 (counts as dc), 2 dc in same space, ch 2, 3 dc in same space (corner made), *ch 1, 3 dc in next ch-2 space, ch 1, 3 dc in next ch-2 space, ch 1, (3 dc, ch 2, 3 dc) in next ch-2 space (corner)*; repeat from * to * around, working corners in every third ch-2 space. Join with sl st to top of ch-3. (4 corners, 8 side groups)
Detail: This is where the square shape emerges. You'll work a corner (3 dc, ch 2, 3 dc) into every third ch-2 space, and simple 3 dc groups into the spaces between corners. The ch-1 spaces between groups create the sides of the square. The result is a classic granny square shape with the flower beautifully centered.
Fasten off Color B.
Square 4: Outer Border (Color D – Sage and Color E – Terracotta)
Round 10: Join Color D with sl st in any corner ch-2 space. Ch 3 (counts as dc), 2 dc in same space, ch 2, 3 dc in same space (corner), *ch 1, 3 dc in next ch-1 space*; repeat from * to * across side, ch 1, (3 dc, ch 2, 3 dc) in next corner space; repeat from * to * around, ending with ch 1, sl st to top of ch-3. (4 corners, 12 side groups)
Detail: This round expands the square, adding a border in sage green. The corners are worked the same way as before, but now there are more side groups because the square is larger. The ch-1 spaces between groups keep the sides flexible and even.
Fasten off Color D.
Round 11: Join Color E with sl st in any corner ch-2 space. Ch 1, (sc, ch 2, sc) in corner space, *sc in each dc across side, sc in each ch-1 space*; repeat from * to * around, working (sc, ch 2, sc) in each corner. Join with sl st to first sc. Fasten off. (Each side has 15 sc, corners have ch-2 spaces)
Detail: This final round in terracotta creates a clean, finished edge for each square. The single crochet stitches provide a neat, flat border, while the (sc, ch 2, sc) in each corner creates a small loop that will make assembly easier. The ch-2 corner spaces also add a subtle decorative detail.
Assembly
Once you've completed all your squares, it's time to assemble them into a beautiful blanket.
Step 1: Arrange your squares. Lay out your squares in your desired layout. For a 24-inch square blanket, use a 4x4 arrangement (16 squares). For a 36-inch throw, use a 6x6 arrangement (36 squares). You can also create a rectangular blanket by using different numbers of squares for width and length (e.g., 4x6 for a 24x36-inch throw).
Step 2: Join the squares. With Color A (Forest Green), whip stitch squares together through back loops only, matching corners and side stitches. This creates a nearly invisible seam on the right side and adds a subtle ridge on the wrong side that adds to the texture.
Detail: To whip stitch, thread your yarn needle with a length of Color A. Hold two squares with right sides together (or wrong sides together, depending on your preference for seam visibility). Insert the needle through the back loop of the corresponding stitch on each square, going from back to front. Pull the yarn through, then insert the needle through the next pair of stitches. Continue across the entire side, keeping your tension even.
Step 3: For a seamless look, use a mattress stitch on the wrong side. This technique creates an invisible seam that's perfect for a polished, professional finish. To mattress stitch, hold the squares with right sides facing you (wrong sides together). Insert the needle under the horizontal bar between the first and second stitches of each square, alternating sides. Pull gently to close the seam.
Edging (Optional)
Adding an edging to your blanket gives it a finished, polished look and helps stabilize the edges.
Round 1: Join Color E in any corner. Ch 1, (sc, ch 2, sc) in corner, *sc in each stitch across, (sc, ch 2, sc) in next corner*; repeat from * to * around, join with sl st.
Detail: Work one sc into each stitch along the sides of your blanket. When you reach a corner, work (sc, ch 2, sc) into the corner stitch to create a neat, rounded corner.
Round 2: Ch 1, sc in each sc, working (sc, ch 2, sc) in each corner ch-2 space. Join and fasten off.
Detail: This second round adds a bit more substance to the edging and ensures the corners are well-defined. The result is a clean, sturdy border that frames your beautiful flower squares perfectly.
Finishing
Weave in all ends securely. Using your yarn needle, weave each tail through the back of several stitches, then trim the excess. Be sure to weave in ends on the wrong side of the work so they're hidden. For extra security, weave each end in one direction, then back in the opposite direction through a different set of stitches.
Once all ends are woven in, give your blanket a gentle blocking if desired. Lay it flat, mist with water, and shape it to ensure all squares are even and the edges are straight. Allow it to dry completely before using or gifting.
Your Enchanted Meadow 3D Flower Granny Square Blanket is now complete! This heirloom-quality piece is sure to be treasured for generations, with its dimensional petals and rich, earthy color palette bringing a touch of whimsical garden charm to any room. Whether draped over a rustic wooden chair, folded at the foot of a bed, or given as a heartfelt handmade gift, this blanket celebrates the beauty of handcrafted texture and the joy of creating something truly special.