Emoji Mood Blanket Free Pattern – Crochet a Pixelated Emotion Quilt
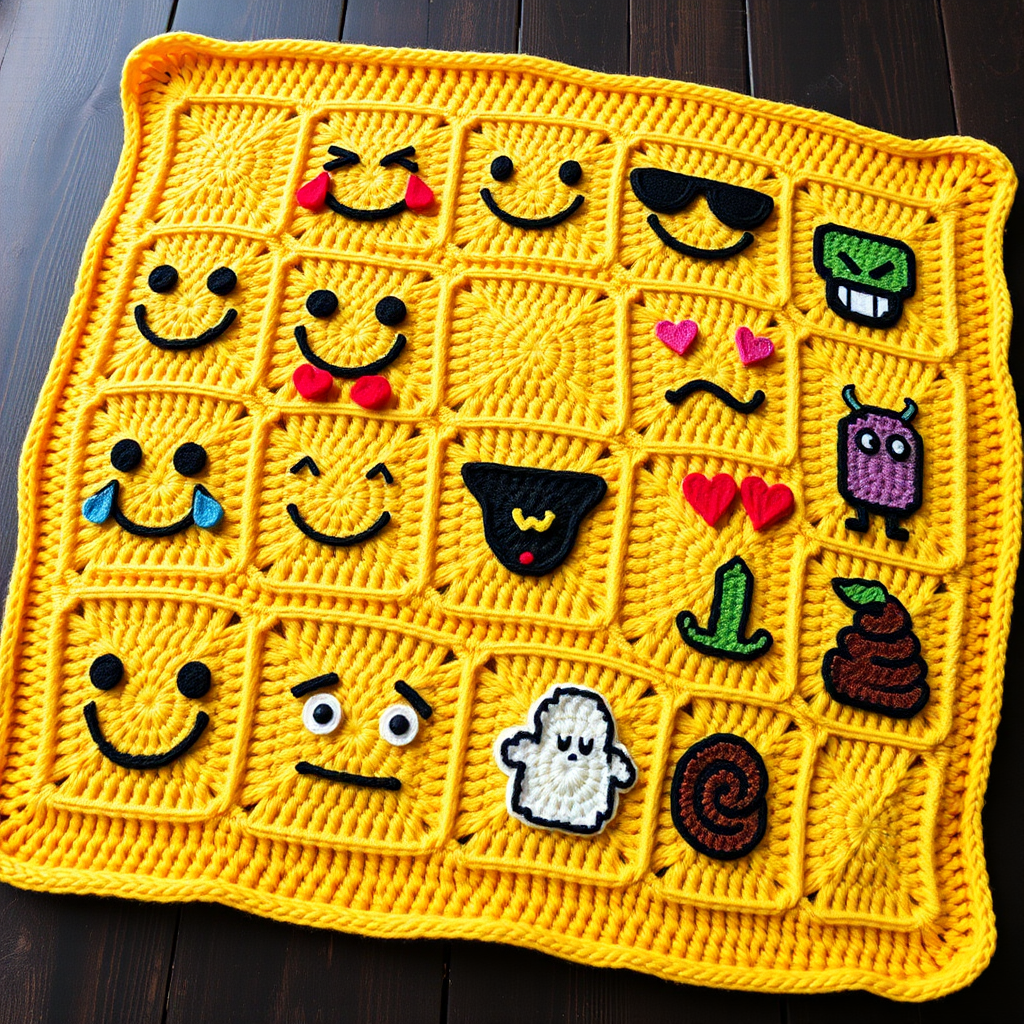
Emoji Mood Blanket Free Pattern – Crochet a Pixelated Emotion Quilt
Turn your feelings into a cozy, colorful throw with this pixel-art crochet pattern featuring 12 classic emoji faces. Each square is a soft, textured portrait of joy, laughter, or love, stitched together into a warm conversation-starting blanket. This is the perfect project for crocheters who love color work, want to practice surface crochet and embroidery, or simply want to create a unique, personal gift that literally wears its heart on its sleeve—or rather, its stitches.
This free pattern is designed to be approachable for confident beginners and a delightful challenge for intermediate crocheters. You'll create twelve 6-inch squares, each with a different emoji, and then join them into a 3x4 grid. The result is a vibrant, pixelated quilt that captures the full spectrum of human emotion, from tears of joy to a cool, sunglassed swagger. Let's dive into this fun and expressive project!
Materials Needed
Before you begin, gather your supplies. This project uses simple, readily available materials. The key is to have a good variety of colors to bring each emoji to life.
- Yarn: Worsted weight cotton or acrylic yarn in 12 colors:
- Yellow (main background & border)
- Black (outlines & features)
- White (eyes/teeth)
- Red (heart eyes)
- Pink (tongue)
- Orange (smile accents)
- Blue (tears)
- Green (alien)
- Purple (devil)
- Brown (poop)
- Light Blue (cool face accents)
- Cream (ghost)
- Crochet Hook: 5.0 mm (H-8) crochet hook
- Tapestry Needle: For weaving in ends and embroidering facial features.
- Scissors: For cutting yarn.
Gauge & Size
Gauge: 4 sc x 4 rows = 1 inch (2.5 cm) in single crochet. This gauge is crucial for ensuring your squares are the correct size. If your gauge is off, adjust your hook size accordingly.
Finished Square Size: Approximately 6 inches x 6 inches. The final blanket will be about 18 inches x 24 inches before bordering, making it a perfect lap blanket or wall hanging.
Step-by-Step Instructions
This pattern is broken down into three main parts: creating the base squares, adding the emoji faces, and assembling the blanket. Follow along carefully, and you'll have your own emoji mood quilt in no time.
Abbreviations
- ch = chain
- sc = single crochet
- dc = double crochet
- sl st = slip stitch
- st(s) = stitch(es)
- rnd = round
- inc = increase (2 sc in same st)
- dec = decrease (sc 2 together)
Pattern Notes
- Each emoji square measures approximately 6 inches x 6 inches.
- Use the intarsia method for color changes – carry yarn across the back or use separate bobbins. For this pattern, we'll be using surface crochet and embroidery for the faces, which is much simpler than intarsia for small details.
- Work in continuous rounds for the base square, then add facial features using surface crochet or embroidery.
Base Square (Make 12)
This is the foundation for every emoji. You'll make 12 of these in total, all in your main yellow yarn.
- Foundation Chain: With yellow yarn, ch 26.
- Row 1: sc in the 2nd ch from the hook and in each ch across. (25 sc)
- Rows 2-25: ch 1, turn, sc in each st across. (25 sc)
- Finish: Fasten off and weave in ends. Repeat this process to create all 12 base squares.
Emoji Faces (Worked Directly onto the Square)
Now for the fun part! You'll use a combination of surface crochet (working slip stitches directly into the fabric) and embroidery (using a tapestry needle and yarn) to create each face. The instructions below give specific row and stitch numbers to help you place the features perfectly. Remember, row 1 is at the bottom of your square and stitch 1 is on the left.
1. Smiley Face
- Eyes: With black yarn, embroider two small circles for eyes using a satin stitch. Place them at rows 8-9, stitches 8-9 and 16-17.
- Smile: With black yarn, surface crochet a smile. Start at row 15, stitch 6, chain across to row 18, stitch 12, then back up to row 15, stitch 19. Use slip stitches to create a smooth curve.
2. Laughing Face (Tears of Joy)
- Eyes: Embroider two closed happy eyes (curved lines) with black yarn at rows 8-9, stitches 8-9 and 16-17.
- Tears: Add two blue teardrops. With blue yarn, embroider small teardrop shapes below each eye at rows 12-13, stitches 7-8 and 17-18.
- Smile: Surface crochet a wide open smile with black yarn, similar to the smiley face but wider and more open.
3. Heart Eyes
- Eyes: With red yarn, embroider two heart shapes at rows 8-10, stitches 8-10 and 15-17. Use a satin stitch to fill them in completely.
- Smile: With black yarn, surface crochet a smile as in the smiley face.
4. Wink
- Open Eye: Embroider one open eye (black circle) at row 8, stitch 8.
- Winking Eye: Embroider a winking eye (black curved line) at row 8, stitch 16.
- Smirk: Surface crochet a smirk. Start at row 15, stitch 6, chain to row 17, stitch 12, then back to row 15, stitch 19, but make the right side slightly higher than the left for a cheeky look.
5. Stuck-Out Tongue
- Eyes: Embroider two open eyes (black circles) at rows 8-9, stitches 8-9 and 16-17.
- Smile: Surface crochet a smile with black yarn.
- Tongue: With pink yarn, embroider a small oval tongue shape below the smile at rows 19-20, stitches 11-14.
6. Cool Face (Sunglasses)
- Sunglasses: With black yarn, embroider two large rectangles for sunglasses at rows 8-10, stitches 7-10 and 15-18. Connect them with a thin black line across the nose at row 9, stitches 11-14.
- Mouth: Surface crochet a straight line for a mouth with black yarn at row 18, stitches 10-15.
7. Sad Face (Tear)
- Eyes: Embroider two sad eyes (slanted downward lines) with black yarn at rows 8-9, stitches 8-9 and 16-17.
- Tear: With blue yarn, embroider a single teardrop below the left eye at rows 12-14, stitches 7-8.
- Frown: Surface crochet a downward curve for a frown with black yarn. Start at row 15, stitch 6, chain to row 18, stitch 12, then back to row 15, stitch 19, but curve the line downward instead of upward.
8. Angry Face
- Eyes: Embroider two angry eyes (slanted inward lines) with black yarn at rows 8-9, stitches 8-9 and 16-17.
- Mouth: Surface crochet a straight line with a slight downward curve for a frown with black yarn at row 18, stitches 8-17.
9. Alien
- Eyes: With green yarn, embroider two large oval eyes using a satin stitch at rows 8-10, stitches 8-10 and 15-17.
- Pupils: With black yarn, embroider small black pupils in the center of each green eye.
- Mouth: Surface crochet a small straight line for a mouth with black yarn at row 18, stitches 11-14.
10. Devil
- Horns: With purple yarn, embroider two small curved horns at the top corners of the square at rows 2-3, stitches 4-5 and 20-21.
- Eyes: Embroider two angry eyes with black yarn at rows 8-9, stitches 8-9 and 16-17.
- Grin & Beard: Surface crochet a wide grin with black yarn. Then, add a small pointed beard with black yarn at row 20, stitches 11-14.
11. Ghost
- Eyes: With cream yarn, embroider two oval eyes using a satin stitch at rows 8-10, stitches 8-10 and 15-17.
- Pupils: With black yarn, embroider small black pupils in the center of each cream eye.
- Mouth: Surface crochet a wavy mouth with black yarn. Start at row 15, stitch 6, chain to row 17, stitch 12, then back to row 15, stitch 19, making small waves as you go.
12. Poop
- Swirl: With brown yarn, embroider a swirl pattern in the center of the square at rows 10-15, stitches 10-15, using spiral stitches.
- Eyes: With black yarn, embroider two small oval eyes at rows 8-9, stitches 9-10 and 15-16.
- Smile: Surface crochet a small smile with black yarn at row 18, stitches 11-14.
Assembly
Once all 12 squares are complete, it's time to bring them together.
- Arrange: Lay out your squares in a 3x4 grid (or 4x3) in any order you like. Play around with the arrangement until you're happy with the flow of colors and emotions.
- Join: With yellow yarn, whip stitch the squares together using a tapestry needle. Work through the back loops only for a flat, invisible seam. Take your time to ensure the corners line up neatly.
- Weave In Ends: Weave in all loose ends securely.
Border
A clean border finishes the blanket beautifully and helps stabilize the edges.
- Round 1: With yellow yarn, sc evenly around the entire blanket, working 3 sc in each corner to turn the corners smoothly.
- Round 2: ch 1, sc in each st around, working 3 sc in each corner st.
- Round 3: Repeat Round 2 for a total of 3 rounds.
- Finish: Fasten off and weave in ends.
Finishing
- Block: Block the blanket gently to even out the squares and give it a professional finish. Lay it flat, mist with water, and pin to the desired dimensions until dry.
- Enjoy: Your cozy emoji mood blanket is complete! Snuggle up, gift it, or hang it as a piece of pixel art. It's a wonderful conversation starter and a unique expression of your crafting skills.