Emerald Offset Bobble Gaiter Free Crochet Pattern
Emerald Offset Bobble Gaiter: A Free Beginner Crochet Pattern
Introduction
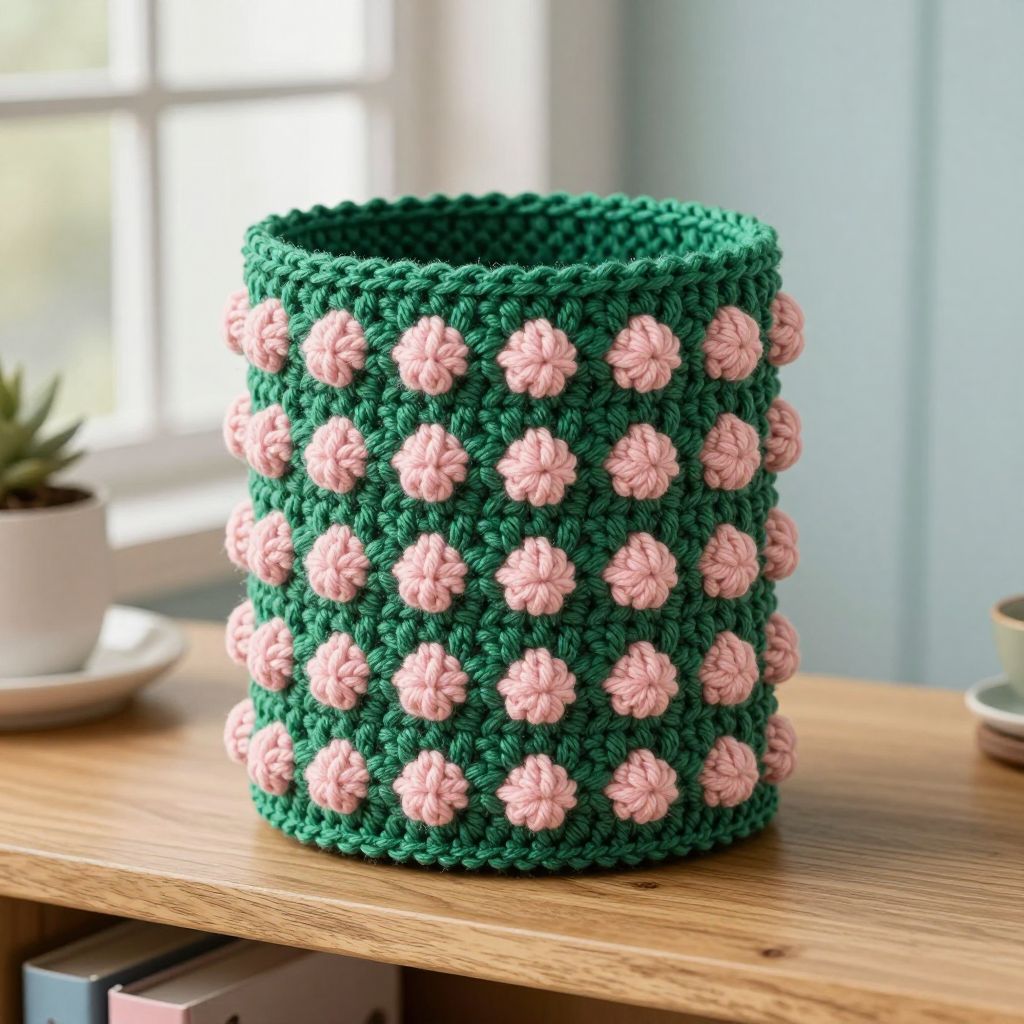
Welcome to your very first bobble project! This Emerald Offset Bobble Gaiter is the perfect next step for a brand-new crocheter who has mastered the basic stitches and wants to make something that looks impressive but is secretly very simple. Worked entirely in the round in half double crochet, the gaiter is a cozy tube of deep emerald wool dotted with raised blush-pink bobbles arranged in a half-drop Moroccan tile repeat. The finished piece is about 18 inches around and 10 inches tall, and it feels soft, dense, and wonderfully squishy against the skin. Slip it on as a warm neck gaiter on a cold walk, or wear it as a stylish leg warmer over boots. Either way, you will be amazed at what a few simple stitches and a handful of little bobbles can create.
Materials Needed
- Yarn (MC - emerald): Aran weight wool blend, approximately 150 yds / 137 m of deep emerald green.
- Yarn (CC - blush): Aran weight wool blend, approximately 40 yds / 37 m of soft blush pink. (Total yarn for the project: about 180–200 yds / 165–185 m.)
- Crochet hook: 5.0 mm (US H-8), or the size you need to match gauge.
- Stitch markers: At least 2, to mark the beginning of each round and to keep track of bobble positions.
- Tapestry needle: A blunt-tipped yarn needle for weaving in ends.
- Scissors: Sharp craft scissors for cutting yarn.
- Finished size: Circumference approx. 18 in / 46 cm (unstretched; comfortably fits a 12–16 in / 30–41 cm calf or neck). Height approx. 10 in / 25 cm.
Abbreviations and Beginner Glossary
Every abbreviation used in this pattern is explained below in plain English. Read through this list once before you begin, and refer back whenever you feel unsure.
- ch - chain. Make a loop of yarn on your hook, then pull the working yarn through that loop. Each loop you pull through is one chain.
- sl st - slip stitch. Insert your hook into the stitch, yarn over, and pull the yarn through both the stitch and the loop on your hook at the same time. It creates a nearly invisible join.
- sc - single crochet. Insert hook into stitch, yarn over, pull up a loop (2 loops on hook), yarn over, pull through both loops. (Used only for the optional edging.)
- hdc - half double crochet. Yarn over, insert hook into stitch, yarn over, pull up a loop (3 loops on hook), yarn over, pull through all 3 loops at once. This is the main stitch of the gaiter.
- dc - double crochet. Yarn over, insert hook into stitch, yarn over, pull up a loop (3 loops on hook), yarn over, pull through 2 loops, yarn over, pull through remaining 2 loops. (Used only inside the bobble.)
- bobble - a 4-dc bobble. Work 4 double crochets into the same stitch, but keep the last loop of each dc on your hook (you will have 5 loops on the hook), then yarn over and pull through all 5 loops at once, and ch 1 to close it. This makes one raised, rounded bump.
- MC - main color, the emerald green yarn.
- CC - contrast color, the blush pink yarn.
- st / sts - stitch / stitches.
- round - one complete circle of stitches worked in the round (a spiral or joined circle), as opposed to a "row" worked back and forth.
- yarn over - wrap the working yarn over your hook from back to front.
- fasten off - cut the yarn a few inches from your work and pull the tail all the way through the last loop to secure it.
Gauge
Gauge: 14 sts x 14 rounds = 4 in / 10 cm in half double crochet worked in the round.
Gauge simply means how big your stitches are. If your stitches are too big, your gaiter will be too loose; if they are too small, it will be too tight. To check your gauge, crochet a small practice swatch: chain 20, then work about 16 rounds of hdc in the round (or back and forth in rows), and measure a 4-inch / 10 cm section in the middle. Count how many stitches fit across 4 inches and how many rounds fit in 4 inches. If you have more stitches than 14, your stitches are too tight — try a larger hook. If you have fewer, your stitches are too loose — try a smaller hook. Always make the swatch before starting so your finished gaiter fits just right.
Beginner Tips Before You Start
- Use a stitch marker. Place a marker in the first stitch of every round so you always know where the round begins and ends. This is the single biggest way to avoid losing your place.
- Do not pull your yarn too tight. Keep an easy, relaxed tension. Tight stitches make the bobbles hard to work and the fabric stiff. Let the hook do the work.
- Count your bobbles. Each bobble round should have exactly 16 bobbles. Count them as you go — it is much easier to fix a mistake in the same round than several rounds later.
- Watch the offset. The bobbles shift by 2 stitches each bobble round to create the Moroccan tile lattice. Read the instruction carefully and trust the pattern — the shift is what makes the design beautiful.
- Keep the right side out. You never turn your work; the front of the fabric always faces you. This keeps the bobbles popping out on the outside.
- Change colors cleanly. When switching from emerald to blush (or back), finish the last stitch of the round with the new color, then join. This hides the color change neatly.
Step-by-Step Instructions
Notes: The gaiter is worked in the round from the bottom up without turning; the right side faces out throughout. Bobbles are worked in CC on a ground of MC hdc. The ch-1 that closes each bobble counts as part of the bobble, not a separate stitch; on the following round, work into each stitch and each ch-1 space. The beginning ch 2 does not count as a stitch. The half-drop repeat means each bobble round is staggered by 2 stitches from the round below.
Set-Up and Bottom Band
Set-Up: With MC, ch 64. Being careful not to twist the chain, join with a sl st to the first ch to form a ring.
Round 1 (MC): Ch 2, hdc in each ch around, join with sl st to first hdc. (64 hdc)
Round 2 (MC): Ch 2, hdc in each st around, join with sl st. (64 hdc)
Round 3 (MC): Ch 2, hdc in each st around, join with sl st. (64 hdc)
Bobble Body (Half-Drop Moroccan Tile Repeat)
Round 4 (CC): Ch 2. *Hdc in next 3 sts, work 1 bobble in next st; repeat from * around, join with sl st to first hdc. (16 bobbles)
Round 5 (MC): Ch 2, hdc in each st and each ch-1 space around, join with sl st. (64 hdc)
Round 6 (MC): Ch 2, hdc in each st around, join with sl st. (64 hdc)
Round 7 (MC): Ch 2, hdc in each st around, join with sl st. (64 hdc)
Round 8 (CC): Ch 2. *Hdc in next 1 st, work 1 bobble in next st, hdc in next 2 sts; repeat from * around, join with sl st. (16 bobbles, offset by 2 sts from Round 4)
Round 9 (MC): Ch 2, hdc in each st and each ch-1 space around, join with sl st. (64 hdc)
Round 10 (MC): Ch 2, hdc in each st around, join with sl st. (64 hdc)
Round 11 (MC): Ch 2, hdc in each st around, join with sl st. (64 hdc)
Round 12 (CC): Ch 2. *Work 1 bobble in next st, hdc in next 3 sts; repeat from * around, join with sl st. (16 bobbles, offset by 2 sts from Round 8)
Round 13 (MC): Ch 2, hdc in each st and each ch-1 space around, join with sl st. (64 hdc)
Round 14 (MC): Ch 2, hdc in each st around, join with sl st. (64 hdc)
Round 15 (MC): Ch 2, hdc in each st around, join with sl st. (64 hdc)
Round 16 (CC): Ch 2. *Hdc in next 2 sts, work 1 bobble in next st, hdc in next 1 st; repeat from * around, join with sl st. (16 bobbles, offset by 2 sts from Round 12)
Round 17 (MC): Ch 2, hdc in each st and each ch-1 space around, join with sl st. (64 hdc)
Round 18 (MC): Ch 2, hdc in each st around, join with sl st. (64 hdc)
Round 19 (MC): Ch 2, hdc in each st around, join with sl st. (64 hdc)
Round 20 (CC): Ch 2. *Hdc in next 3 sts, work 1 bobble in next st; repeat from * around, join with sl st. (16 bobbles, offset by 2 sts from Round 16)
Round 21 (MC): Ch 2, hdc in each st and each ch-1 space around, join with sl st. (64 hdc)
Round 22 (MC): Ch 2, hdc in each st around, join with sl st. (64 hdc)
Round 23 (MC): Ch 2, hdc in each st around, join with sl st. (64 hdc)
Round 24 (CC): Ch 2. *Hdc in next 1 st, work 1 bobble in next st, hdc in next 2 sts; repeat from * around, join with sl st. (16 bobbles, offset by 2 sts from Round 20)
Round 25 (MC): Ch 2, hdc in each st and each ch-1 space around, join with sl st. (64 hdc)
Round 26 (MC): Ch 2, hdc in each st around, join with sl st. (64 hdc)
Round 27 (MC): Ch 2, hdc in each st around, join with sl st. (64 hdc)
Round 28 (CC): Ch 2. *Work 1 bobble in next st, hdc in next 3 sts; repeat from * around, join with sl st. (16 bobbles, offset by 2 sts from Round 24)
Round 29 (MC): Ch 2, hdc in each st and each ch-1 space around, join with sl st. (64 hdc)
Round 30 (MC): Ch 2, hdc in each st around, join with sl st. (64 hdc)
Round 31 (MC): Ch 2, hdc in each st around, join with sl st. (64 hdc)
Round 32 (CC): Ch 2. *Hdc in next 2 sts, work 1 bobble in next st, hdc in next 1 st; repeat from * around, join with sl st. (16 bobbles, offset by 2 sts from Round 28)
Round 33 (MC): Ch 2, hdc in each st and each ch-1 space around, join with sl st. (64 hdc)
Round 34 (MC): Ch 2, hdc in each st around, join with sl st. (64 hdc)
Round 35 (MC): Ch 2, hdc in each st around, join with sl st. (64 hdc)
Total rounds: 35 rounds. At 14 rounds = 4 in / 10 cm, 35 rounds gives approximately 10 in / 25 cm of height, matching the finished measurement.
Assembly and Finishing
Fasten off: Cut the MC yarn about 6 inches / 15 cm from your work and pull the tail all the way through the final loop to secure it.
Weave in ends: Thread each yarn tail onto your tapestry needle. Working on the wrong side (the inside of the tube), weave the tail in and out through the backs of several stitches, changing direction once or twice so it cannot work loose. Trim the excess close to the fabric. Weave in the CC tails the same way.
Blocking: Lightly block the gaiter to settle the bobbles and even out the fabric. Mist the gaiter with cool water until it is damp but not soaking, then lay it flat on a towel or blocking mat and gently pat it into a neat tube shape. Do not press the bobbles flat with an iron — let them stay raised. Allow it to dry completely at room temperature.
Optional edging: If you would like a firmer, tidier edge around the openings, join MC to any stitch at the top or bottom opening and work one round of sc evenly around, then join with a sl st and fasten off. Repeat on the other opening if desired.
Pro Tips and Variations
- Change the colors: Swap the emerald and blush for any two colors you love — charcoal and mustard, cream and dusty rose, or navy and pale blue. Just keep one color as the plain ground (MC) and one as the bobbles (CC) so the pattern stays clear.
- Adjust the size: To make the gaiter wider or narrower, add or remove chains in multiples of 4 at the set-up (each repeat of 4 stitches holds one bobble). Keep the round count the same for the same height, or add extra plain MC rounds between bobble rounds for a taller gaiter.
- Substitute the yarn: Any aran weight wool or wool blend will work beautifully. If you use a different weight, make a gauge swatch first and change your hook size until you match 14 sts x 14 rounds = 4 in / 10 cm.
- Make it a matching set: Crochet two gaiters for a pair of leg warmers, or make one for your neck and one for a friend. The pattern is quick, portable, and perfect for using up leftover yarn.