Cherry Checkerboard Folk Coat: Free Crochet Dog Sweater Pattern with Tunisian Knit Stitch
Cherry Checkerboard Folk Coat: A Cozy First Project for Your Best Friend
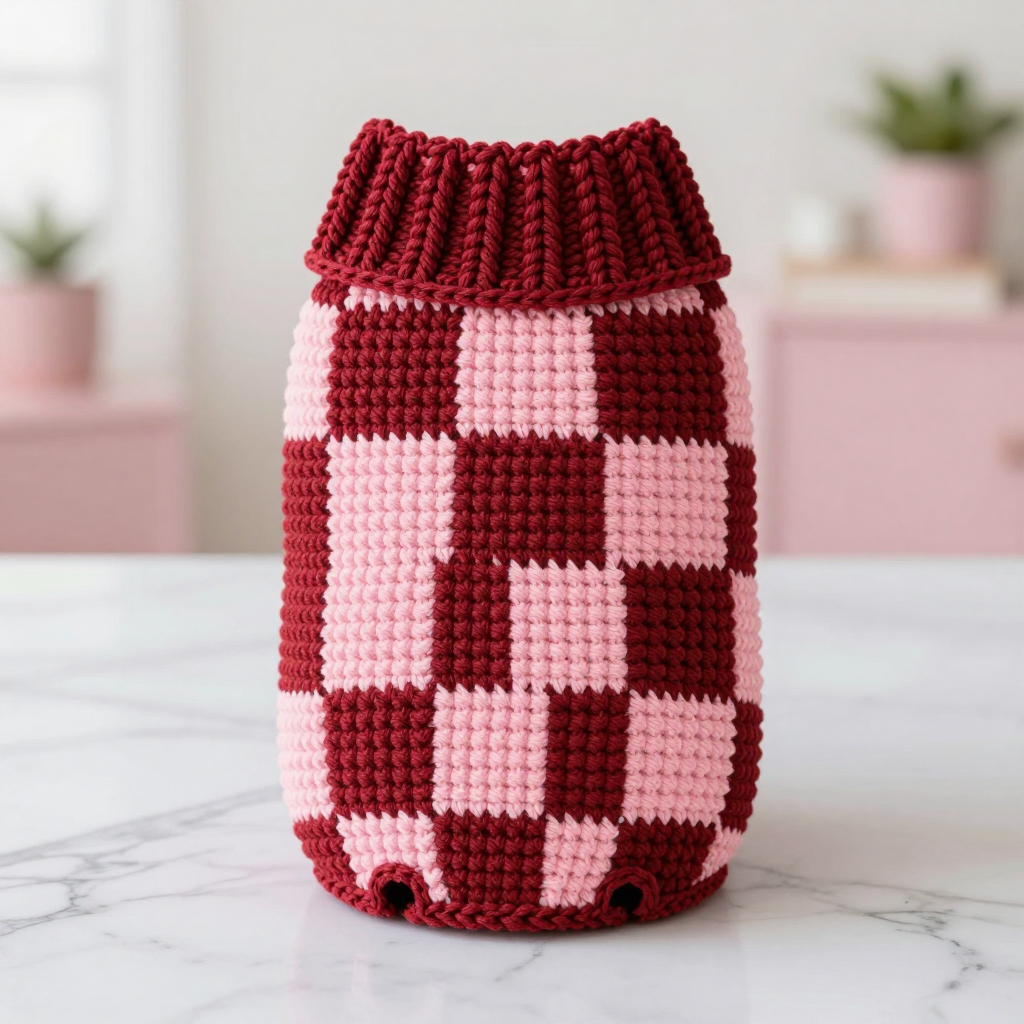
If you have never held a hook before but dream of dressing your dog in something handmade and beautiful, this is the pattern for you. The Cherry Checkerboard Folk Coat is built from twelve simple squares worked in Tunisian knit stitch, joined into a tube, and finished with a soft ribbed collar. It is perfect for the absolute beginner because every square is identical — you learn one stitch and repeat it until it feels natural. The finished coat looks like a piece of folk art: a bold cherry-red and soft-pink checkerboard with a dense, slightly ribbed texture that resembles knitting, warm and structured against your dog's back. Slip it over the head and your pup is instantly cozy, stylish, and ready for a winter walk.
Materials Needed
- Yarn: Worsted weight (CYC 4) cotton yarn, approximately 330–400 yards total — 200–240 yards cherry red, 130–160 yards soft pink.
- Tunisian crochet hook: 6.0 mm (J-10) Tunisian hook with a cable (the cable holds the loops of the forward pass).
- Standard crochet hook: 5.0 mm (H-8) for joining squares, edging, and the collar.
- Stitch markers: at least 4, to mark corners, leg openings, and the start of rounds.
- Tapestry needle: a blunt, large-eye needle for weaving in ends and seaming.
- Scissors for cutting yarn.
- Measuring tape for checking squares and fit.
Finished size: Medium dog — fits chest 18–20 inches (46–51 cm), back length 14 inches (36 cm), neck 12–14 inches (30–36 cm). Finished garment: 20-inch chest circumference, 14-inch length, 13-inch neck opening. Each square measures 5 x 5 inches (12.7 x 12.7 cm).
Abbreviations and Beginner Glossary
- ch — chain: yarn over the hook and pull it through the loop on your hook. This makes a small "V" of linked loops.
- Tks — Tunisian knit stitch: insert the hook between the front and back vertical bars of the stitch below, yarn over, and pull up a loop. It looks like a tiny knit "V".
- Tss — Tunisian simple stitch: insert the hook under the front vertical bar only, yarn over, pull up a loop.
- Forward pass — the row where you pull up loops onto the hook, left to right.
- Return pass (RetP) — the row back: yarn over and pull through one loop, then yarn over and pull through two loops across until one loop remains.
- sc — single crochet: insert hook into stitch, yarn over, pull up a loop (2 loops on hook), yarn over, pull through both loops.
- sc2tog — single crochet two together (a decrease): insert hook in first stitch, pull up a loop, insert hook in next stitch, pull up a loop, yarn over, pull through all three loops.
- dc — double crochet: yarn over, insert hook, pull up a loop (3 loops), yarn over, pull through two, yarn over, pull through last two.
- fpdc — front post double crochet: work a dc around the post (the vertical body) of the stitch below, inserting the hook from front to back.
- bpdc — back post double crochet: work a dc around the post of the stitch below, inserting the hook from back to front.
- sl st — slip stitch: insert hook, yarn over, pull through both the stitch and the loop on your hook at once.
- sts — stitches.
- bind off — finishing a Tunisian piece so the loops become secure stitches (here, worked in Tss).
Gauge
14 Tunisian knit stitches x 14 rows = 4 inches (10 cm) in Tunisian knit stitch with the 6.0 mm hook.
Gauge matters because it controls size: if your stitches are too big, the coat will be baggy; too small, and it won't fit over your dog's head. To check, make one practice square exactly as written below (18 stitches wide, 18 rows tall). It should measure 5 x 5 inches. If it is larger than 5 inches, try a smaller hook; if smaller, try a larger hook. Always check gauge before making all twelve squares.
Beginner Tips Before You Start
- Practice one square first. Make a single square and measure it before committing to all twelve. It is much easier to fix gauge on square one.
- Count your loops on the forward pass. You should always have 18 loops on the hook before starting the return pass. Count every row until it becomes habit.
- Do not pull the yarn too tight. Keep your loops relaxed and even; tight loops make the fabric stiff and hard to work into on the next row.
- Use stitch markers to mark the first and last stitch of each square and to mark the leg openings and round starts later.
- Leave long tails. A 12-inch tail on every square gives you plenty of yarn for seaming without knots.
- Keep your squares the same size. Lay finished squares flat and compare them; if one is noticeably bigger, adjust your tension on the next one.
Step-by-Step Instructions
Squares (make 12 total: 6 cherry red, 6 soft pink)
Row 1 (forward): With the 6.0 mm Tunisian hook, ch 18. Pull up a loop in each ch across. (18 loops on hook)
Row 1 (return): RetP across. (18 sts)
Rows 2–18: Tks across in the forward pass, RetP in the return pass. (18 sts x 18 rows = 5 x 5 inches)
Bind off loosely in Tss. Leave a 12-inch tail for seaming. Do not weave in tails yet. Make 6 squares in cherry red and 6 in soft pink.
Checkerboard Layout
Arrange the 12 squares in a 4-wide x 3-tall grid, alternating colors like a checkerboard:
- Row 1 (top): Red, Pink, Red, Pink
- Row 2: Pink, Red, Pink, Red
- Row 3 (bottom): Red, Pink, Red, Pink
Joining Into a Tube
Step 1: With the 5.0 mm hook and matching yarn, whipstitch or sc-join the squares together along the vertical seams first, following the checkerboard layout above. Work a flat seam so the coat lies smooth against the dog.
Step 2: Join the two short ends of the 4-wide panel together to form a tube — this becomes the body of the coat. Seam with an sc join or whipstitch using matching color.
Step 3: The tube now measures approximately 20 inches around and 15 inches tall (3 squares tall).
Shaping the Body (bottom edge and leg openings)
The tube is worn with the top edge at the neck and the bottom edge at the hindquarters. The belly area needs to be open for comfort and leg movement.
Round 1: With the 5.0 mm hook and cherry red, join yarn at the bottom edge of the tube at the center-back. Sc evenly around the bottom edge (approximately 70 sc). Join with sl st. (70 sc)
Round 2: Ch 1, sc in each sc around. Join. (70 sc)
Rounds 3–4: Repeat Round 2. Fasten off. (70 sc)
Leg Openings
Try the tube on the dog (or measure): mark two points on the lower front edge approximately 4 inches apart for the front leg openings, centered on the chest side.
Row 1: Join cherry red at the first marker. Ch 1, sc in next 8 sts. Turn. (8 sc)
Rows 2–3: Ch 1, sc in each sc across. Turn. (8 sc)
Fasten off. Repeat for the second leg opening. These create small reinforced flaps at the leg openings.
Belly Panel (optional modesty panel)
With the 5.0 mm hook and soft pink, ch 12.
Row 1: Sc in 2nd ch from hook and each ch across. (11 sc)
Rows 2–10: Ch 1, sc in each sc across. Turn. (11 sc)
Fasten off, leaving a long tail. Sew the belly panel between the two front leg openings along the lower front edge, leaving the top open for the chest.
Ribbed Collar
With the 5.0 mm hook and cherry red, join yarn at the top edge (neck opening) at center-back.
Round 1: Ch 2 (counts as first dc), dc evenly around the top edge (approximately 60 dc). Join with sl st to top of ch-2. (60 dc)
Round 2: Ch 2, fpdc around first dc, bpdc around next dc, alternate fpdc and bpdc around. Join. (60 sts)
Rounds 3–5: Repeat Round 2, maintaining the rib pattern (fpdc over fpdc, bpdc over bpdc). (60 sts)
Round 6: Ch 1, sc in each st around. Join. Fasten off. Weave in ends. (60 sc)
The collar measures approximately 2 inches tall and stretches gently to fit over the dog's head.
Assembly and Finishing
Seaming: Thread a tapestry needle with a square's tail and whipstitch (bring the needle through both edges from front to back, over and over) along each seam, matching stitch to stitch so the checkerboard lines stay straight. Pull each stitch snug but not tight so the seam stays flat.
Weaving in ends: Turn the coat inside out. Thread each tail onto the tapestry needle and weave it through the back of several stitches in one direction, then back through a few in the opposite direction to lock it. Trim close to the fabric.
Blocking: Mist the finished coat lightly with water and lay it flat, shaping the collar and body with your hands. Let it dry completely — cotton holds its shape beautifully after blocking.
Fit check: Try the coat on the dog. It should slip over the head easily and sit with the collar at the neck and the bottom edge at the hindquarters.
Care: Hand wash cold, lay flat to dry. Do not tumble dry.
Pro Tips and Variations
- Change the palette: Swap cherry red and soft pink for any two contrasting worsted cottons — try mustard and cream, or forest green and oatmeal — for a different folk-art feel.
- Adjust the size: For a smaller dog, work squares with ch 14 and 14 rows (about 4 inches each); for a larger dog, use ch 22 and 22 rows (about 6 inches each). Always re-check gauge and measure your dog's chest first.
- Substitute yarn: A worsted acrylic or wool blend works just as well and is machine washable; just check your gauge square again because fiber content changes how the fabric drapes.
- Add a border: Work one round of sc in cherry red around the bottom edge and leg openings for a crisp, finished look that also strengthens the edges.