Whispering Willow Cable Knit Coffee Cozy Free Pattern – A Forest-Inspired Mug Hug
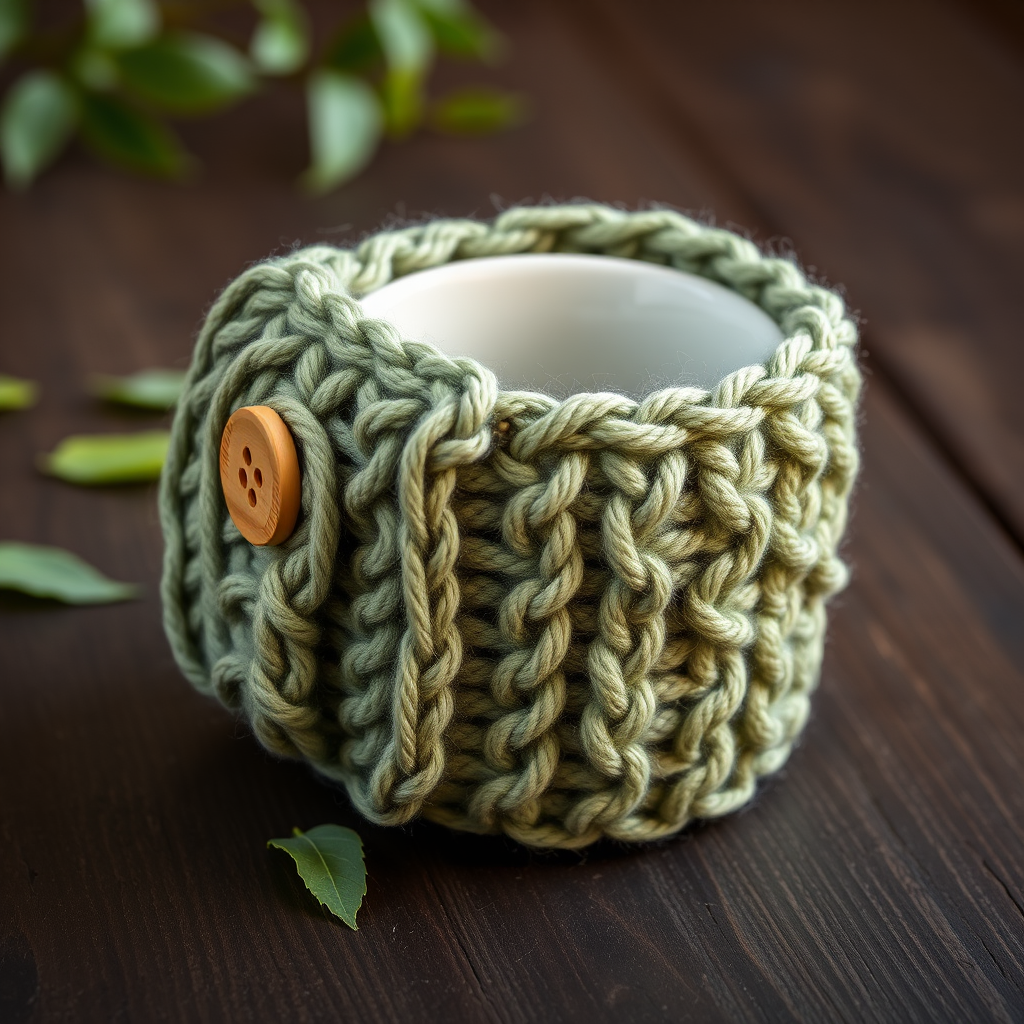
Whispering Willow Cable Knit Coffee Cozy Free Pattern – A Forest-Inspired Mug Hug
Wrap your morning brew in the gentle embrace of a hand-knitted cable cozy, inspired by the quiet rustle of willow leaves. This textured mug hug is a quick, satisfying project that adds a touch of woodland charm to your daily ritual. Whether you're a seasoned knitter looking for a fast weekend project or a beginner eager to try cables for the first time, this pattern is designed to be both approachable and rewarding. The result is a beautiful, functional piece that makes a thoughtful handmade gift for coffee lovers, tea drinkers, or anyone who appreciates the cozy details of life.
This pattern creates a rectangular cozy that wraps around a standard 12 oz mug and secures with a single button. The cable pattern is simple enough to memorize quickly but produces a stunning, textured fabric that looks far more complex than it is. The sage green yarn evokes a forest floor, and the twisting cables mimic the branches of a willow tree, making this a perfect project for nature lovers and crafters alike.
Materials Needed
Before you begin, gather the following supplies. All items are readily available at your local yarn shop or online.
Yarn
- Worsted weight yarn in a soft sage green (approx. 50g / 100 yards). A wool blend or acrylic will work beautifully. Choose a yarn with good stitch definition to make the cables pop.
Needles & Notions
- US 6 (4.0 mm) knitting needles – straight or circular (if you prefer to knit flat on a circular needle).
- Cable needle – a small, double-pointed needle or a specialized U-shaped cable needle.
- Yarn needle for weaving in ends.
- One decorative button – a natural wooden round with a subtle grain is ideal, but any button with a shank or holes that fits through a buttonhole will work.
- Scissors.
- Tape measure or ruler.
Gauge
20 stitches and 28 rows = 4 inches in stockinette stitch. It's always a good idea to knit a small swatch to check your gauge, but for this project, a slight variation won't ruin the fit. The cozy is meant to be snug but stretchy.
Step-by-Step Instructions
Follow these instructions carefully, and you'll have a beautiful cable knit coffee cozy in no time. The pattern is written for flat knitting (back and forth on straight needles).
Finished Size
Fits a standard 12 oz mug (approx. 8 inches around and 3.5 inches tall).
Abbreviations
- CO: cast on
- K: knit
- P: purl
- C4F: slip 2 stitches to cable needle, hold in front, knit 2, knit 2 from cable needle
- C4B: slip 2 stitches to cable needle, hold in back, knit 2, knit 2 from cable needle
- K2tog: knit two stitches together
- YO: yarn over
- BO: bind off
- RS: right side (the side that will face outward)
- WS: wrong side (the inside of the cozy)
Getting Started: Cast On
CO 30 stitches using your preferred method (long-tail cast on is recommended for a neat, stretchy edge).
Knitting the Cable Pattern
Now you'll work the main body of the cozy. The pattern is a 12-row repeat. Pay close attention to the row numbers and whether you're on the right side (RS) or wrong side (WS) of the work.
Row 1 (RS): K2, P2, K6, P2, K6, P2, K6, P2, K2
Row 2 (WS): P2, K2, P6, K2, P6, K2, P6, K2, P2
Row 3 (RS): K2, P2, C4F, K2, P2, C4B, K2, P2, C4F, K2, P2, K2
Row 4 (WS): Repeat Row 2
Row 5 (RS): Repeat Row 1
Row 6 (WS): Repeat Row 2
Row 7 (RS): K2, P2, K2, C4B, P2, K2, C4F, P2, K2, C4B, P2, K2
Row 8 (WS): Repeat Row 2
Row 9 (RS): Repeat Row 1
Row 10 (WS): Repeat Row 2
Row 11 (RS): Repeat Row 3
Row 12 (WS): Repeat Row 2
Repeat Rows 1-12 until the piece measures approximately 8 inches from the cast-on edge, ending with a WS row (Row 2, 4, 6, 8, 10, or 12). This ensures you're ready to work the buttonhole on a right-side row.
Creating the Buttonhole
This row creates a neat, centered buttonhole using a yarn over (YO) and a decrease (K2tog).
Buttonhole Row (RS): K2, P2, K6, P2, K2tog, YO, K2, YO, K2tog, P2, K6, P2, K2
Let's break this down to make sure it's clear:
- K2, P2, K6, P2 – work the first part of the pattern as usual.
- K2tog – knit the next two stitches together (this decreases one stitch).
- YO – bring the yarn to the front, then over the needle to the back (this creates an extra loop, increasing one stitch).
- K2 – knit the next two stitches.
- YO – yarn over again.
- K2tog – knit the next two stitches together.
- P2, K6, P2, K2 – finish the row as per the pattern.
You'll notice that the YOs and K2togs balance each other out, so you'll still have 30 stitches on your needle. The buttonhole is formed by the two YOs in the center, creating a small gap.
Finishing the Top Edge
After the buttonhole row, work 2 more rows in the established pattern to create a neat, finished edge above the buttonhole.
Next Row (WS): Repeat Row 2 (P2, K2, P6, K2, P6, K2, P6, K2, P2)
Next Row (RS): Repeat Row 1 (K2, P2, K6, P2, K6, P2, K6, P2, K2)
Binding Off
BO all stitches in pattern. This means you'll knit the knit stitches and purl the purl stitches as you bind off. This creates a stretchy, neat edge that matches the ribbed sides. To do this:
- Knit the first stitch.
- Purl the second stitch (since it's a purl stitch in the pattern).
- Pass the first stitch over the second stitch (bind off).
- Continue in this manner, following the K2, P2 pattern across the row, until all stitches are bound off.
Finishing Touches
Now it's time to bring your cozy to life.
- Weave in all ends: Use your yarn needle to weave in the cast-on tail and the bind-off tail on the wrong side of the work. Weave in a zigzag pattern through the purl bumps to secure them invisibly.
- Sew on the button: Position the button on the end of the cozy opposite the buttonhole. The buttonhole should be on the right side of the cozy when wrapped around the mug. Sew the button securely using a needle and thread (or a small piece of the yarn if you prefer). Make sure the button aligns perfectly with the buttonhole when the cozy is wrapped around the mug.
- Wrap and enjoy: Wrap the cozy around your mug, inserting the button through the buttonhole. The cozy should fit snugly but comfortably.
- Block lightly (optional): If you want to even out the stitches and give the cables extra definition, you can lightly block the cozy. Soak it in lukewarm water with a drop of wool wash, gently squeeze out excess water (don't wring), lay it flat on a towel, and shape it to the correct dimensions. Let it dry completely before using.
Your Whispering Willow Cable Knit Coffee Cozy is complete! This charming, forest-inspired mug hug is perfect for your own morning ritual or as a heartfelt handmade gift. The cable pattern is addictive to knit, and you may find yourself making several in different colors to match every season. Enjoy the quiet comfort of your handcrafted creation.


