The Whispering Waves Reversible Baby Shell Blanket Free Pattern
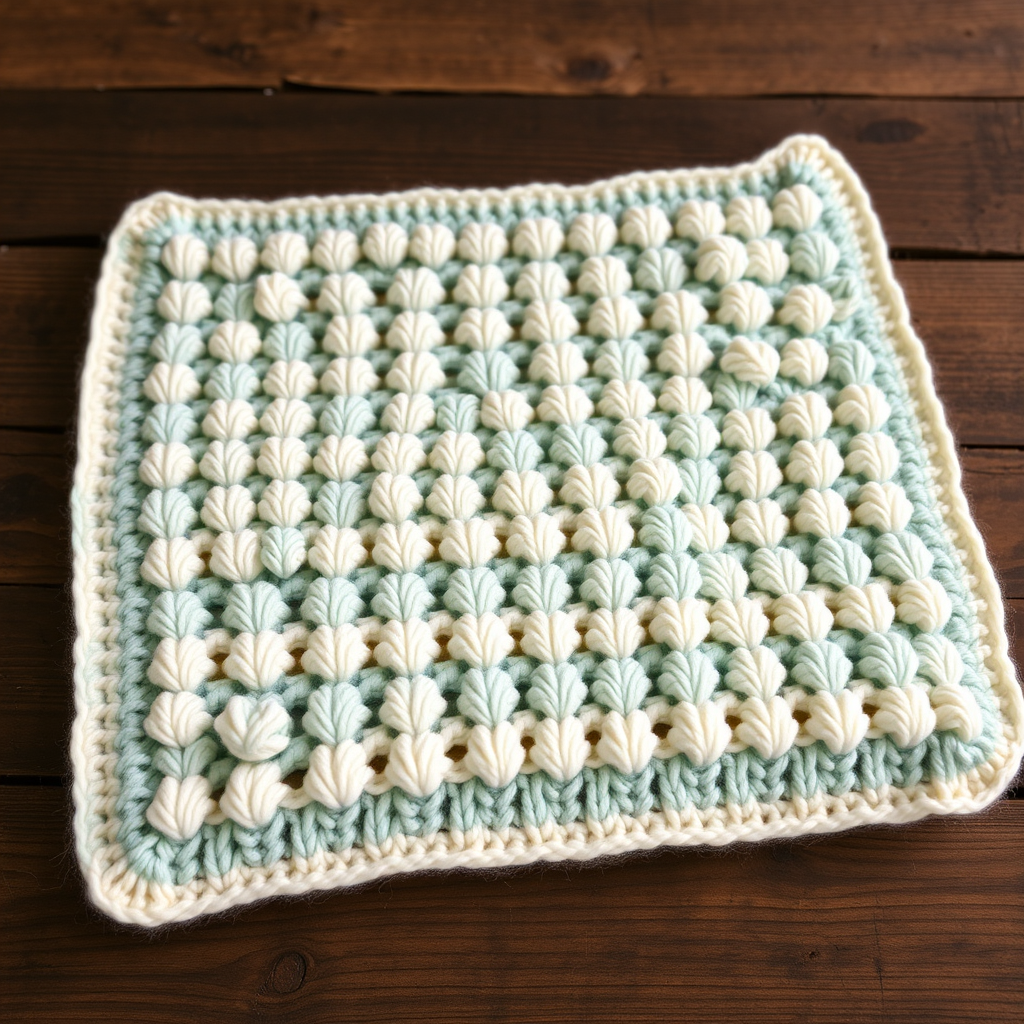
The Whispering Waves Reversible Baby Shell Blanket: A Free Knitting Pattern
There is something truly magical about creating a handmade heirloom for a new little one. The Whispering Waves Reversible Baby Shell Blanket is more than just a baby blanket—it's a tactile experience designed to soothe and delight. With its deeply textured, rhythmic shell-and-ridge stitch, this pattern mimics the gentle ebb and flow of ocean waves, offering a sensory playground for tiny fingers. Best of all, this clever two-sided design is fully reversible, meaning it looks stunning from every angle—perfect for a baby who loves to flip over mid-nap. Whether you're a seasoned knitter or a confident beginner looking for a rewarding project, this heirloom-quality blanket is a joy to create and an even greater joy to gift.
In this comprehensive guide, we'll walk you through every step, from gathering your materials to the final blocking process. By the end, you'll have a beautiful, washable, and deeply textured blanket that will be cherished for generations.
Materials Needed
Before you cast on, let's gather everything you'll need. The beauty of this pattern lies in its simplicity—you don't need a huge arsenal of tools, just the right ones.
Yarn
- Weight: Worsted weight (#4) superwash merino or cotton blend
- Yardage: 1000–1200 yards (approximately 3–4 skeins, depending on the brand)
- Recommended Yarns: Cascade 220 Superwash (a classic, durable choice) or Lion Brand Comfy Cotton Blend (soft and breathable for warmer climates)
Pro Tip: Superwash merino is machine-washable, making it ideal for a baby item that will need frequent cleaning. The cotton blend is a fantastic alternative if you prefer a cooler, more breathable fabric.
Needles
- US 7 (4.5 mm) 32-inch circular knitting needle (used for the magic loop method or to accommodate the large number of stitches)
Why circular? Even though you're knitting flat, a long circular needle holds the 122+ stitches comfortably, preventing cramping in your hands and allowing the fabric to rest naturally in your lap.
Gauge
- 18 stitches and 24 rows = 4 inches in stockinette stitch (blocked)
Always knit a gauge swatch! It's a small investment of time that ensures your blanket comes out the correct size. If your gauge is off, adjust your needle size accordingly.
Additional Tools
- Tapestry needle (for weaving in ends)
- Stitch markers (optional, but helpful for keeping track of pattern repeats)
- Blocking mats and pins (or a clean towel and a flat surface)
- Wool wash (like Eucalan or Soak) for blocking
Step-by-Step Instructions
Now, let's dive into the pattern. This blanket is worked flat, and the special stitch pattern is surprisingly simple once you get into the rhythm. We'll break it down into manageable sections.
Finished Size & Customization
The pattern as written produces a blanket approximately 30 inches wide x 36 inches long—perfect for a stroller or crib. To adjust the size, simply add or subtract multiples of 8 stitches. For a larger throw, add 8 stitches per repeat. For a lighter summer blanket, you can use a DK weight yarn with US 6 needles, but remember to re-calculate your gauge.
Stitch Abbreviations
Before you begin, familiarize yourself with these standard abbreviations:
- K = knit
- P = purl
- K2tog = knit two stitches together (right-leaning decrease)
- SSK = slip, slip, knit (left-leaning decrease)
- YO = yarn over
- Sl = slip stitch purlwise
- Rep = repeat
The Special Stitch Pattern (Worked over a multiple of 8 + 2 stitches)
This is the heart of the blanket. The pattern creates a beautiful shell-and-ridge effect that is mirrored on both sides. Here's the full 8-row repeat:
- Row 1 (RS): K1, *K2, P4, K2*, rep from * to * to last stitch, K1.
- Row 2 (WS): K1, *P2, K4, P2*, rep from * to * to last stitch, K1.
- Row 3: K1, *SSK, YO, K4, YO, K2tog*, rep from * to * to last stitch, K1.
- Row 4: K1, *P2, K4, P2*, rep from * to * to last stitch, K1.
- Row 5: K1, *K2, P4, K2*, rep from * to * to last stitch, K1.
- Row 6: K1, *P2, K4, P2*, rep from * to * to last stitch, K1.
- Row 7: K1, *K4, YO, K2tog, YO, SSK*, rep from * to * to last stitch, K1.
- Row 8: K1, *P2, K4, P2*, rep from * to * to last stitch, K1.
Note: The edge stitches (the first and last K1) create a neat selvedge edge. The pattern repeat is between the asterisks (* *).
Getting Started: Cast On & Border
Follow these steps to begin your blanket:
- Cast on 122 stitches loosely. Use a stretchy cast-on method like the long-tail cast-on, but be sure not to pull too tightly. A loose cast-on is crucial for a flexible edge that won't pucker.
- Work a 6-row garter stitch border. Knit every stitch for 6 rows. This creates a flat, sturdy border that prevents the blanket from curling—a common issue with stockinette-based patterns.
Working the Main Body
Once your border is complete, it's time to start the shell-and-ridge pattern:
- Begin the pattern: Start with Row 1 of the special stitch pattern. Remember to keep the first and last stitch as K1 for the selvedge edge.
- Repeat Rows 1–8: Continue repeating these 8 rows until the blanket measures approximately 34 inches from the cast-on edge, ending with a Row 8. This ensures you finish on a complete pattern repeat, leaving you ready for the final border.
Pro Tip: Place a stitch marker after the first stitch and before the last stitch. This helps you keep track of your selvedge edges and ensures you never accidentally lose them in the pattern.
Finishing the Top Border
To mirror the bottom border and create a symmetrical finish:
- Work another 6-row garter stitch border. Knit every stitch for 6 rows, just as you did at the beginning.
- Bind off loosely. Use a stretchy bind-off method to maintain the blanket's flexibility. Jenny's Surprisingly Stretchy Bind-Off is an excellent choice. Alternatively, you can use a larger needle (US 9 or 10) to bind off, which also creates a loose edge.
Weaving in Ends
Thread your tapestry needle with the yarn tails from your cast-on and bind-off edges, as well as any color changes if you're using multiple colors. Weave them in securely along the selvedge edge, being careful not to pull too tightly, which can distort the fabric. Trim any excess yarn.
Blocking: The Final Step
Blocking is essential for this pattern to bloom. It evens out the stitches, opens up the yarn overs, and gives the blanket its professional, heirloom finish.
- Soak: Fill a clean sink or basin with lukewarm water and add a drop of wool wash (like Eucalan or Soak). Submerge the blanket and let it soak for 15–20 minutes. Do not agitate or wring—this can felt the yarn.
- Press out water: Gently press the water out of the blanket. Roll it in a clean towel and press to remove excess moisture.
- Lay flat to dry: Place the blanket on blocking mats or a clean, dry towel. Gently stretch it to the desired dimensions (30" x 36"). Use pins to hold the edges in place if needed, especially along the garter stitch borders.
- Let it dry completely: This may take 24–48 hours. Once dry, unpin and enjoy your beautiful creation!
Understanding the Reversible Nature
One of the most magical aspects of this pattern is its reversibility. Because the decreases (SSK and K2tog) are mirrored and paired with yarn overs on both sides, the fabric looks nearly identical from the front and back. The only subtle difference is the direction in which the shell curves. This makes the blanket perfect for a baby who loves to flip over—it looks beautiful no matter which side is up. It also means you don't have to worry about "wrong sides" when wrapping your little one.
Customization Ideas
While the pattern is beautiful as written, feel free to make it your own:
- Color Palette: The sample uses serene seafoam green, soft cream, and pale aqua in gentle horizontal stripes. You can easily create stripes by changing colors every few rows. Just remember to weave in ends as you go or carry the yarn up the side.
- Size Adjustments: To make a larger throw, add 8 stitches per repeat. For a smaller stroller blanket, subtract 8 stitches. The pattern is incredibly versatile.
- Yarn Substitutions: For a lighter, summer-weight blanket, use a DK weight yarn and US 6 needles. Just be sure to knit a gauge swatch first to ensure your finished size is correct.
Final Thoughts
The Whispering Waves Reversible Baby Shell Blanket is a labor of love that will be treasured for years. Its rhythmic stitch pattern is meditative to knit, and the finished result is a stunning, textured heirloom that feels as good as it looks. Whether you're knitting it for your own little one or as a heartfelt gift, this blanket is sure to become a family favorite.
Happy knitting, and may your needles always be full of love!