Enchanted Meadow Baby Blanket Free Pattern – Knit a Whimsical Wildflower Garden
Enchanted Meadow Baby Blanket Free Pattern – Knit a Whimsical Wildflower Garden
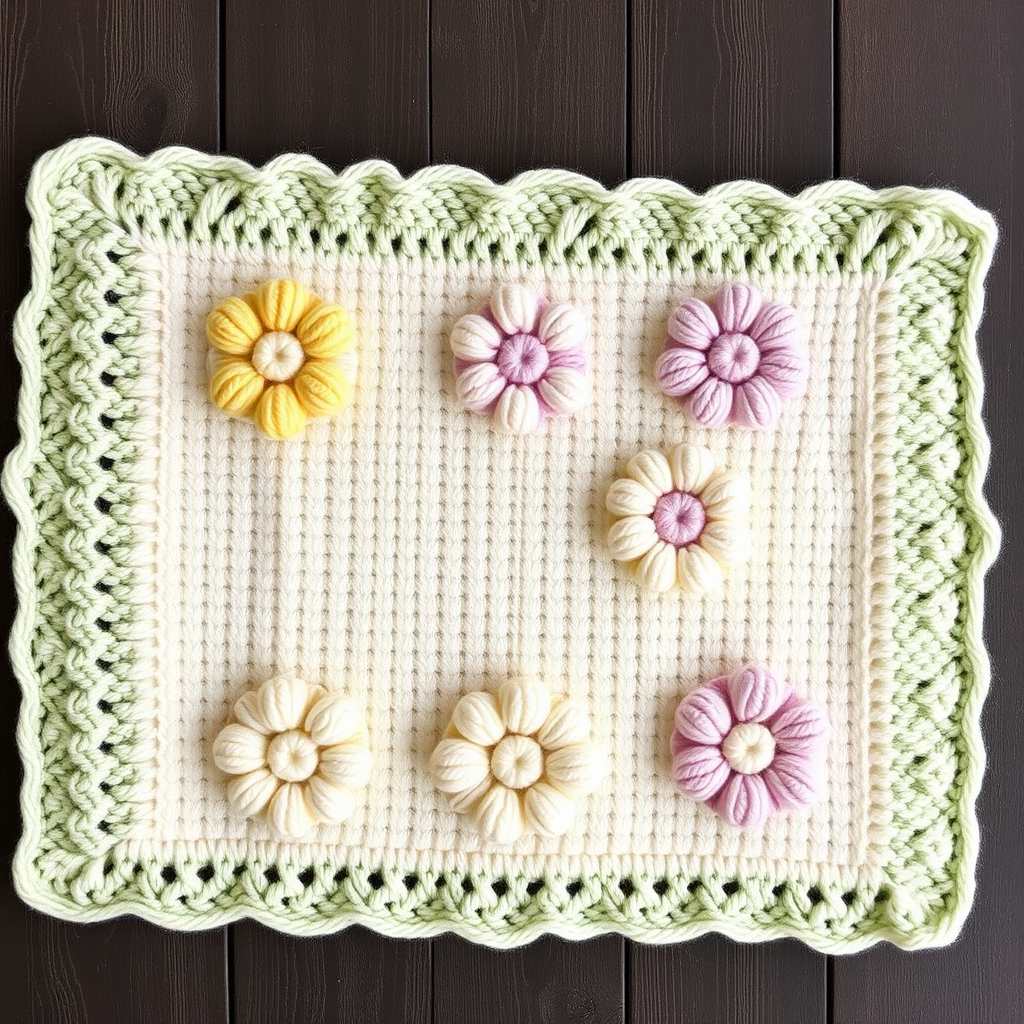
Wrap your little one in a hand-knitted meadow of soft, textured flowers and gentle waves. This enchanting blanket combines cozy warmth with a dreamy, nature-inspired design that grows with your child. The Enchanted Meadow Baby Blanket is more than just a practical accessory—it's an heirloom piece that captures the magic of a spring garden in every stitch. With its pastel palette and dimensional floral motifs, this blanket is perfect for baby showers, newborn gifts, or creating a special keepsake for your own family.
Whether you're a seasoned knitter looking for a rewarding project or a confident beginner ready to expand your skills, this pattern offers a delightful journey through texture, color, and timeless design. The combination of gentle wave borders and raised flower motifs creates a sensory experience that babies will love to touch and explore.
Materials Needed
Before you begin your knitting adventure, gather these essential supplies:
Yarn
Worsted weight (Category 4) yarn in 5 colors:
- Main Color (MC): Soft Sage Green – approximately 400 yards
- Color A: Buttercup Yellow – approximately 150 yards
- Color B: Blush Pink – approximately 150 yards
- Color C: Lavender – approximately 150 yards
- Color D: Cream – approximately 150 yards
Tools & Notions
- US Size 8 (5.0 mm) knitting needles (straight or circular for comfort)
- Tapestry needle for weaving in ends
- Stitch markers (at least 10, preferably locking style)
- Scissors
- Measuring tape
Gauge
18 stitches and 24 rows = 4 inches in stockinette stitch
Always knit a gauge swatch before starting to ensure your blanket measures correctly. If your gauge is off, adjust your needle size accordingly.
Pattern Overview
Finished Size
Approximately 30 inches wide x 36 inches long – perfect for a crib, stroller, or cuddle time.
Abbreviations
- CO: Cast on
- K: Knit
- P: Purl
- Yo: Yarn over
- K2tog: Knit two together (right-leaning decrease)
- SSK: Slip, slip, knit (left-leaning decrease)
- PM: Place marker
- SM: Slip marker
- Rep: Repeat
- St(s): Stitch(es)
- RS: Right side
- WS: Wrong side
Pattern Notes
- The blanket is worked flat in one piece from the bottom up.
- The border is worked first, then the main body with repeating textured flower and wave patterns.
- Use a separate ball of yarn for each color section to avoid long floats; weave in ends as you go.
- The flower motifs are created using intarsia technique—you'll be working with multiple colors in the same row. Take your time and twist yarns at color changes to prevent holes.
- Always slip markers as you come to them unless otherwise instructed.
Step-by-Step Instructions
Border (worked in MC – Soft Sage Green)
Cast On: CO 120 sts using your preferred method (long-tail cast on works beautifully).
Row 1 (RS): K all sts.
Row 2 (WS): K all sts.
Row 3: K1, *yo, K2tog* rep to last st, K1. (This creates the eyelet border)
Row 4: K all sts.
Row 5: K all sts.
Row 6: K all sts.
Your border is complete. The eyelet row will create a delicate, decorative edge once blocked.
Main Body – Wave Pattern (MC)
Now we'll create the gentle wave pattern that frames the flower motifs. This section uses only the Main Color.
Row 7 (RS): K1, *K6, yo, K1, yo, K6, SSK, K2tog* rep to last st, K1.
Explanation: The yarn overs create increases, while the SSK and K2tog create decreases. Together, they form the wave shape. The pattern repeat is 18 stitches, so with 120 stitches you'll have 6 full repeats plus 1 stitch on each edge.
Row 8 (WS): P all sts.
Row 9: K1, *K7, yo, K1, yo, K5, SSK, K2tog* rep to last st, K1.
Row 10: P all sts.
Row 11: K1, *K8, yo, K1, yo, K4, SSK, K2tog* rep to last st, K1.
Row 12: P all sts.
Row 13: K1, *K9, yo, K1, yo, K3, SSK, K2tog* rep to last st, K1.
Row 14: P all sts.
Row 15: K1, *K10, yo, K1, yo, K2, SSK, K2tog* rep to last st, K1.
Row 16: P all sts.
Row 17: K1, *K11, yo, K1, yo, K1, SSK, K2tog* rep to last st, K1.
Row 18: P all sts.
Row 19: K1, *K12, yo, K1, yo, SSK, K2tog* rep to last st, K1.
Row 20: P all sts.
Notice how the knit stitches before the yarn overs increase by one each right-side row, while the stitches after decrease. This creates the beautiful wave curve. The wrong-side rows are always purled to create stockinette texture.
Flower Motif Section (worked in intarsia with Colors A, B, C, D)
This is where the magic happens! Each flower motif is worked over 20 rows, and you'll repeat the same sequence with each of the four colors. The cream background (MC) frames each flower.
Understanding the Structure: Each row has 120 stitches. The pattern divides into 6 sections of 20 stitches each. Each section has 10 MC stitches, then 10 flower-color stitches. You'll place markers to separate these sections.
First Flower Motif – Color A (Buttercup Yellow)
Row 21 (RS): With MC, K1, *K10, PM, switch to Color A, K10, PM, switch to MC, K10* rep to last st, K1.
Tip: When switching colors, gently twist the old yarn over the new yarn to prevent holes. Don't pull too tightly—keep the tension even.
Row 22 (WS): With MC, P1, *P10, SM, switch to Color A, P10, SM, switch to MC, P10* rep to last st, P1.
Row 23: With MC, K1, *K10, SM, with Color A: K1, yo, K2tog, K4, SSK, yo, K1, SM, with MC: K10* rep to last st, K1.
Explanation: This row begins shaping the flower petals. The yarn overs and decreases create the petal curves.
Row 24: With MC, P1, *P10, SM, with Color A: P all sts, SM, with MC: P10* rep to last st, P1.
Row 25: With MC, K1, *K10, SM, with Color A: K2, yo, K2tog, K2, SSK, yo, K2, SM, with MC: K10* rep to last st, K1.
Row 26: With MC, P1, *P10, SM, with Color A: P all sts, SM, with MC: P10* rep to last st, P1.
Row 27: With MC, K1, *K10, SM, with Color A: K3, yo, K2tog, SSK, yo, K3, SM, with MC: K10* rep to last st, K1.
Row 28: With MC, P1, *P10, SM, with Color A: P all sts, SM, with MC: P10* rep to last st, P1.
Row 29: With MC, K1, *K10, SM, with Color A: K4, yo, K3tog, yo, K4, SM, with MC: K10* rep to last st, K1.
Note: K3tog (knit three together) is a double decrease that creates the pointed tip of the flower petal.
Row 30: With MC, P1, *P10, SM, with Color A: P all sts, SM, with MC: P10* rep to last st, P1.
Row 31: With MC, K1, *K10, SM, with Color A: K5, yo, K1, yo, K5, SM, with MC: K10* rep to last st, K1.
Explanation: Now we begin the second half of the flower—the yarn overs create increases that will form the lower petals.
Row 32: With MC, P1, *P10, SM, with Color A: P all sts, SM, with MC: P10* rep to last st, P1.
Row 33: With MC, K1, *K10, SM, with Color A: K6, yo, K1, yo, K6, SM, with MC: K10* rep to last st, K1.
Row 34: With MC, P1, *P10, SM, with Color A: P all sts, SM, with MC: P10* rep to last st, P1.
Row 35: With MC, K1, *K10, SM, with Color A: K7, yo, K1, yo, K7, SM, with MC: K10* rep to last st, K1.
Row 36: With MC, P1, *P10, SM, with Color A: P all sts, SM, with MC: P10* rep to last st, P1.
Row 37: With MC, K1, *K10, SM, with Color A: K8, yo, K1, yo, K8, SM, with MC: K10* rep to last st, K1.
Row 38: With MC, P1, *P10, SM, with Color A: P all sts, SM, with MC: P10* rep to last st, P1.
Row 39: With MC, K1, *K10, SM, with Color A: K9, yo, K1, yo, K9, SM, with MC: K10* rep to last st, K1.
Row 40: With MC, P1, *P10, SM, with Color A: P all sts, SM, with MC: P10* rep to last st, P1.
Congratulations! Your first row of flowers is complete. The increases in rows 31-39 create the rounded bottom of each flower, giving it that beautiful three-dimensional quality.
Repeat Flower Motif with Color B (Blush Pink)
Rows 41-60: Repeat Rows 21-40, but replace Color A with Color B.
Tip: Cut Color A yarn leaving a 6-inch tail to weave in later. Join Color B at the beginning of Row 41.
Repeat Flower Motif with Color C (Lavender)
Rows 61-80: Repeat Rows 21-40, but replace Color A with Color C.
Repeat Flower Motif with Color D (Cream)
Rows 81-100: Repeat Rows 21-40, but replace Color A with Color D.
Now you have four beautiful rows of flowers in yellow, pink, lavender, and cream. The cream flowers will blend slightly with the background, creating a lovely subtle effect.
Wave Pattern (MC)
Rows 101-120: Repeat Rows 7-20.
This mirrors the wave pattern at the bottom of the blanket, creating a symmetrical frame around the flower garden.
Border (MC)
Row 121: K all sts.
Row 122: K all sts.
Row 123: K1, *yo, K2tog* rep to last st, K1. (Eyelet row matching the bottom border)
Row 124: K all sts.
Row 125: K all sts.
Row 126: K all sts.
Bind Off
Bind Off (WS): K all sts loosely.
Tip: Use a larger needle for binding off (like a US 9 or 10) or bind off loosely to ensure the edge isn't too tight. A tight bind-off will make the blanket curl at the edges.
Finishing Touches
Weaving in Ends
Weave in all ends securely using your tapestry needle. Take your time with this step—it's what gives your blanket a professional, polished look. Weave each end through the back of the stitches in the same color, going back and forth at least 1 inch to secure.
Blocking
Block the blanket gently to open up the lace and even out the stitches. Here's how:
- Fill a basin with cool water and add a small amount of gentle wool wash.
- Submerge the blanket and let it soak for 15-20 minutes. Don't agitate—this can cause felting.
- Gently press out excess water (don't wring or twist).
- Roll the blanket in a clean towel to remove more water.
- Lay flat on a blocking mat or dry towel, shaping to the correct dimensions (30" x 36").
- Pin the edges if needed to maintain shape, especially the eyelet borders.
- Let dry completely before removing pins.
Tips for Success
- Count your stitches regularly: The yarn overs and decreases should keep the stitch count consistent, but it's easy to make a mistake. Count after each right-side row.
- Use locking stitch markers: They're easier to move and won't fall out as you work.
- Keep color changes tidy:Also Check Out: We think you'd love this beautiful pattern on our sister site: The Vintage Blossom Sweater Free Pattern


